Hello amigurumi lovers and beautiful visitors, I wanted to share free amigurumi models with you here. In my article, I will share with you a model and how to make it. At the end of my article, I will share with you the detailed construction patterns of the mold.
Materials
• LaVita yarn velur – one skein of the main color and a little extra. You can use any analogue of Plush yarn, where in 100 g / 120 m.
• YarnArt jeans black for muzzle and nose decoration
• Filler
• Eyes 12 mm
• Hook No4 for knitting a toy, No2 for knitting a spout
• Sewing pins
• Scissors
• Needle for sewing details and embroidery of the face
• Thick thread for sewing details
• Knitting needles for fixing the head
• Marker for marking the beginning of the row
Abbreviations
MR– Magic ring
Sc– Single crochet
Inc– Increase
Dec– Decrease
Ch– Chain
Hdc– Half double crochet
Sl st– Slip stitch
Ch(s)– Chain(s) (Hold the hook in you right hand and loop the yarn from the ball over your left index finger. Hold the end of the slip knot between the thumb and middle finger of your left hand. With your left index finger, wrap the yarn from back to front around the shaft of the hook. Use the hook to draw the yarn through the loop on the hook: one chain is now made.)
• The size of the finished amigurumi dog toy is approximately 29-30 cm.
Ears (Make 2)
Rnd 1. 8 sc in MR
Rnd 2. 8 inc (16)
Rnd 3. (1 sc, inc)*8 (24)
Rnd 4. (2 sc, inc)*8 (32)
Rnd 5-7. 32 (3 rows)
Rnd 8. (6 sc, dec)*4 (28)
Rnd 9. 28 sc
Rnd 10. (5 sc, dec)*4 (24)
Rnd 11. 24 sc
Rnd 12. (4 sc, dec)*4 (20)
Rnd 13. 20 sc
Rnd 14. (3 sc, dec)*4 (16)
Rnd 15. 16 sc
Rnd 16. (2 sc, dec)*4 (12)
Rnd 17. 12 sc
Fold in half, crochet 6 sc for two loops together. Fasten and cut the thread.
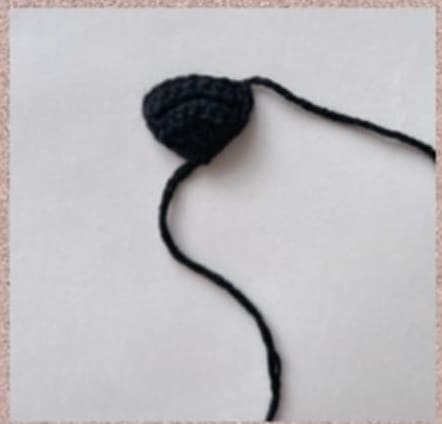
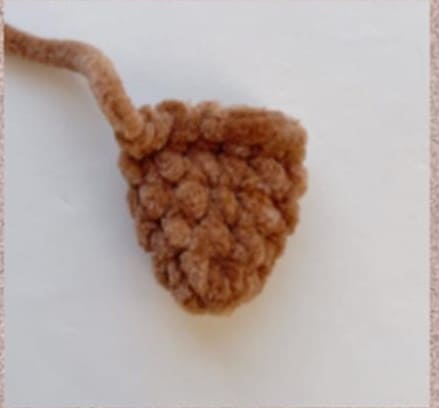
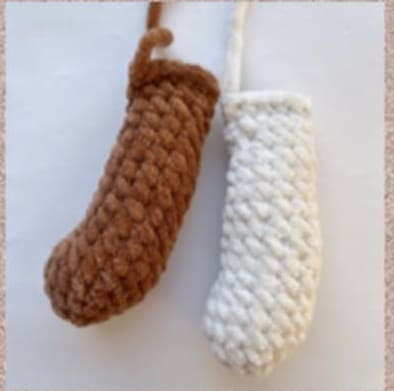
Nose
I leave at the beginning the long end of the thread in order to later embroider a strip under the spout.
Rnd 1. chain of 2 ch
Rnd 2. inc in the second loop from the hook (2)
We crochet in rotary rows
Rnd 3. 1 ch(s), 2 inc (4)
Rnd 4. 1 ch(s), (1 sc, inc) * 2 (6)
Rnd 5. 1 ch(s), (2 sc, inc) * 2 (8)
Rnd 6-7. 8 sc
Next, we make 1 ch and tie in a circle 5 sc on the first side, 1 sc in the base and 5 sc on the second side. We fix the thread and cut it off, leaving a long end for sewing.
Tail
Rnd 1. 6 sc in MR
Rnd 2. (2 sc, inc) * 2 (8)
Rnd 3. (3 sc, inc) * 2 (10)
Rnd 4-5. 10 sc (2 rows)
We fold the part in half, we crochet 5 sc for two loops together. We fasten the thread and cut it off.
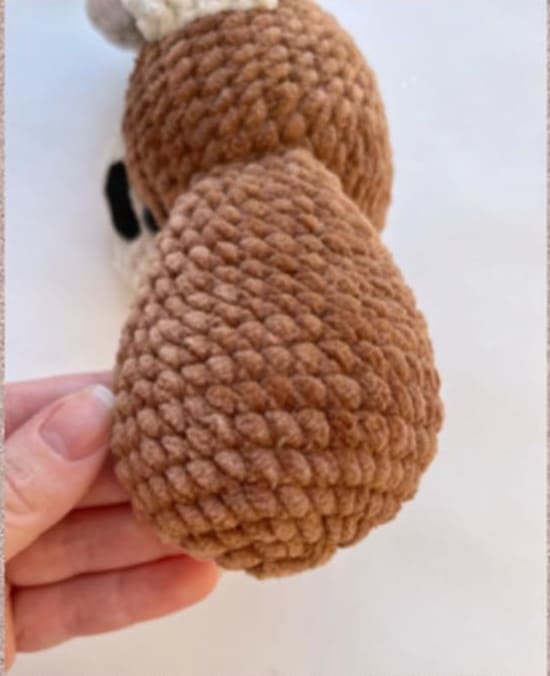
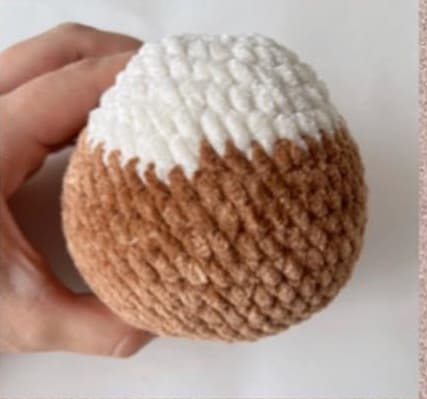
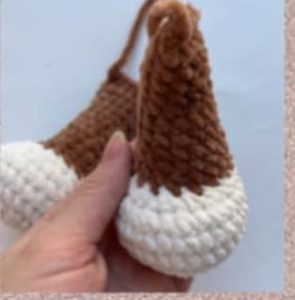
Head
We start crocheting with a thread of an additional color.
Rnd 1. chain of 7 ch
Rnd 2. in the second loop from the hook 5 sc, 3 sc in the extreme loop, on the second side of the chain from ch we crochet 4 sc, inc (14)
Rnd 3.inc, 4 sc, 3 inc, 4 sc, 2 inc (20)
Rnd 4. (4 sc, inc) * 4 (24)
Rnd 5. (3 sc, inc) * 6 (30)
Rnd 6. 30 sc
Carefully knit 7 and 8 row!
Rnd 7. 4 sc, inc, we change the thread to the main color and we knit another (4 sc, inc) * 2, then 3 sc, 8 increases from hdc (!), 3 sc, inc (42)
Rnd 8. 21 sc, (1 hdc, inc from hdc) * 8 (!), 5 sc (50)
Rnd 9-12. 50 sc (4 rows)
Rnd 13. (23 sc, dec) * 2 (48)
We insert the eyes in the 7th row after the second and in the sixth increase. 14. (6 sc, dec) * 6 (42)
Rnd 15. (5 sc, dec) * 6 (36)
Rnd 16. (4 sc, dec) * 6 (30)
Rnd 17. (3 sc, dec) * 6 (24)
Rnd 18. (2 sc, dec) * 6 (18)
Rnd 19. (1 sc, dec) * 6 (12)
Rnd 20. 6 dec.
Pull the hole, fasten the thread and
hide the tip inside the part.
Arms (Make 2)
Let’s start crocheting
Rnd 1. 6 sc in MR
Rnd 2. 6 inc (12)
Rnd 3. (1 sc, inc) * 6 (18)
Rnd 4. 18 sc
Rnd 5. 6 sc, 3 dec, 6 sc (15)
Rnd 6. 5 sc, 2 dec, 6 sc (13)
Rnd 7-11. 13 sc (5 rows)
Rnd 12. 6 sc, dec, 5 sc (12)
Rnd 13. 5 sc, dec, 5 sc (11)
Rnd 14. 4 sc, dec, 5 sc (10)
Rnd 15-16. 10 sc
Fold in half, crochet 5 sc for two loops together. Fasten and cut the thread.
Legs (Make 2)
We start crocheting with a thread of an additional color.
Rnd 1. 8 sc in MR
Rnd 2. 8 inc (16)
Rnd 3. (1 sc, inc) * 8 (24)
Rnd 4. (3 sc, inc) * 6 (30)
Rnd 5-6. 30 sc
Rnd 7. 6 sc, (1 sc, dec) * 6, 6 sc (24)
Rnd 8. 6 sc, 6 dec, 6 sc (18)
Change the thread to the thread of the main color.
Rnd 9-11. 18 sc (in a row)
Rnd 12. (4 sc, dec) * 3 (15)
Rnd 13-14. 15 sc (2 rows)
Rnd 15. (3 sc, dec) * 3 (12)
Rnd 16-19. 12 sc (4 rows)
Body
Rnd 1. 6 sc in MR
Rnd 2. 6 inc (12)
Rnd 3. 12 inc (24)
Rnd 4. (3 sc, inc) * 6 (30)
Rnd 5. (4 sc, inc) * 6 (36)
Rnd 6. (5 sc, inc) * 6 (42)
Rnd 7. (6 sc, inc) * 6 (48)
Rnd 8. (7 sc, inc) * 6 (54)
In the next row we crochet the legs and tail. The marker runs along the back.
Rnd 9. 9 sc, 6 sc with a leg, 24 sc, 6 sc with a leg, 6 sc, 3 sc With a tail (54) in the 10th row, we continue to crochet a tail. We divide the tail into 2 rows so that it is in the center of the back.
Rnd 10. 2 sc with tail, 12 sc, (2 sc, dec)*6, 15 sc (48)
Rnd 11. 48 sc
Rnd 12. 15 sc, (1 sc, dec) * 6, 15 sc (42)
Rnd 13-14. 42 sc (2 rows)
Rnd 15. (3 sc, dec) * 3, 12 sc, (3 sc, dec) * 3 (36)
Rnd 16. 12 sc, 6 dec, 12 sc (30)
Rnd 17. 30 sc
Rnd 18. (3 sc, dec) * 6 (24)
Rnd 19. 24 sc In the next row, we crochet handles. They should be exactly on the sides, if you can’t, edit the location of the handles.
Rnd 20. 5 sc, 5 sc with a handle, 8 sc, 5 sc with a handle, 1 sc (24)
Rnd 21. (2 sc, dec) * 6 (18)
Rnd 22. 18 sc
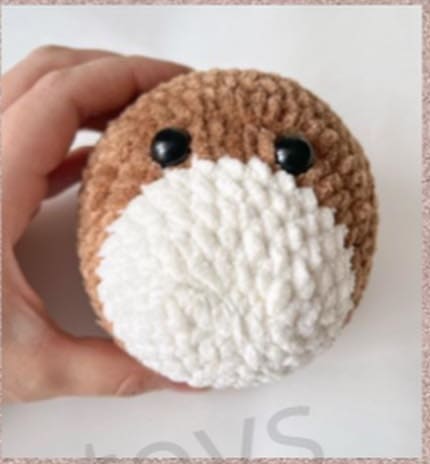
Fasten the thread, if necessary, leave a long end for sewing on the head. I sew the head with nylon thread.
Feel free to tag me (@freeamigurumii) in your photos on Instagram or Facebook if you’d like!
All Finished.
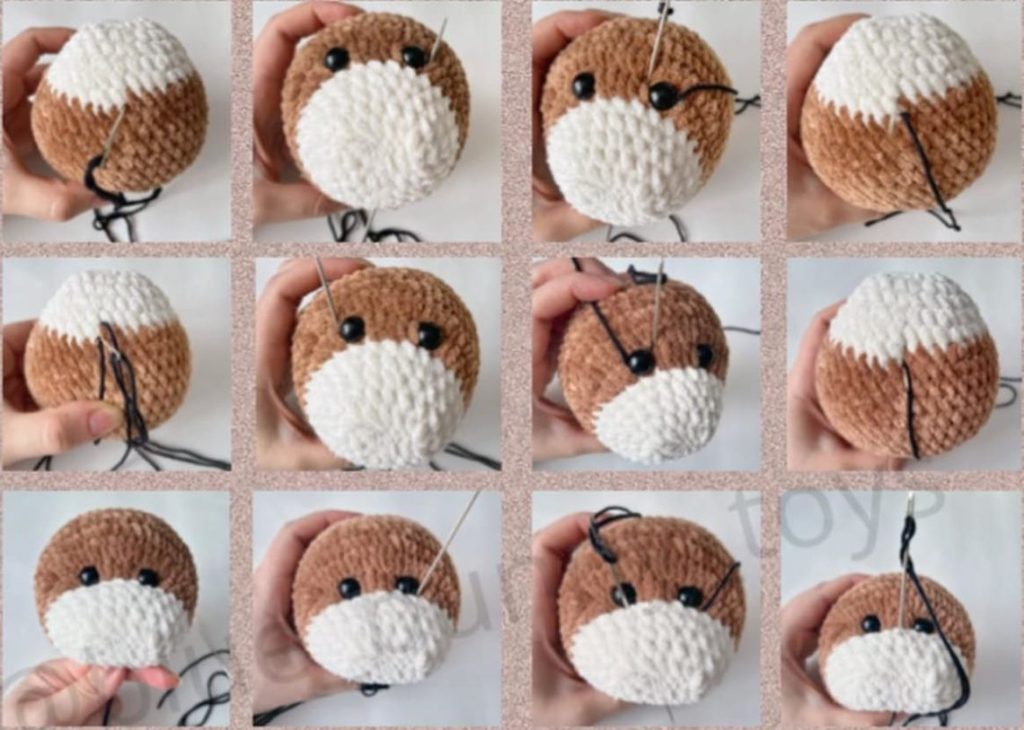
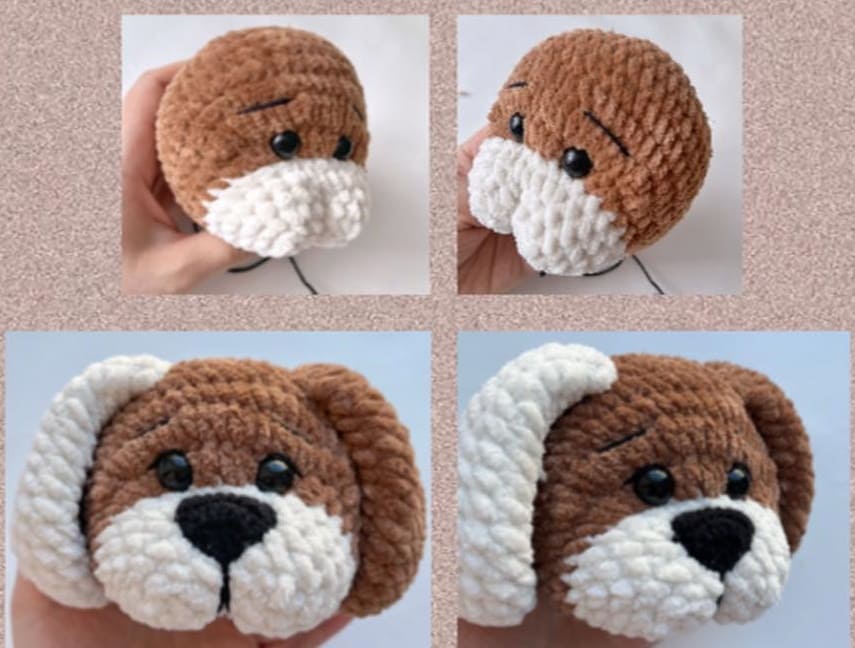
Stretching and decoration faces:
We make a tightening, as shown in the photo: