Hello amigurumi lovers and beautiful visitors, I wanted to share free amigurumi models with you here. In my article, I will share with you a model and how to make it. At the end of my article, I will share with you the detailed construction patterns of the mold.
Abbreviations
MR – magic ring
Ch – chain
Slst– Slip Stitch
Sc – single crochet
Hdc – half double crochet
Dc – double crochet
Inc– increase
Dec– decrease
FLO– Front loop only
BLO– Back loop only
Materials
• 2.0mm crochet
• Blue, white, pink, light blue and black yarn (I used Jeans from YarnArt)
• Felt / Scarf for the eyes, black and white color
• Felting needle
• Synthetic padding
• Wool needle
• Pair of scissors
• Markers (optional)
Head / Body
With blue:
Rnd 1. MR from 6sc (6)
Rnd 2. 6 inc (12)
Rnd 3. (1sc, 1 inc) x 6 (18)
Rnd 4. (1sc, 1 inc, 1sc) x 6 (24)
Rnd 5. (3sc, 1 inc) x 6 (30)
Rnd 6. (2sc, 1 inc, 2sc) x 6 (36)
Rnd 7. (5sc, 1 inc) x 6 (42)
Rnd 8. 42sc (42)
Rnd 9. (3sc, 1 inc, 3sc) x 6 (48)
Rnd 10. (7sc, 1 inc) x 6 (54)
Rnd 11. (4sc, 1 inc, 4sc) x 6 (60)
Rnd 12. (9sc, 1 inc) x 6 (66)
Rnd 13-14. 66sc (66)
Rnd 15. (5sc, 1 inc, 5sc) x 6 (72)
Rnd 16-17. 72sc (72)
Rnd 18. (11sc, 1 inc) x 6 (78)
Rnd 19-25. 78sc (78)
Rnd 26. (11sc, 1 dec) x 6 (72)
Rnd 27. (5sc, 1 dec, 5sc) x 6 (66)
Rnd 28. (9sc, 1 dec) x 6 (60)
Rnd 29. (4sc, 1 dec, 4sc) x 6 (54)
Rnd 30. (7sc, 1 dec) x 6 (48)
Rnd 31. (3sc, 1 dec, 3sc) x 6 (42)
Rnd 32. (5sc, 1 dec) x 6 (36)
Start to fill
Rnd 33. (2sc, 1 dec, 2sc) x 6 (30)
Rnd 34. (3sc, 1 dec) x 6 (24)
Rnd 35. (1sc, 1 dec, 1sc) x 6 (18)
Rnd 36. (1sc, 1 dec) x 6 (12)
Rnd 37. 6 dec (6)
Close with a wool needle.
Legs x2
With blue:
Rnd 1. 6 ch, start from penultimate: 1 inc, 3sc, 3sc at a single stitch, 4sc (12)
Rnd 2. 2 inc, 3sc, 3 inc, 3sc, 1 inc (18)
Rnd 3-11. 18sc (18)
Rnd 12. 3sc, 6 ch (jump 5 stitch), 10sc (18)
Rnd 13. 18sc (18)
Rnd 14. 2 dec, 3sc, 3 dec, 3sc, 1 dec (12)
Rnd 15. 6 dec (6)
Fill lightly and close with a wool needle. Now let’s work on the hole left in row 12
Take any stitch and knit all the way around
Rnd 1-3. 14sc (14)
The number of stitch will depend on how many they make in the first round, I 14 left.
Mouth
Rnd 1. 4 ch, start from penultimate: 1 inc, 1sc, 3sc at a single stitch, 2sc (8)
Rnd 2. 2 inc, 1sc, 3 inc, 1sc, 1 inc (14)
Rnd 3. 14sc (14)
1 slst and close5
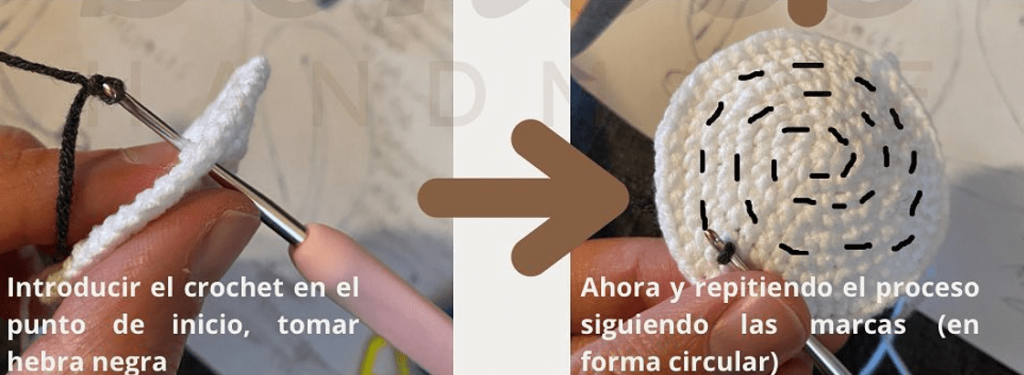
Circle
With white:
Rnd 1. MR from 6 sc (6)
Rnd 2. 6 inc (12)
Rnd 3. (1sc, 1 inc) x 6 (18)
Rnd 4. (1sc, 1 inc, 1sc) x 6 (24)
Rnd 5. (3sc, 1 inc) x 6 (30)
Rnd 6. (2sc, 1 inc, 2sc) x 6 (36)
Rnd 7. (5sc, 1 inc) x 6 (42)
Rnd 8. (3sc, 1 inc, 3sc) x 6 (48)
Rnd 9. (7sc, 1 inc) x 6 (54)
• Introduce the crochet at the starting point, take black thread
• Now and repeating the process following the marks (in a circular way)
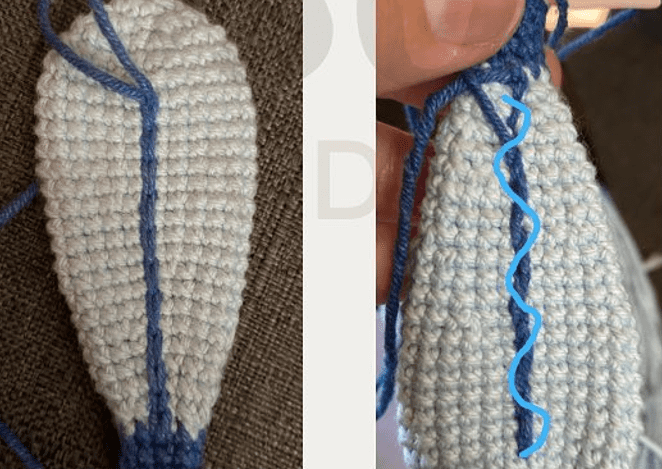
Tail
With light blue:
Rnd 1. MR from 6sc (6)
Rnd 2. 6 inc (12)
Rnd 3. (1sc, 1 inc) x 6 (18)
Rnd 4. (1sc, 1 inc, 1sc) x 6 (24)
Rnd 5-12. 24sc (24)
Rnd 13. (3sc, 1 dec, 3sc) x 3 (21)
Rnd 14-16. 21sc (21)
Rnd 17. (5sc, 1 dec) x 3 (18)
Rnd 18-19. 18sc (18)
Rnd 20. (2sc, 1 dec, 2sc) x 3 (15)
Rnd 21. 15sc (15)
Rnd 22. (3sc, 1 dec) x 3 (12)
Rnd 23. 12sc (12)
Rnd 24. (1sc, 1 dec, 1sc) x 3 (9)
Color change to blue
Rnd 25-26. 9sc (9)
Rnd 27. (1sc, 1 inc, 1sc) x 3 (12)
Rnd 28. 12sc
Do not fill, leave thread to join the body. The tail detail is done in the same way as the circle detail. For the rear part, we are going to “thicken” the line that remains, passing the zig-zag strand.
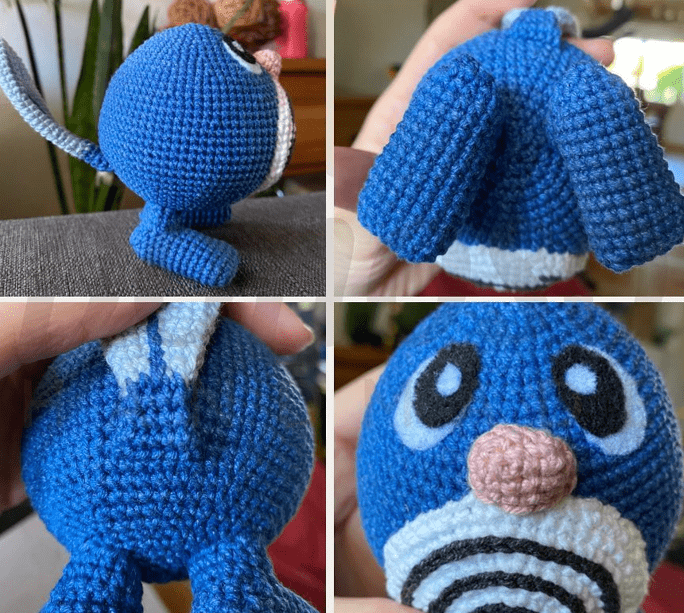
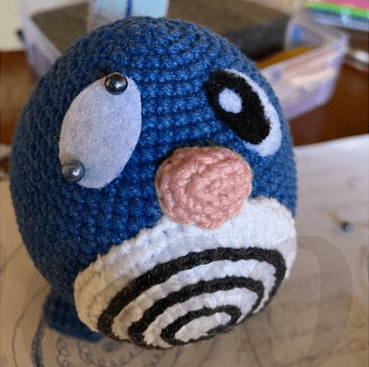
Details
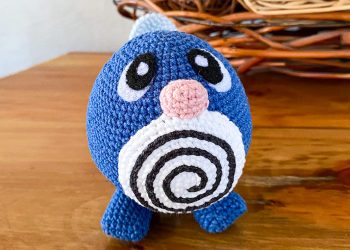
• See the images to have a reference of how to join the parts.
• The eyes have to cover 7 stitch in height, 1.6 cm left wide and 2.1 cm long.
Feel free to tag me (@freeamigurumii) in your photos on Instagram or Facebook if you’d like!
All Finished.