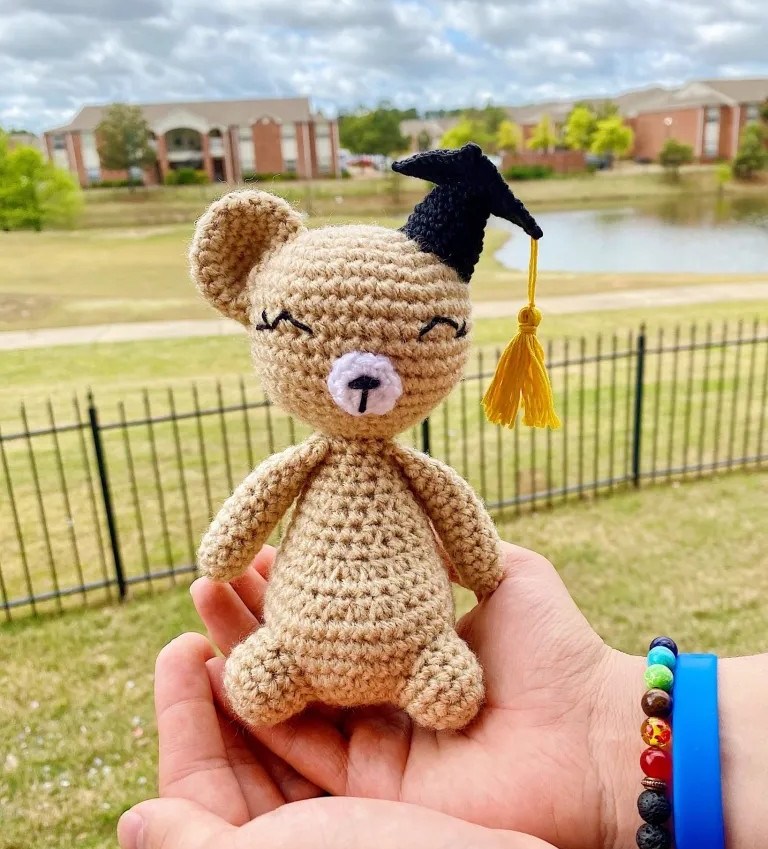
Hello amigurumi lovers and beautiful visitors, I wanted to share the free amigurumi patterns for you here. In my article I will share 1 pattern and how to make it for you. At the end of my article, I will share amigurumi patterns that can generate ideas for you.
Materials:
- Worsted weight yarn in light brown (I used Red Hart Super Saver)
- Light weight yarn in white and black (I used Loops and thread baby yarn for the white and Patron Grace yarn for the black)
- 3.75mm and 3.25 mm crochet hook
- Embroidery thread in your choice of color (I used a gold color)
- Stuffing
- Yarn needle
- Scissors
- Pins (optional)
Abbreviations:
st (sts) – stitch (stitches)
sl st – slip stitch
ch – chain
mc – magic circle
sc – single crochet
sc inc – single crochet increase
invdec – invisible decrease
Rnd – round
() – the total number of stitches at the end of each round
** – repeat the steps between
If you do not know how to crochet any of these stitches, visit my stitch dictionary here for step-by-step instructions on all kinds of stitches.
Head:
Work with 3.75 mm hook and light brown-
Rnd 1: 6 sc in mc (6)
Rnd 2: sc inc x6 (12)
Rnd 3: 1 sc, sc inc (18)
Rnd 4: 2 sc, sc inc (24)
Rnd 5: 3 sc, sc inc (30)
Rnd 6: 4 sc, sc inc (36)
Rnd 7: 5 sc, sc inc (42)
Rnd 8-13: sc in every st (42)
Rnd 14: 5 sc, invdec (36)
Rnd 15: 4 sc, invdec (30)
Rnd 16: 3 sc, invdec (24)
Start Stuffing
Rnd 17: 2 sc, invdec (18)
Rnd 18: 1 sc, invdec (12)
sl st and fasten off leaving a long tail for sewing.
Body:
Work with 3.75 mm hook and light brown-
Rnd 1: 6 sc in mc (6)
Rnd 2: sc inc x6 (12)
Rnd 3: 1 sc, sc inc (18)
Rnd 4: 2 sc, sc inc (24)
Rnd 5: 3 sc, sc inc (30)
Rnd 6: 4 sc, sc inc (36)
Rnd 7: 5 sc, sc inc (42)
Rnd 8-10: sc in every st (42)
Rnd 11: 15 sc, invdec x6, 15 sc (36)
Rnd 12: sc in every st (36)
Rnd 13: 12 sc, invdec x6, 12 sc (30)
Rnd 14: sc in every st (30)
Start Stuffing
Rnd 15: 3 sc, invdec (24)
Rnd 16: sc in every st (24)
Rnd 17: 2 sc, invdec (18)
Rnd 18: sc in every st (18)
Rnd 19: 1 sc, invdec (12)
Rnd 20-21: sc in every st (12)
sl st and fasten off, weave in the ends.
Legs x2:
Work with 3.75 mm hook and light brown-
Rnd 1: 6 sc in mc (6)
Rnd 2: sc inc x6 (12)
Rnd 3: 5 sc, sc inc (14)
Rnd 4-5: sc in every st (14)
sl st and fasten off with a long tail for sewing. You will stuff as you sew.
Arms x2:
Work with 3.75 mm hook and light brown, stuff as you crochet-
Rnd 1: 5 sc in mc (5)
Rnd 2: sc inc, *sc, sc inc* x2 (8)
Rnd 3-12: sc in each st (8)
Rnd 13: ch 1 and sc across the top of the piece, working through two stitches at a time (4)
ch 1 and fasten off with a long tail for sewing.
Ear x1:
Work with 3.75 mm hook and light brown-
Rnd 1: 6 sc in mc (6)
Rnd 2: sc inc x6 (12)
Rnd 3: 1 sc, sc inc (18)
Rnd 4-7: sc in every st (18)
sl st and fasten off with a long tail for sewing. Do not stuff the ear, you will fold it in half before sewing.
Tail:
Work with 3.75 mm hook and light brown-
Rnd 1: 8 sc in mc (8)
Rnd 2-4: sc in each st (8)
Rnd 5: ch1 and sc across the top of the piece, work through two stitches at a time (4)
ch 1 and fasten off with a long tail for sewing. Do not stuff the tail.
Muzzle:
Work with 3.75 mm hook and white-
Rnd 1: 6 sc in mc (6)
Rnd 2: sc inc x6 (12)
sl st and fasten off with a long tail for sewing. Embroider the nose using black yarn.
Cap Base:
Work with 3.25 mm hook and black, make sure you leave a long tail at the beginning for sewing the cap top on later-
Rnd 1: ch 12 and sl st in the first ch to create a circle. Make sure you do not twist the chain (12)
Rnd 2: sc in every ch (12)
Rnd 3: sc in every st (12)
Rnd 4: 1 sc, sc inc (18)
Rnd 5-6: sc around (18)
Rnd 7: 2 sc, sc inc (24)
sl st and fasten off leaving a long tail for sewing. You will stuff as you sew.
Cap Top:
Work with 3.25 mm hook and black-
Rnd 1: ch 11, sc in the 2nd ch from hook and in the next 9 sts (10)
Rnd 2-10: sc in every st across (10)
ch 1 and fasten off, weave in all of the ends. If the top of the cap will not stay flat, spray it with some water and place a flat heavy object on top of it. Wait for a few minutes for it to dry a little bit and take shape.
Tassel:
You can use any colors you desire or as many colors as you’d like-
Step 1: Take your embroidery thread and wrap it around two fingers about 20 times. You can adjust how many times you wrap the thread around your finger for a bigger or smaller tassel.
Step 2: Cut the strands of embroidery thread in half.
Step 3: Cut a long piece of thread and tie all of the strands together in the center of the strands.
Step 4: Fold the strands in half where you tied them and take another separate strand of thread. Tie the thread once folded in half near the top of the tassel.
Assembly:
Use some sewing pins to help you place and sew the pieces. When sewing the tail and legs sew them in a tripod-like shape to help the bear stand on it’s own-
Step 1: Sew the head to the body. Add a little bit of extra stuffing to give the neck some support but not too much.
Step 2: Sew the arms to the sides of the body.
Step 3: Sew The legs to the front sides of the body. Stuff as you sew.
Step 4: Sew the tail to the bottom middle of the body. You do not stuff the tail.
Step 5: Sew the muzzle on the middle of the face. I places the muzzle between rounds 11 and 15 of the head.
Step 6: Embroider the eyes, if you do not know how to do this check out this link here to learn how!
Step 7: Fold and sew the ear on either side of the head, it’s your choice which side. I chose to sew the ear on the left side.
Step 8: Either sew or tie the tassel onto the middle of the top part of the cap.
Step 9: Sew the top of the cap to the base of the cap. Try and make the base of the cap as centered as you can.
Step 10: Sew the cap to the other side of the head where you would have placed the other ear if there was one. Stuff lightly as you sew, making sure to keep the shape of the cap base.
Feel free to tag me (@freeamigurumii) in your photos on Instagram or Facebook if you’d like!
All Finished.