Hello amigurumi lovers and beautiful visitors, I wanted to share the free amigurumi patterns for you here. In my article I will share 1 pattern and how to make it for you. At the end of my article, I will share amigurumi patterns that can generate ideas for you.
Supplies:
4mm crochet hook, 4/Medium weight yarn in Main Color and Icing color. 8mm safety eyes for cake, 6mm safety eyes for the lemon, tapestry needle, scissors, and stuffing.
Additional Information:
Difficulty: Easy
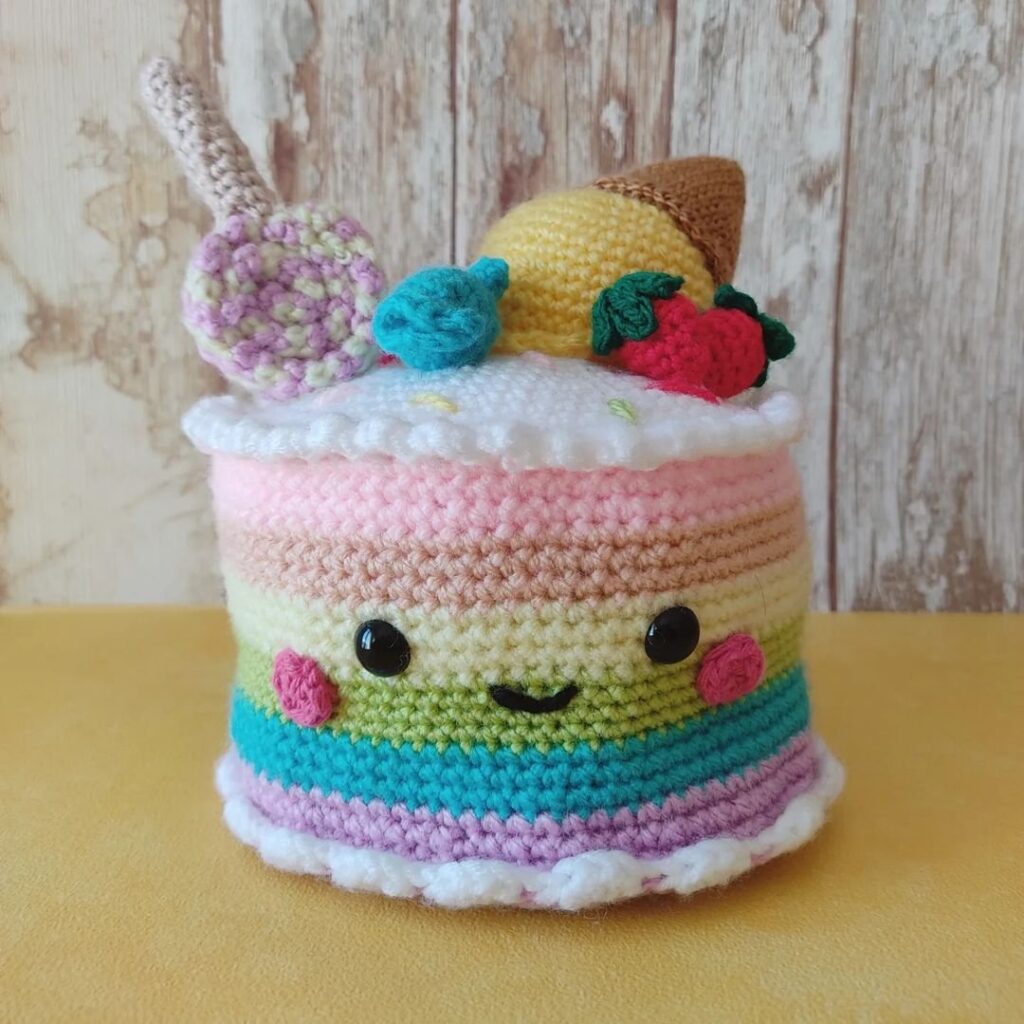
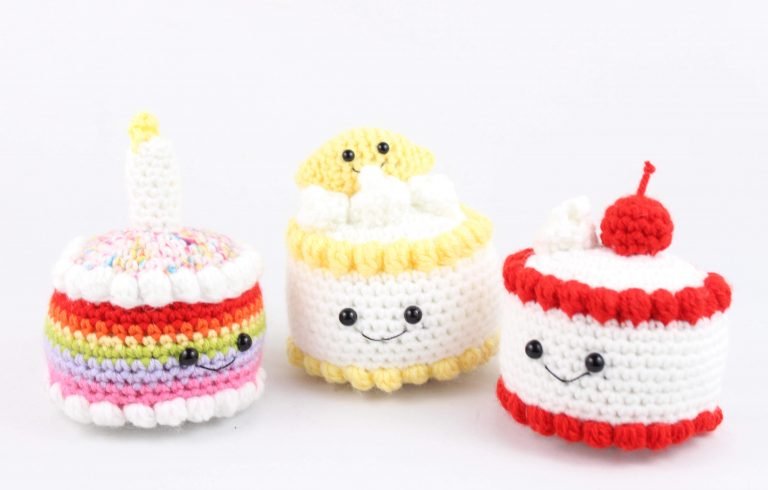
This pattern refers to “Main Color”. This is the main color you will use for your cake. I used white for the example in this pattern. “Icing Color” is the color you want the icing to be. I used red for the example in this pattern. We start by making the cake. We then make any toppings and sew the toppings on. Done!
Cake:
In Main Color
Round 1: 6 Sc in Magic Ring (6)
Round 2: *Inc* all around (12)
Round 3: *Inc, Sc* all around (18)
Round 4: *Inc, Sc 2* all around (24)
Round 5: *Inc, Sc 3* all around (30)
Round 6: *Inc, Sc 4* all around (36)
Round 7: *Inc, Sc 5* all around (42)
Switch to Icing Color
Round 8: We will now do the icing stitch. Yarn over and insert hook into the next stitch. Yarn over again, and pull through the stitch. Yarn over and pull through 2 of the loops on your hook. Repeat steps 1-7 a total of 6 times. You will have a total of 7 stitches on your hook. Yarn over and pull through all loops on your hook. This completes 1 icing stitch. Sc in the next stitch* Repeat this all around (42)
Switch to Main Color
Round 9-11: *Sc* all around (42)
Round 12: Sc in the next 20 stitches. Sc in the next st and add a different colored st marker to the Sc just made. This marks where to place the eye. Sc in the next 3 st. Sc in the next st and add a different colored st marker to the Sc just made. Sc in the last 17 st (42)
Round 13-17: *Sc* all around (42)
Add safety eyes now. Switch to the Icing color.
Round 18: We will now do the icing stitch again. *Icing stitch in the next st, Sc in the next stitch* Repeat this all around (42)
Switch to Main Color
Round 19: In BLO (Back Loop Only), repeat *Dec in the next st, Sc in the next 5 st* all around (36)
Round 20: In BOTH Loops, repeat *Dec, Sc 4* all around (30)
Round 21: *Dec, Sc 3* all around (24)
Round 22: *Dec, Sc 2* all around (18)
Stuff here. Continue stuffing after each round
Round 23: *Dec, Sc* all around (12)
Round 24: *Dec* all around (6)
Finish off. Sew the bottom closed.
Cake Smile:
In Black Embroidery Thread
Insert needle with thread into the cake and pull needle out under the right eye as shown. Insert needle into the middle area of the cake, and pull needle out under the left eye as shown. Reinsert needle into the middle of the mouth, and pull out of original insertion spot.
Toppings
Icing Swirl:
In White
Row 1: Ch 19. Sc in the 2nd Ch from hook. Sc in the next 3 st, Hdc (You can do Dc here for a larger swirl) in the next 14 st (18)
Finish off.
Hold the Sc part and fold it up as shown. Now twist the rest of the piece around. Sew the cream in place and place on the cake as shown above.
Cookie:
Make 2 in black, 1 in white
Round 1: 6 Dc in Magic Ring (6)
Round 2: *2 Dc in each stitch* all around (12)
Finish off. Place the white part between the black cookies, and sew them together. Pin the cookie to the cake as shown and sew on.
Lemon:
In Yellow
Round 1: 6 Sc in Magic Ring (6)
Round 2-3: *Sc* all around (6)
Round 4: *Inc* all around (12)
Round 5: *Sc* all around (12)
Round 6: *Inc, Sc 2* all around (16)
Round 7-10: *Sc* all around (16)
Round 11: *Dec, Sc 2* all around (12)
Round 12: *Sc* all around (12)
Stuff here. Add stuffing after each round. Add 6mm safety eyes in Round 7 and Round 10, making sure they line up.
Round 13: *Dec* all around (6)
Round 14-15: *Sc* all around (6)
Finish off.
Lemon Smile:
In Black Embroidery Thread
Insert needle with thread into the lemon and pull needle out under the right eye as shown. Insert needle into the middle area of the lemon, and pull needle out under the left eye as shown. Reinsert needle into the middle of the mouth, and pull out of original insertion spot.
Pin onto the cake as shown and sew on.
Flower:
In Pink or Red
Row 1: Ch 30. Dc in the 2nd Ch from the hook. Dc in the next 27 st (30)
Finish off. Roll the flower from one end to the other to form the flower. Sew the flower together. Pin to the cake and sew on.
Flower Leaf: (Make 2)
In Green
Row 1: Ch 7. Sc in the next st, Dc in the next 2 st, Trc in the next st, Dc in the next st, Sc in the last st.
Finish off. Pin onto the cake, next to the flower.
Strawberry:
In Red
Round 1: 6 Sc in Magic Ring (6)
Round 2: *Inc, Sc 2* all around (8)
Round 3-4: *Sc* all around (8)
Round 5: *Inc, Sc* all around (12)
Round 6: *Sc* all around (12)
Round 7: *Inc, Sc* all around (18)
Round 8-9: *Sc* all around (18)
Round 10: *Dec, Sc* all around (12)
Round 11: *Dec* all around (6)
Stuff now. Finish off and sew closed.
Strawberry Top:
In Green
Round 1: 6 Sc in Magic Ring (6)
Round 2: *Sc in the next st. Ch 3. Sc in the 2nd ch from hook. Sc in next Ch.* 6 times. SlSt in the next st to complete.
Finish off. Pin and sew to the top of the strawberry.
Pin the strawberry to the top of the cake and sew on.
Cherry:
In Red
Round 1: 6 Sc in Magic Ring (6)
Round 2: *Inc* all around (12)
Round 3-5: *Sc* all around (12)
Round 6: *Dec* all around (6)
Stuff now. Finish off leaving a long tail. Sew closed. Now pull the long tail to the very top of the cherry. Tie a knot 2-3 times as shown. Cut the thread above the knot. Now pin onto the cake and sew on.
Birthday Candle:
In White
Round 1: 6 Sc in Magic Ring (6)
Round 2: *Inc, Sc 2* all around (8)
Round 3: In BLO (Back Loop Only), *Sc* all around (8)
Round 4: In BOTH Loops, *Sc* all around (8)
Round 5-10: *Sc* all around (8)
Finish off. Stuff and pin to the middle of the cake. Sew on.
Candle Light:
In Yellow
Round 1: Ch 4. Sc in the 2nd Ch from hook. Dc in the next ch, Trc in the last ch.
Finish off and pin to the top of the candle. Sew on.
Feel free to tag me (@freeamigurumii) in your photos on Instagram or Facebook if you’d like!
All Finished.