Hello amigurumi lovers and beautiful visitors, I wanted to share the free amigurumi patterns for you here. In my article I will share 1 pattern and how to make it for you. At the end of my article, I will share amigurumi patterns that can generate ideas for you.
Materials:
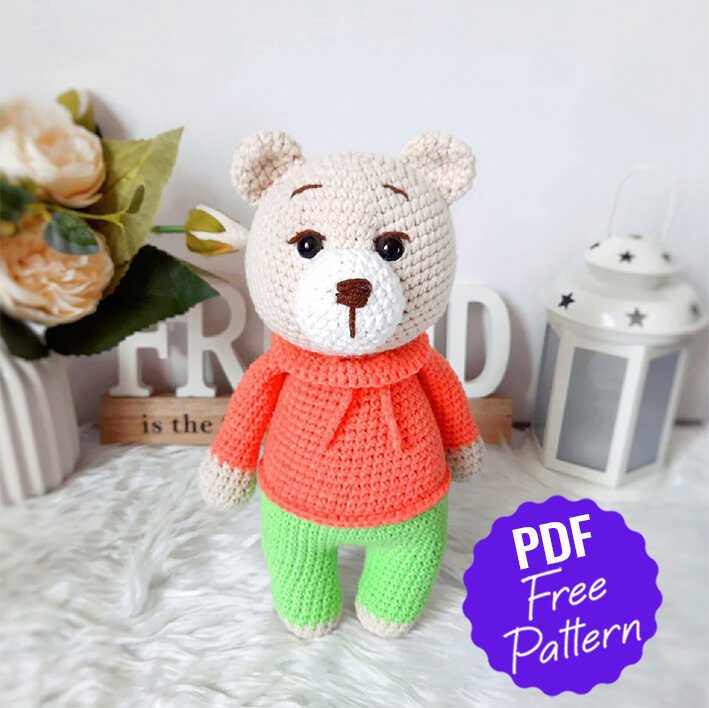
Yarn “YarnArt Jeans” semi-cotton 50g / 160m, colors:
– 70 milk chocolate, a little for decoration of the muzzle
– 01 white, for the muzzle
– 05 cold beige, consumption 0.5 skein
– 61 coral, consumption 0.5 skein
– 60 light green neon, consumption 0.5 skein
Hook No. 2, sewing needle, scissors, long sewing needle
Filler – holofiber
Safe eyes or half beads with a diameter of 9 mm.
You can use completely different yarn. The size and quality of the product will depend on this.
The toy is knitted in a spiral from both walls of the loop, unless otherwise indicated.
The growth of the finished toy when using these materials is about 20 cm.
Abbreviations
ch = chain
sc = single crochet
dc: double crochet
hdc = half double crochet
sl st = slip stitch
inc = increase (2 sc in one st)
dec = decrease (2 sc together)
BLO = back loop only
FLO = front loop only
F.o. = finish off
(…) = repeat the instructions in brackets the given number of times
[…] = number of stitches you should have at the end of the round/row
Legs + Body:
We start crocheting with cold beige yarn.
1 Rnd: 6sc in MR
2 Rnd: 6inc (12)
3 Rnd: (1sc, inc)*6 (18)
4 – 5 Rnd: 18sc (2 rnds)
Change to light green neon yarn.
6 Rnd: 8sc, 2inc, 8sc (20)
7 – 10 Rnd: 20sc (4 rnds)
11 Rnd: 9sc, 2inc, 9sc (22)
12 – 13 Rnd: 22sc (2 rnds)
14 Rnd: 10sc, 2inc, 10sc (24)
15 Rnd: 24sc
Fasten and cut the yarn on the first leg.
We crochet the second leg in the same way as the first. We do not cut the yarn, but continue to crochet the body.
16 Rnd: from the second leg, dial a chain of 3ch and attach to the first leg with the help of slst.
Next, crochet 24sc on the first part, 3sc on the chain from ch, 24sc on the second part, 3sc on the reverse side of the chain from ch (54sc) In this place, you need to set a marker (the marker is at the back).
17 – 24 Rnd: 54sc (8 rows)
Change to coral color yarn.
25 Rnd: 54sc
26 Rnd: 54sc BLO
27 – 29 Rnd: 54sc (3 rnds)
30 Rnd: (7sc, dec)*6 (48)
31 – 32 Rnd: 48sc (2 rnds)
33 Rnd: (6sc, dec)*6 (42)
34 – 35 Rnd: 42sc (2 rnds)
36 Rnd: (5sc, dec)*6 (36)
37 – 38 Rnd: 36sc (2 rnds)
39 Rnd: (4sc, dec)*6 (30)
40 – 41 Rnd: 30sc (2 rnds)
42 Rnd: (3sc, dec)*6 (24)
43 Rnd: 24sc BLO
Change to cold beige yarn.
44 Rnd: (10sc, dec)*2 (22)
Stuff the body tightly. Cut the yarn, hide the end of the yarn inside the part.
26 row, where we crocheted BLO, we will tie 1 next sc with coral yarn.
Collar:
To the 43rd row, where we crocheted BLO, we attach a coral-colored yarn.
1 row: we crochet inc from sc in each half loop of the row to the end (48)
2 – 4 Rnd: 48sc (3 rnds)
Cut the yarn, hide the end of the yarn.
Laces:
Crochet with coral yarn.
From the chain with 10ch we will make laces for the collar.
Fasten the yarn to the collar, crochet 10ch, make a knot. Repeat the same for the second string. We fasten the laces symmetrically in the center of the collar.
Head:
We crochet with cold beige yarn.
1 Rnd: 6sc in MR
2 Rnd: 6inc (12)
3 Rnd: (1sc, inc)*6 (18)
4 Rnd: (2sc, inc)*6 (24)
5 Rnd: (3sc, inc)*6 (30)
6 Rnd: (4sc, inc)*6 (36)
7 Rnd: (5sc, inc)*6 (42)
8 Rnd: (6sc, inc)*6 (48)
9 Rnd: (7sc, inc)*6 (54)
10 – 19 Rnd: 54sc (10 rows)
If you use safety eyes, we fasten them between 10 – 11 rows. The approximate distance between the eyes is 8 loops.
20 Rnd: (7sc, dec)*6 (48)
21 Rnd: (6sc, dec)*6 (42)
22 Rnd: (5sc, dec)*6 (36)
23 Rnd: (4sc, dec)*6 (30)
24 Rnd: (3sc, dec)*6 (24)
25 Rnd: (10sc, dec)*2 (22)
Fill tightly. Leave the yarn for sewing.
Muzzle:
We crochet with white yarn.
1 Rnd: 6sc in MR
2 Rnd: 6inc (12)
3 Rnd: (1sc, inc)*6 (18)
4 Rnd: (2sc, inc)*6 (24)
5 – 7 Rnd: 24sc (3 rnds)
Leave the yarn for sewing.
Ears (make 2):
We crochet with cold beige yarn.
1 Rnd: 6sc in MR
2 Rnd: 6inc
3 Rnd: (3sc, inc)*3 (15)
4 Rnd: 15sc
5 Rnd: (3sc, dec)*3 (12)
Do not stuff the ears. Fold in half and crochet 6sc for both loops. Leave a long yarn for sewing.
Arms (make 2):
We crochet with cold beige yarn.
1 Rnd: 6sc in MR
2 Rnd: 6inc (12)
3 Rnd: (3sc, inc)*3 (15)
4 – 6 Rnd: 15sc (3 rnds)
7 Rnd: (3sc, dec)*3 (12)
Change to coral color yarn.
8 – 23 Rnd: 12sc (16 rows)
We stuff the paws in the process of crocheting: stuff the bottom very tightly, the middle is medium, the upper part (about 1-2 cm) can not be stuffed.
Fold the foot in half and connect 6sc for both loops. The second foot is crocheted in the same way.
Assembly and decoration:
First, let’s draw the head of the bear.
We outline two points of tightening on the head of the bear:
points 1 and 2 are located between 10 and 11 side by side, the distance between them is approximately 8 loops.
We insert a needle with a strong yarn into the base of the head, bring it to the tightening point of the right eye. We retreat 1 column, insert the needle, bring it to the tightening point of the left eye. We retreat 1 column, insert the needle, bring it to the base of the head.
We repeat the tightening several times, constantly pulling the yarn. We fix the yarn.
Sew on the eyes in place of the tightening.
Sew a muzzle to the head. Sew in the center of the lower part of the head, under the eyes, approximately between 10 – 11 (upper border) and 19 – 20 (lower border) rows. During sewing, when a small hole remains, fill the muzzle with holofiber and sew to the end.
Then, sew on the ears, securing them with pins first. The ears should be symmetrical. Sew on the ears approximately between 5-10 rows of the head.
We embroider the nose, eyebrows and eyelashes with a yarn of milk chocolate color. We embroider the whites of the eyes with white yarn in order to make the eyes look more “alive”.

We sew the head and torso, fastening them first in a circle with pins.
When a small hole remains, fill the gap between the neck and head with holofiber.
You need to fill it tightly so that the head does not bend.
We sew to the end. Hide the end of the yarn inside the part.
On the sides of the body we sew the upper legs, securing them with pins. I sewed between 41 – 42 rows of the body.
Feel free to tag me (@freeamigurumii) in your photos on Instagram or Facebook if you’d like!
All Finished.