Hello amigurumi lovers and beautiful visitors, I wanted to share the free amigurumi patterns for you here. In my article I will share 1 pattern and how to make it for you. At the end of my article, I will share amigurumi patterns that can generate ideas for you.
Materials
•Yarnart Jeans yarn (50gr -160m, 55% cotton, 45% acrylic)
•Any suitable yarn can be used.
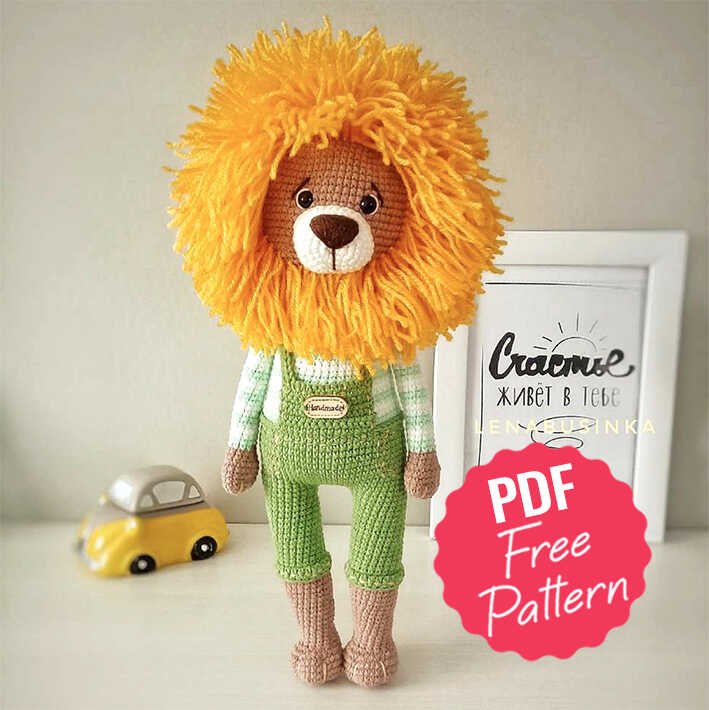
-color 71 (head, arms, legs, tail)
-color 69 (pants)
-color 79 (blouse)
-color 62 (blouse, muzzle)
-color 07 (leg tightening)
•Yarn Alize shekerim color 488 (mane)
•You can use Pekhorka children’s novelty or other suitable yarn.
•Hook No. 2
•Eyes on a secure mount # 9 or # 10
•Holofiber filler
•Brown yarn for nose and eyebrow embroidery (floss or others)
•Needle for stitching parts
•Scissors
•Good mood!
Abbreviations
MR – Magic ring
R = row
ch = chain
sc = single crochet
dc: double crochet
hdc = half double crochet
sl st = slip stitch
inc = increase (2 sc in one st)
dec = decrease (2 sc together)
BLO = back loop only
FLO = front loop only
F.o. = finish off
(…) = repeat the instructions in brackets the given number of times
[…] = number of stitches you should have at the end of the round/row
Head
R1: 6sc in MR
R2: (inc)*6 (12)
R3: (1sc, inc)*6 (18)
R4: (2sc, inc)*6 (24)
R5: (3sc, inc)*6 (30)
R6: (4sc, inc)*6 (36)
R7: (5sc, inc)*6 (42)
R8: (6sc, inc)*6 (48)
R9: (7sc, inc)*6 (54)
R10: (8sc, inc)*6 (60)
R11: (9sc, inc)*6 (66)
R12 -23: 66sc (12 rows)
Eyes No. 9 or No. 10 are inserted between 17 and 18 rows, at a distance of 9sc
R24: (9sc, dec)*6 (60)
R25: (8sc, dec)*6 (54)
R26: (7sc, dec)*6 (48)
R27: (6sc, dec)*6 (42)
R28: (5sc, dec)*6 (36)
R29: (4sc, dec)*6 (30)
R30: (3sc, dec)*6 (24)
Fasten the yarn, cut, leaving enough for sewing to the body.
We fill it tightly, giving the desired shape to the head.
Ears (make 2)
R1: 6sc in MR
R2: (inc)*6 (12)
R3: (1sc, inc)*6 (18)
R4 -8: 18sc (5 rows)
Fold in half, knit at both ends with 9sc, fasten and cut yarn, leaving enough for sewing.
Muzzle
R1: 6sc in MR
R2: (inc 3sc in one loop)*2, 1sc, (inc 3sc in one loop)*2, 1sc (14)
R3: (1sc, inc)*3,1sc, (1sc, inc)*3, 1sc (20)
R4: (2sc, inc)*3, 1sc, (2sc, inc)*3, 1sc (26)
R5: (3sc, inc)*3, 1sc, (3sc, inc)*3, 1sc (32)
R6-8: 32sc (3 row)
Fasten the yarn, cut, leaving enough for sewing.
Tail
R1: 6sc in MR
R2: (1sc, inc)*3 (9)
R3-35: 9sc
Fold in half, knit at both edges 4sc, cut the yarn, leave the tip for sewing.
Arms (make 2)
R1: 6sc in MR
R2: (inc)*6 (12)
R3: (1sc, inc)*6 (18)
R4-7: 18sc (4 row)
R8: (1sc, dec)*6 (12)
R9-10: 12sc
R11: color change12sc
R12-37: 12sc (26 rows)
Change color every 2 rows, for a striped blouse.
Fold in half, knit at both ends 6sc, trim the yarn.
Legs (make 2)
R1: 6sc in MR
R2: (inc)*6 (12)
R3: (1sc, inc)*6 (18)
R4: (2sc, inc)*6 (24)
R5: (3sc, inc)*6 (30)
R6-8: 30sc (3 row)
R9: 6sc, (1sc, dec)*6, 6sc (24)
R10: 6sc, 6dec, 6sc (18)
R11: (4sc, dec)*3 (15)
R12-14: 15sc (3 row)
R15: (4sc, inc)*3 (18)
R16-19: 18sc (4 row)
R20: (5sc, inc)*3 (21)
R21-26: 21sc (6 rows)
R27: changing the color to green 21sc
R28: behind the back wall of the loop 21sc
R29-43R: 21sc (15 rows)
Cut the yarn on one leg, do not cut on the other.
Attach yarn to row 28 and knit 1 row of hdc and 1 row sc of 21sc behind the front wall of the loop. Fasten the ends and hide inside the legs.
Body
Cast on 6ch from the second leg and attach to the first leg.
R1: 21sc on one leg, 6sc on the chain, 21sc on the other leg, 6sc on the chain (54)
R2: (8sc, inc)*6 (60)
R3-13: 60sc (11 rows)
R14: behind the front wall of the loop 60sc
R14: behind the back wall of the loop color change 60sc
R15: 60sc
R16: (8sc, dec)*6 (54)
R17: (7sc, dec)*6 (48)
R18-21: 48sc (4 row)
R22: (10sc, dec)*4 (44)
R23-30: 44sc (8 rows)
R31: (9sc, dec)*4 (40)
R32-33: 40sc (2 row)
R34: (8sc, dec)*4 (36)
R35: 36sc
R36: (4sc, dec)*6 (30)
R37: 30sc
R38: (3sc, dec)*6 (24)
R39: 24sc
Fasten the yarn, cut.
Assembly and design
Sew the muzzle to the head, place it under the eyes.
Sew the ears to the head.
Embroider nose, eyebrows, eyes.
Attach a yarn in the color of the panties in the front and knit 8 rows of 16sc in pivoting rows.
Make the straps for the pants, having typed the required number of air loops, knit a row of psn.
Sew the arms to the body between rows 35 and 36.
Make a slight tightening of the legs.
Customize the pants as desired.
Sew the head to the body.
Cut the yarn for the mane
To arrange a mane:
Attach -2 rows below the muzzle in each loop;
– make markings around the face;
– fasten the yarn to each loop.
Design the tassel on the tail in the same way.
If you do not make a mane, you will get a cute bear cub, only knit the ears 2 rows less and tie a round tail!
Congratulations! Your lion cub is ready!
Feel free to tag me (@freeamigurumii) in your photos on Instagram or Facebook if you’d like!
All Finished.


