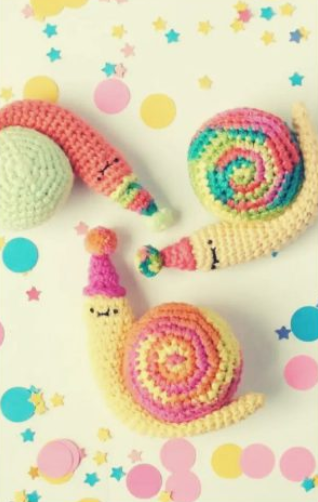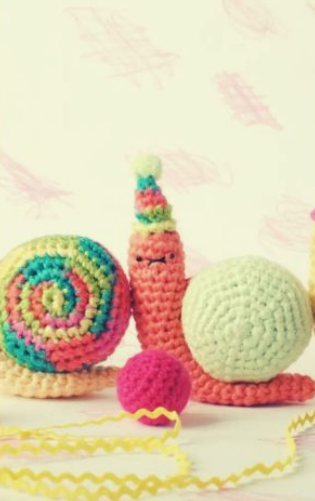
Hello amigurumi lovers and beautiful visitors, I wanted to share the free amigurumi patterns for you here. In my article I will share 1 pattern and how to make it for you. At the end of my article, I will share amigurumi patterns that can generate ideas for you.
NOTES
- The shell, body, and hat are all worked in a continuous round (like a spiral). Mark the first stitch of each round with a stitch marker.
- For your body color, use a light color so the face shows!
SNAIL CROCHET PATTERN
SNAIL SHELL
rnd 1: Start with a magic, sc 7 (7 sts)
rnd 2: inc 7 (14 sts)
rnd 3: [sc 1, inc 1] 7 times (21 sts)
rnd 4: [sc 1, inc 1, sc 1] 7 times (28 sts)
rnd 5: [sc 3, inc 1] 7 times (35 sts)
rnd 6: [sc 2, inc 1, sc 2] 7 times (42 sts)
rnds 7-10: Sc around (42 sts for 4 rnds)
• • • Weave in your beginning yarn tail before continuing. • • •
rnd 11: [sc 4, inv dec] 7 times (35 sts)
rnd 12: [sc 3, inv dec] 7 times (28 sts)
rnd 13: [sc 2, inv dec] 7 times (21 sts)
• • • Stuff the shell now and continue stuffing until closed. • • •
rnd 14: [sc 1, inv dec 1] 7 times (14 sts)
rnd 15: inv dec 7 times, sl st 1 into first st of previous round (7sts)
Fasten off and finish off.
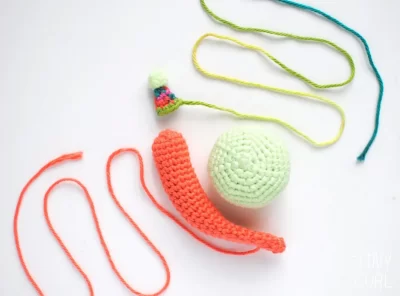
BODY
rnd 1: Start with a magic ring, sc 7 (7 sts)
rnd 2: inc 7 (14 sts)
rnds 3-5: Sc around (14 sts for 3 rnds)
rnd 6: [sc 5, inv dec 1] 2 times (12 sts)
rnds 7-16: Sc around (12 sts for 10 rnds)
• • • Stuff your snail’s body when you reach rnd 16. The body should only be stuffed from rnds 1-16. Don’t stuff the section of body that will be under the shell. This will help your crochet snail stand up on its own. • • •
rnds 17-24: Sc around (12 sts for 8 rnds)
rnd 25: [sc 4, inv dec 1] 2 times (10 sts)
rnd 26: Sc around (10 sts)
rnd 27: [sc 3, inv dec 1] 2 times (8 sts)
rnd 28: Sc around (8 sts)
rnd 29: [sc 2, inv dec 1] 2 times, sl st 1 into first st of last round (6 sts)
Fasten off and finish off, but DON’T WEAVE IN THE END and leave a long tail (about 24 inches) for attaching the body to the shell.
HAT
rnd 1: Start with a magic, sc 5 (5 sts)
• • • Leave the beginning yarn tail outside of the hat and don’t weave in this end. We will use it to attach the yarn pompom. • • •
rnd 2: [sc 1, inc 1] 2 times, sc 1 (7 sts)
rnd 3: [sc 2, inc 1] 2 times, sc 1 (9 sts)
rnd 4: [sc 3, inc 1] 2 times, sc 1, sl st 1 into first st of last round (11 sts)
rnd 5: In FLO, sl st around making sure your tension isn’t too tight (11 sts)
Leave a long tail (about 18 inches) for attaching.
Make a tiny yarn pompom with the shell color yarn. To make a pompom, I wrap the yarn around my index finger and tie the center with a piece of nylon thread (any color). Then I cut the loops and shape the pompom with scissors.
Using the beginning yarn tail of the hat, thread through the center of the pompom so that the yarn is going through the knotted thread securing your pompom. Bring the yarn tail back through the top of the hat and knot it on the inside of the hat. Weave the tail in so it’s secure. Cut the remaining tail length and/or stuff it into the hat.
ATTACHING PIECES
ATTACHING THE BODY TO SHELL
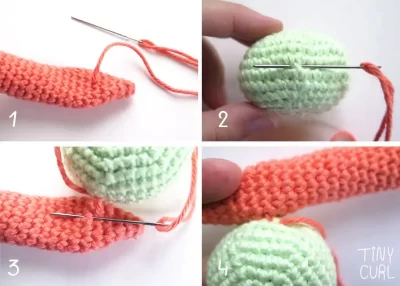
We will be attaching the shell with 3 rows of running stitches, going through a st on the shell and then through a st on the body. We will start with a center running stitch that connects the body to the shell.
Using your tapestry needle, thread the long end tail from your body and bring it through the center of the tail (where you fastened off). Bring the needle up through the snail body at the point where you want to begin attaching it to the shell (around the row you started decreasing on the body, see image 1 below).
Thread your needle in and out of a stitch on the shell (image 2 below). Then thread your needle in and out of a stitch on the body (image 3 below) pulling tight. Continue this running stitch (image 4 below) until you reach the bottom of the snail’s head (about the 7th row of the body). Leave the snail’s head detached from the shell. Pinch your snail’s head so that it is flatter and wider than the rest of it’s body.
More Free Amigurumi Patterns
More amigurumi pattern in there. If you want to another amigurumi crochet pattern, you look at free amigurumi category.
Now we will be making 2 additional rows of running stitches along the base of the snail. This will help it stand up on its own by flattening the bottom.
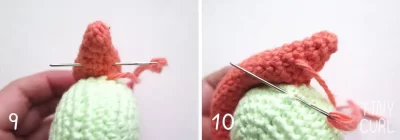
Go through the snail’s body with your threaded needle and bring it out a little above the base of the snail’s body (about row 14 of the body, see image 5 below). Working with the same running stitch in the stitches directly next to your center stitch line, work your way to the end of the shell (images 6, 7, and 8 below show the process).
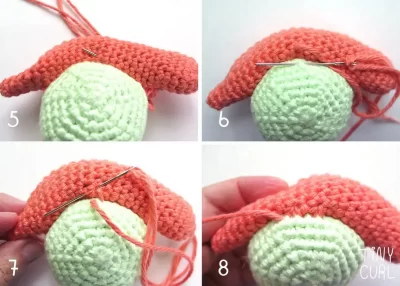
Bring your needle through the snail’s body to the other side of the center running stitch (image 9 below) and work your way back up the snail’s body with the running stitch (image 10), ending where you started the other side running stitch line.
ATTACHING THE HAT
Using the long tail of yarn, attach the hat to the snail’s head.
EMBROIDERING THE FACE
Thread your embroidery needle with black embroidery thread (about 24 inches) and knot the end. Embroidery thread is 6 ply (aka has 6 individual strings), you will be using all 6 strings.
EYES
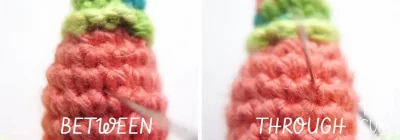
Insert your needle through the back of the snail’s head BETWEEN stitches and bring it through the front of the snail’s head THROUGH a stitch on rnd 4. Pull the beginning thread knot into the snail’s head from the back, so it is hidden and secure.
Each eye is made with one french knot on rnd 4 with .
MOUTH & CHEEKS
For the mouth, bring your thread through a stitch on rnd 5 at the front of the head where you want to start your mouth. Make a horizontal stitch and bring the yarn through the back of the head.
For the cheeks, bring your thread through the front, a little above and to the left of your mouth stitch. Insert and pull your thread through the mouth stitch (see image below). Insert the needle a little below and to the left of your mouth stitch and bring through to the back. Repeat on the other side of the mouth and secure your thread.
Feel free to tag me (@freeamigurumii) in your photos on Instagram or Facebook if you’d like!
All Finished.