Hello amigurumi lovers and beautiful visitors, I wanted to share the free amigurumi patterns for you here. In my article I will share 1 pattern and how to make it for you. At the end of my article, I will share amigurumi patterns that can generate ideas for you.
Supplies:
• Yarn 4/Medium Weight Yarn in…
Skin Color, Orange, Yellow, Green, Black, White, Red, Hot Pink, Purple, Brown
• 3mm Crochet Hook
We will use the 3mm crochet hook only for the fingers and arm
• 4mm Crochet Hook
We will use the 4mm crochet hook for the rest of the pattern
•12mm safety eyes
•Tapestry needle
•Scissors
•Stuffing
•Black Embroidery Thread
•Foam roller or dowel (optional) This is recommended for the neck to strand firm
Additional Information:
Difficulty: Experienced
• Size
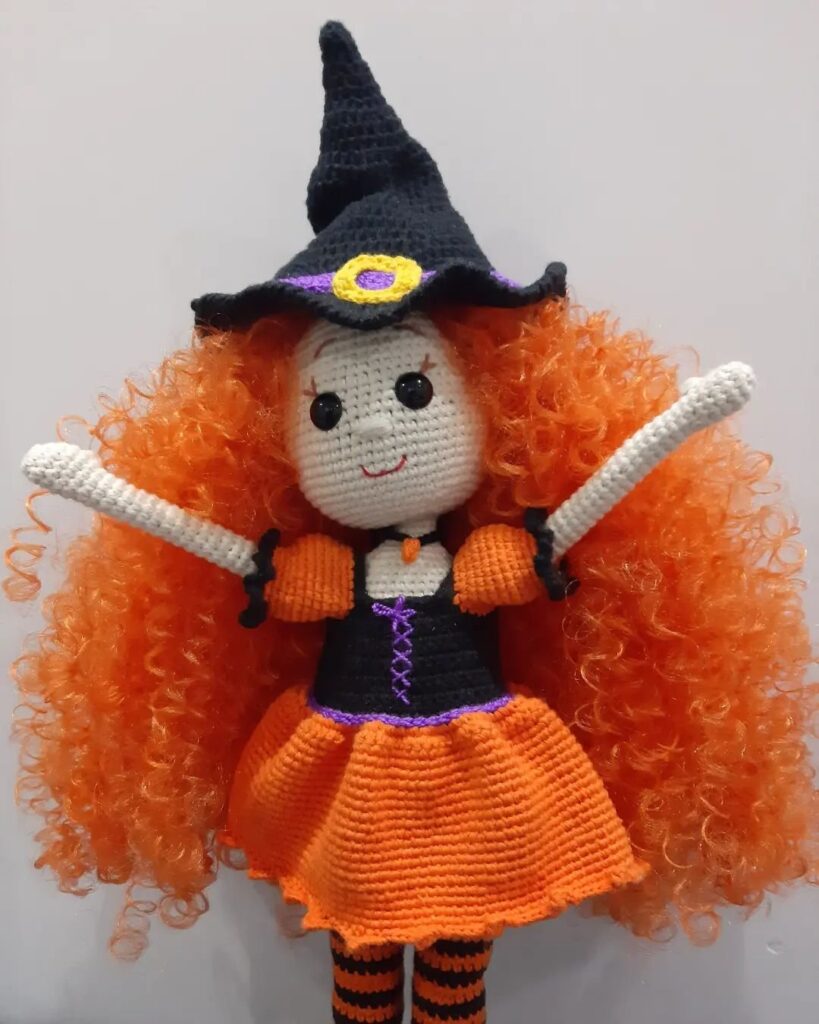
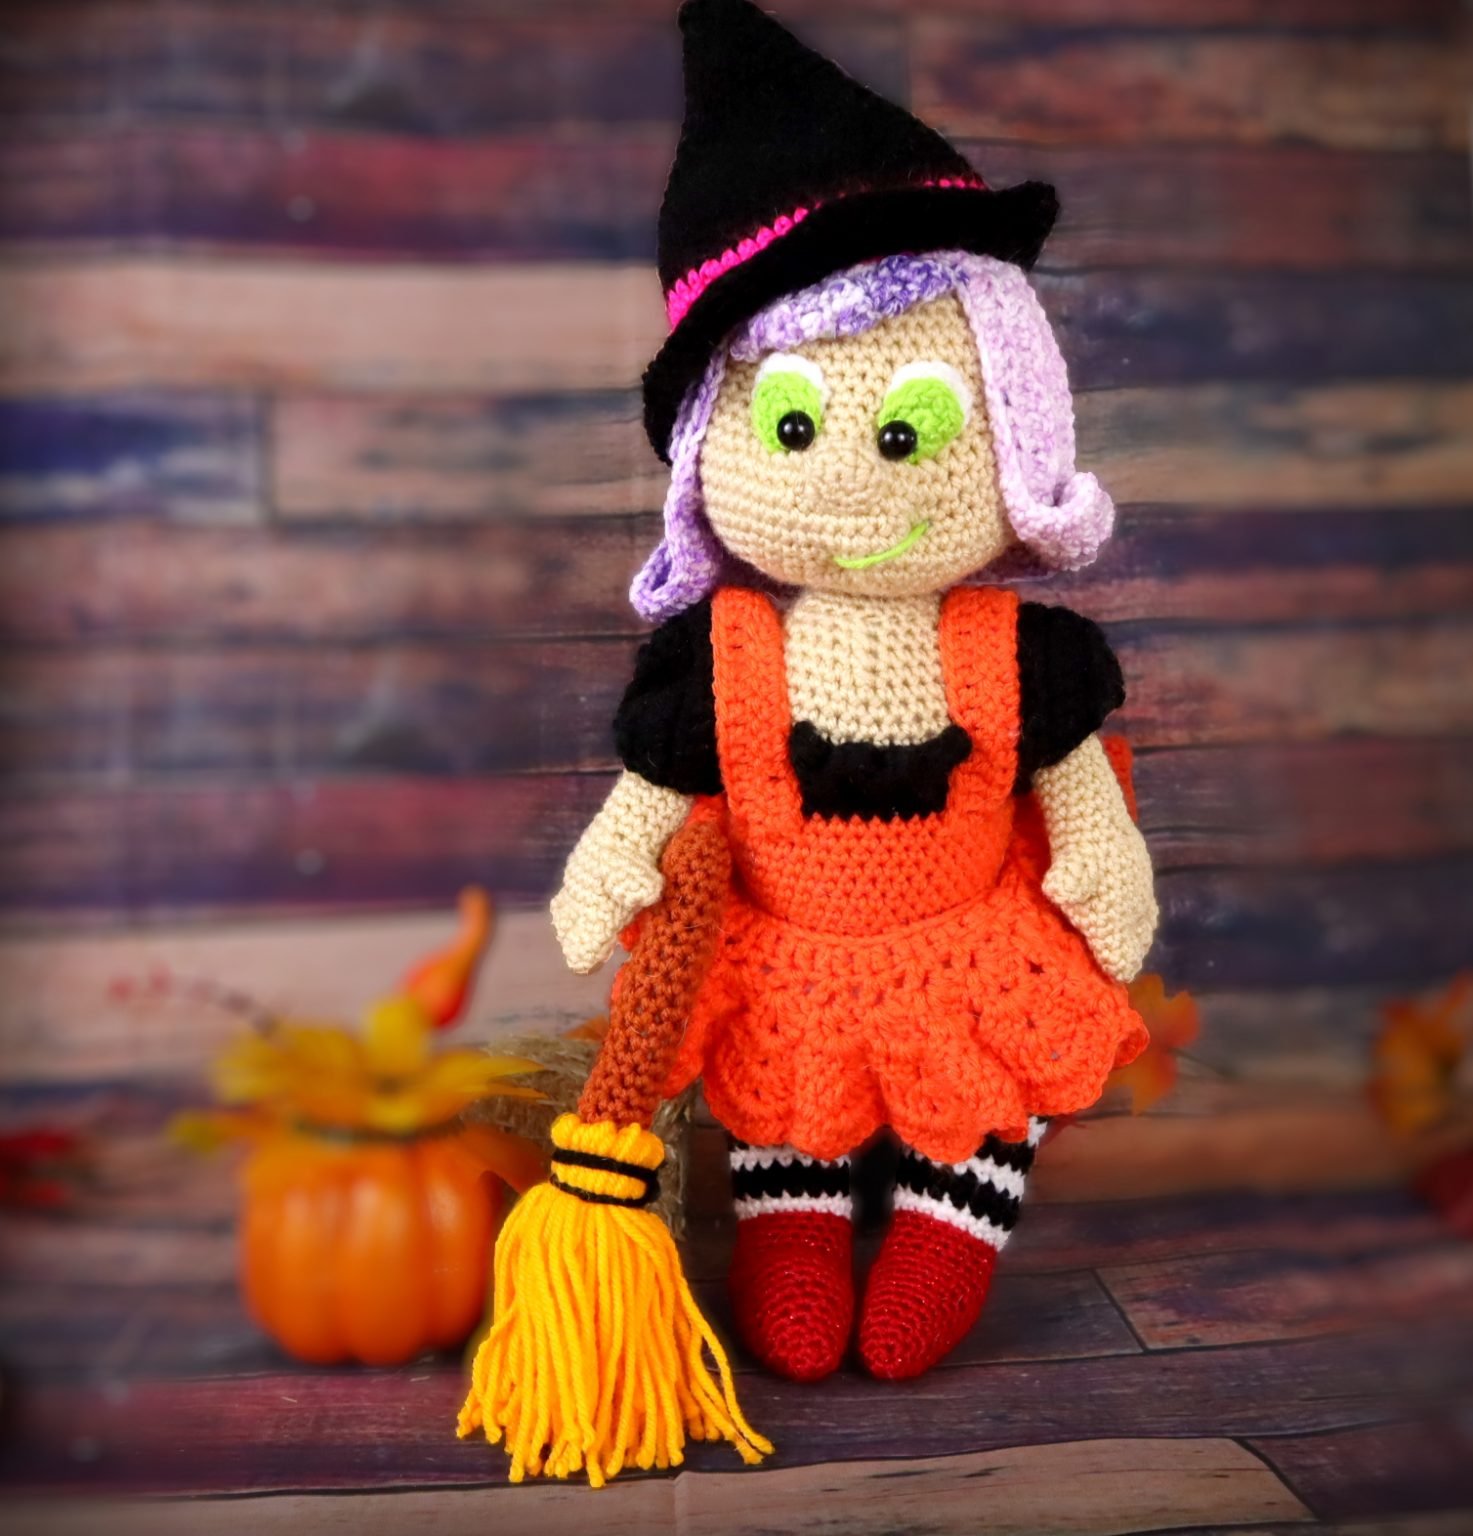
This witch measures 20″ from the shoes to the tip of the hat. She’s about 15.5″ from the shoes to her head. This pattern has lots of parts but is worth it in the end!
• Getting started
We start with the legs and crochet them together, which then forms the body and head. All are one piece. We then make the face, arms, clothes, hair, hat, and broom!
Feet: (Make 2)
In Red
To start the witch we first create her feet. The foot then leads into the leg. We make one more foot that leads into the leg and crochet both legs together. This forms the bottom of the hips, then leads into the body, and the head. The legs to the head are all one continuous piece.
Make one leg first, then create the second
Round 1: 6 Sc in magic Ring (6)
Round 2: *Sc* all around (6)
Round 3: *Inc, Sc* all around (9)
Round 4: *Sc* all around (9)
Round 5: *Inc, Sc in the next 2 st* all around (12)
Round 6: *Sc* all around (12)
Round 7: *Inc, Sc 3* all around (15)
Round 8: *Sc* all around (15)
Round 9: *Inc, Sc 4* all around (18)
Round 10-12: *Sc* all around (18)
Round 12 Will Look Like This
In the following rows we will be working “short rows”. This means we will temporarily no longer be working in rounds. When you see “row” you will know we are working in rows. Short rows will make the shoe curve to start forming the leg.
Round 13: Sc in the next 9 st
Row 14: Turn, Sc in the next 9 st ( sideview , backview , regular shoe view)
Row 15: Turn, Skip the first st, Sc in the next st. Sc in the next 5 st, Skip the next st and Sc in the last st (7)
Row 16: Turn, Skip the first st, Sc in the next st. Sc in the next 3 st, Skip the next st and Sc in the last st (5)
Row 17: Turn, Skip the first st, Sc in the next 2 st, Skip the next st and Sc in the last st (3)
Row 17 will look like the images below:
In the next row we will start to work around the entirety of the shoe. This is so we can start working in rounds again
Round 18: Sc in the next 3 st on the side of the shoe . Now we’re at the top of the shoe. SlSt loosely in the next 9 st , Sc in the next 3 st on the side of the shoe , Sc in the next 3 st on the bottom of the shoe The shoe will now look like (18)
Round 19: Sc in the next st and add a stitch marker to the Sc just made. This stitch marker will mark the start of each round. Sc in the next 17 st (18)
Round 19 Stitch Marker Pictured Below
Round 20-22: *Sc* all around (18)
Round 23: Change to White. In the BLO, *Sc* all around (18)
Round 24: In BOTH Loops, *Sc* all around (18)
Round 25-26: Change to Black. *Sc* all around (18)
Round 27-28: Change to White. *Sc* all around (18)
Round 29-30: Change to Black. *Sc* all around (18)
Round 31: Change to White. *Sc* all around (18)
Round 32: Repeat *Inc, Sc in the next 5 st* all around (21)
Round 33-34: Change to Black. *Sc* all around (21)
Round 35: Change to White. *Sc* all around (21)
Stuff the leg now. Finish off only the first leg now – leave the stitch marker in the first leg. Don’t finish off the second leg here. Instead, continue on with Round 36.
Leg Assembly
Round 36: Ch 4. Now take the 1st leg and count 9 stitches before the stitch marker. Sc in that 9th stitch. Add a stitch marker to the Sc you just made . You can now take out the old stitch markers.
Sc in the next 20 st on the leg. Now we meet the chain. Sc in the next 4 st along the chain.
This is still Round 36. We’re still working on connecting the legs together.
Round 36 (Continued): Now we meet the other leg. Sc in the next 21 st on the other leg. Now we meet the other side of the ch.
Sc in the next 4 st along the chain.
Round 37: Now we meet the new stitch marker of the other leg. Sc in the next 21 st of that leg. Now Sc in the next 4 st across the middle of the legs.
Now we meet the other leg. Sc in the next 21 st. Now Sc in the next 4 st across the middle of the leg.
Hips
Now that we have the feet connected we’re now working on the hips. This will soon lead to the waist and torso.
Round 38: *Sc* all around (50)
Round 39: *Inc, Sc 6* 7 times, Sc in the last st (57)
Round 40-45: *Sc* all around (57)
Round 46: *Dec, Sc in the next 17 st* 3 times (54)
Round 47: *Dec, Sc 7* all around (48)
Round 48: *Sc* all around (48)
Round 49: *Dec, Sc 6* all around (42)
Now we’re working on the torso
Round 50: Change to Orange, *Sc* all around (42)
In the next round we will work in the Back Loop Only. This is because later we will sew the skirt along the front loops that are left from that round.
Round 51: In the BLO (Back Loop Only), *Sc* all around (42)
Round 51 Pictured Below
Stuff here. Continue stuffing as needed.
Round 52-58: In BOTH Loops, *Sc* all around (42)
Round 59-62: Change to Black, *Sc* all around (42)
In the next round we will work clusters of double crochets into the front loop only for a part of the round.
This will create a ruffled chest area for a cute and stylish looking dress. If you prefer to not have a ruffled chest dress, just Sc 1 in BOTH loops for the next 7 stitches where we typically would do the Dc.
Round 63: In BOTH Loops, Sc in the next 2 st. Now in the FLO, do 3 Dc in each of the next 7 stitches. In BOTH loops, Sc in the next 33 st (Stitch Count: 42 sc, don’t count the Dcs but count the each loop behind the Dc, so 7 total loops behind the Dc.)
Note: If your DCs don’t land centered, that’s fine. Simply make the 3 DCs in each FLO of 7 stitches where they will be centered, and make 35 Sc in BOTH loops where needed.
Round 63 Ruffles
Now we’re about to start working on the head after we crochet a few rounds in the skin color
Round 64: Change to Skin Color. Sc in the next 2 st. Now we meet the 7 back loops left from the clusters of Dc. Since we crocheted in the front loops only in Round 63, we have the back loops left. Sc in the back loops for the next 7 st. Now continue crocheting in both loops the next 33 st (42)
Round 65-67: *Sc* all around (42)
Round 68: Repeat *Dec, Sc 5* all around (36)
Stuff the body again here. Continue stuffing after each decrease round.
Round 69: *Dec, Sc 4* all around (30)
Round 70: *Dec, Sc 3* all around (24)
Round 71: *Dec, Sc 2* all around (18)
Now we will start making the neck
Round 72: In the FLO, *Sc* all around (18)
Now we’re making the head. If you’d like the head to be firm, place a foam roller or wooden dowel into the doll’s neck now to keep it stable. I would highly recommend this so it’s head won’t be floppy.
Round 73-74: In BOTH Loops, *Sc* all around (18)
Round 75: In the FLO repeat *Inc, Sc 2* all around (24)
Round 77: In BOTH Loops repeat *Inc, Sc 3* all around (30)
Round 76: *Inc, Sc 4* all around (36)
Round 77: *Inc, Sc 5* all around (42)
Round 78: *Inc, Sc 6* all around (48)
Round 79: *Inc, Sc 7* all around (54)
Round 80: *Inc, Sc 8* all around (60)
Round 81-84: *Sc* all around (60)
Round 85: *Dec, Sc 8* all around (54)
Round 86: *Dec, Sc 7* all around (48)
Round 87-93: *Sc* all around (48)
Round 94: *Dec, Sc 6* all around (42)
Stuff here. Continue stuffing after each round. You may also want to do the face shaping here. I did, but if you prefer you can do the face shaping after closing the head. I recommend doing it before closing the head so you can move stuffing around where you may need it. After face shaping, continue on to Round 95.
Round 95-97: *Sc* all around (42)
Round 98: *Dec, Sc 5* all around (36)
Round 99: *Dec, Sc 4* all around (30)
Round 100: *Dec, Sc 3* all around (24)
Round 101: *Dec, Sc 2* all around (18)
Round 102: *Dec, Sc* all around (12)
Round 103: *Dec* all around (6)
Finish off and sew the head closed. Set body aside for now.
Face Shaping: Eyes
We will shape the face by sewing a string through the face in a certain way. The pins provide a visual as to where we’ll put our needle next. The red pins show where we will insert our needle for the eyes. Place the red pins on Round 89. Each pin being about 1 stitch apart and 5 stitches apart between the pairs.
You can place pins on as shown. Take a long piece of skin colored yarn and insert it into the back of the neck. Pull the needle out at the right eye area. Reinsert needle one stitch to the left. Pull the needle out to the left eye area. Reinsert needle one stitch to the left.
Now pull the needle out at the back of the neck, where we originally first inserted out needle. We will have two ends of yarn. Pull both ends at the same time firmly. This will tighten the eye area. Tie a firm knot with both ends of yarn.
Pull the tails of yarn into the doll and cut the excess yarn.
Face shaping: Smile
We will shape the face by sewing a string through the face in a certain way. The pins provide a visual as to where we’ll put our needle next. The green pins show where we will insert our needle for the smile. Place the bottom green pins on Round 81 and the top green pins on Round 84.
You can pin needles on as shown. Take a long piece of skin colored yarn and insert it into the front of the neck. Pull the needle out at the right mouth area. Reinsert needle one stitch to the left. Pull the needle out at bottom left of the smile area. Reinsert needle one stitch to the left and pull the needle out at the front of the neck, where we originally first inserted our needle.
We will have two ends of yarn. Pull both ends at the same time firmly. This will tighten the smile area. Tie a firm knot with both ends of yarn. Pull the tails of yarn into the doll and cut the excess yarn. The face will now look like.
Eye Iris: (Make 2)
In Green
Round 1: 6 Sc in Magic Ring (6)
Round 2: Sc in the first st, *Inc* in the next 3 st, Sc in the last 2 st (9)
Finish off, leaving a tail for sewing. Add a 12mm safety eye in the 2nd stitch of Round 2.
Eyes White: (Make 2)
In White
Round 1: 7 Sc in Magic Ring (7)
Round 2: Sc in the first st, *Inc* in the next 4 st, Sc in the last 2 st (11)
Finish off. Weave in ends.
Eye Assembly:
In Green
Now we will sew the iris to the eye white. Place the iris slightly below the white of the eye. Sew the iris to the eye with the tail of yarn, be sure to sew the eye in the last round. Now pin the eyes where the eye indents are and sew on.
Nose:
In Skin Color
Round 1: 6 Sc in Magic Ring (6)
Round 2: *Inc* all around (12)
Round 3: *Sc* all around (12)
Finish off, leaving a tail for sewing.
Pin the nose below & between the eyes as shown. Sew on.
Smile:
In Green Yarn
Insert needle with thread close to the mouth and pull needle out the right smile indent. Reinsert needle into the left smile indent. Pull needle out close to the mouth. Tie knots with both ends of yarn and weave into the doll. Done!.
Hands/Arms
We start the hands by creating each individual finger. We then crochet the fingers together, this will form the hand. The hand then leads into the arm as one continuous piece.
Note: Make all fingers and the entire arm using a 3mm hook. Change back to a 4mm hook for all other parts of the pattern.
Thumb: (Make 1 per arm, Make this first)
In Skin Color
Round 1: 6 Sc in Magic Ring (6)
Round 2-3: *Sc* all around (6)
Finish off and set aside for now.
Fingers: (Make 3 per hand)
In Skin Color
Round 1: 6 Sc in Magic Ring (6)
Round 2-4: *Sc* all around (6)
Finish off the first 2 fingers. Don’t finish off the third finger, instead continue on to Round 5.
Hand
Now we will connect 3 fingers and this will start forming the hand. A few rounds later we will connect the thumb.
Round 5: Sc in the next 3 st. Now take a finger and Sc into any stitch on that finger.
Sc in the next 2 st of that finger. Now take the third finger and Sc into the next 6 st of that 3rd finger. Now we’re at the other side of the fingers. Sc in the next 3 st of the middle finger,
Sc in the next 3 st of the first finger. Round 5 will look like. (18)
Round 6-8: *Sc* all around (18)
Now we’re going to connect the thumb like we did the other fingers. After this, we will start to form more of the arm. In the next round we will add the thumb
Round 9: Sc in the next 9 st. Now take the thumb and align the stitches to the hand. Going under BOTH the thumb and hand stitches, Sc in the next 3 st. Now continuing on just the hand, Sc in the next 6 st (18)
Round 10: Sc in the next 9 st . Now we meet the thumb. Sc in the next 3 st on the thumb. Continuing on the hand, Sc in the next 6 st (18)
Round 11: *Repeat *Dec, Sc* all around (12)
Stuff gradually in the next rounds
Round 12-24: *Sc* all around (12)
Finish off, leaving a long tail for sewing.
Arms
Pin each arm to the sides of the doll as shown. Be sure the thumbs are pointing outwards. Leave equal room on each side of the arm for the sleeve and strap later.
Sleeves: (Make 2)
In Black. Remember to use a 4mm hook now
Round 1: Ch 30. Connect the ch to the first ch made. Make sure to not twist the chain. Sc in the next 29 st (30)
Round 2: *Sc* all around (30)
Round 3: Sc in the next 24 st
Now we are working in rows. This will give us the opening to put her arm in the sleeve.
Row 4-7: Turn, Sc in the next 24 st (24)
Row 8: Turn, *Dec, Sc in the next st* 8 times (16)
Row 9: Turn, *Dec* 8 times (8)
Row 10: Turn, *Dec* 4 times (4)
Row 11: Turn, *Dec* 2 times (2)
Finish off, leaving a long tail for sewing. Weave the tail to the very first round so we can sew the sleeve to the dress. Put the sleeve on, the first round will be by the shoulder and the last row will face outwards
Arm Straps: (Make 2)
In Orange
Row 1: Ch 30. Dc in the 2nd Ch from the hook. Dc in the next 28 st (29)
Row 2: Turn, Dc in the next 29 st (29)
Finish off and pin each strap starting from the front orange area of the dress to back orange area of the dress. They should be right between the sleeve and the ruffle.
Skirt:
In Orange
Row 1: Ch 45. Dc in the 3rd ch from the hook. This counts as a Dc. Repeat *Skip the next st, 2 Dc in the next st* 21 times or all the way down the chain (43)
Row 2: Turn, Repeat *Dc in the next st, Ch 1, Dc in that same st. Skip the next Dc* 21 times, Dc in the last st, Ch 1, Dc in that same st (66)
Row 3: Turn, Repeat *SlSt into the next Ch 1 space. Chain 2, Dc 1 time into the same Ch 1 space, Ch 1, Dc 2 times into the same Ch 1 space* 22 times(Stitch count: We will have a total of 22 dc clusters (one cluster is counted as 4 dc going into the same Ch 1 space). Another way to count your stitches is we will have a total of 88 Dcs in the entire row)
Row 4: Turn, Ch 2, Repeat *Dc 2 times in the Ch 1 space, Chain 1, Dc 2 more times in that same space, Dc in the next st, Skip the next 2 st, Dc in the next st* 21 times, Dc 2 times in the Ch 1 space, Chain 1, Dc 2 more times in that same space, Dc in the next st(Stitch count: We will have a total of 131 Dc in the entire row)
Row 5: Turn, Repeat *Dc in the next 2 st, In the next Ch space Dc 2, Ch 1, Dc 2 in that same Ch space, Dc in the next 2 st, Skip the next 2 st* 21 times, Dc in the next 2 st, In the next Ch space Dc 2, Ch 1, Dc 2 in that same Ch space, Dc in the next 2 st(Stitch count: We will have a total of 176 Dc in the entire row)
Row 6: Turn, Repeat *Dc in the next 3 st, In the next Ch space Dc 2, Ch 1, Dc 2 in that same Ch space, Dc in the next 3 st, Skip the next 2 st* 21 times, Dc in the next 3 st, In the next Ch space Dc 2, Ch 1, Dc 2 in that same Ch space, Dc in the next 3 st(Stitch count: We will have a total of 220 Dc in the entire row)
Finish off, leaving a very long tail for sewing. Line up the ends of the skirt and sew them together. Now your tail of yarn should be at the top of the skirt. Put the skirt onto the doll and pin it in place. Be sure to pin it right by the front loops we left. Sew the skirt on, going from the front loop on the skirt to the front loop of the doll. Weave in ends once complete
Hair:
To create the hair we start at the top by making the top of it. We then crochet lots of hair strands in rows. Once completing the hair you can flip the ends of the rows up for a cute look (I did), or you can keep then straight.
Hair:
In Light Purple
Rounds 1-8 create the top of the hair
Round 1: 6 Sc in Magic Ring (6)
Round 2: *Inc* all around (12)
Round 3: *Inc, Sc* all around (18)
Round 4: *Inc, Sc 2* all around (24)
Round 5: *Inc, Sc 3* all around (30)
Round 6: *Inc, Sc 4* all around (36)
Round 7: *Inc, Sc 5* all around (42)
Round 8: *Inc, Sc 6* all around (48)
Information for Round 9:
In the next round we will be creating hair strands.
1.This is done by first making a long chain, then we Dc down the chain.
2. We Sc back into the hair center, then turn our work and crochet back up the hair strand we made. We’ll now be at the edge of the hair strand
3. Now we crochet back down the hair strand.
4. Once again we meet the hair center and crochet on the center.
We repeat the process of going from the center, working up to the edge of the hair strand, back down the hair strand, and at the center again, until we’ve made most of the hair. Finally, we create the bangs in a similar fashion just with less chains involved for a shorter hair length.
Round 9: Sc in the next st. Ch 26. Dc in the 3rd Ch from the hook. Dc in the next 23 ch. Now we meet the hair center. *Skip the next st and Sc in the next 2 st. Turn, now we will continue working up on the strand of hair we made. In the BLO, Dc in the next 25 st.
Turn, now we’re working our way down the hair strand. In the BLO, Dc in the next 25 st.* 11 times. This will make a total of 23 hair strands.
Now we’re making the bangs. Skip the next st and Sc in the next 2 st. Ch 6. Dc in the 3rd Ch from the hook. Dc in the next 3 ch. Now we meet the hair center. *Skip the next st and Sc in the next 2 st. Turn, now we will continue working up on the strand of hair we made. In the BLO, Dc in the next 4 st. Turn, now we’re working our way down the hair strand. In the BLO, Dc in the next 4 st.* 3 times. Skip the next st and Sc in the last st. SlSt in the first st of the round to complete. Pin the hair to the head as shown. I twisted the bangs slightly up
Sew the hair on, making sure to sew it on firmly. I first started sewing the hair on around the top in a circle, then sewed it on going up and down the hair strands.
Be sure to sew the bangs in place as well.
Hat:
In Black
Round 1: 6 Sc in Magic Ring (6)
Round 2-3: *Sc* all around (6)
Round 4: *Inc* all around (12)
Round 5-6: *Sc* all around (12)
Round 7: *Inc, Sc* all around (18)
Round 8-9: *Sc* all around (18)
Round 10: *Inc, Sc 2* all around (24)
Round 11-12: *Sc* all around (24)
Round 13: *Inc, Sc 3* all around (30)
Round 14: *Sc* all around (30)
Round 15: *Inc, Sc 4* all around (36)
Round 16: *Sc* all around (36)
Round 17: *Inc, Sc 5* all around (42)
Round 18: *Sc* all around (42)
Round 19: *Inc, Sc 6* all around (48)
Round 20-21: *Sc* all around (48)
Round 22: Change to Hot Pink. *Inc, Sc 7* all around (54)
Round 23-25: *Sc* all around (54)
Round 26: Change to Black. In the FLO, *Inc, Sc 8* all around (60)
Round 27: In BOTH Loops, *Inc, Sc 9* all around (66)
Round 28: *Inc, Sc 10* all around (72)
Round 29: *Inc, Sc 11* all around (78)
Finish off, leaving a very long tail for sewing.
Pin the hat slightly askew onto the head for a cute look. Weave the tail of yarn to the last pink round and sew along the last pink round to the head.
Broom Stick:
In Brown
Round 1: 6 Sc in Magic Ring (6)
Round 2: *Inc, Sc* all around (9)
Stuff gradually in the next rounds
Round 3-24: *Sc* all around (9)
Round 25: *Dec, Sc* all around (6)
Finish off and sew closed.
Broom Brush:
In Yellow
Cut 50 strands of yarn each about 11″ long . Place all strands evenly in a pile. Place the broom stick in the middle of the pile. Now evenly move pieces of yarn around the stick to cover the stick. Take a piece of yarn and tie it around both the strands and the handle. Tie it around 2″ up from the handle.
Now fold the strands over where we tied the string. Take another piece of yarn in black and tie around both the handle and the strands a few times as shown. Cut excess yarn Do this once more, above the strand we just tied. Now cut the broom strands to your liking!
Feel free to tag me (@freeamigurumii) in your photos on Instagram or Facebook if you’d like!
All Finished.