Hello amigurumi lovers and beautiful visitors, I wanted to share the free amigurumi patterns for you here. In my article I will share 1 pattern and how to make it for you. At the end of my article, I will share amigurumi patterns that can generate ideas for you.
You will need: yarn of different colors, filler, safe eyes for toys measuring 9 mm, a tapestry needle.
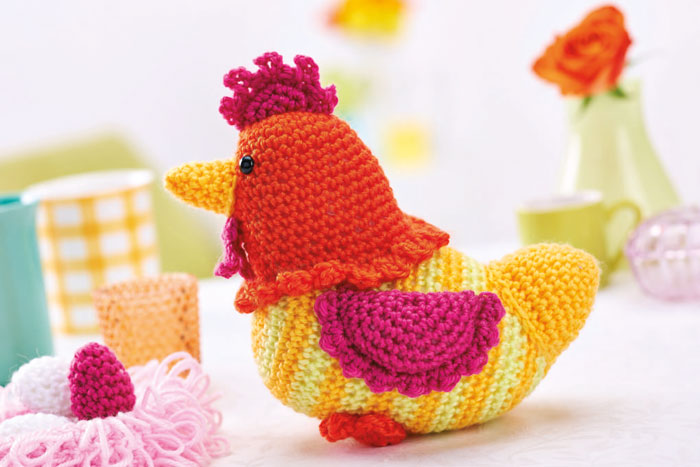
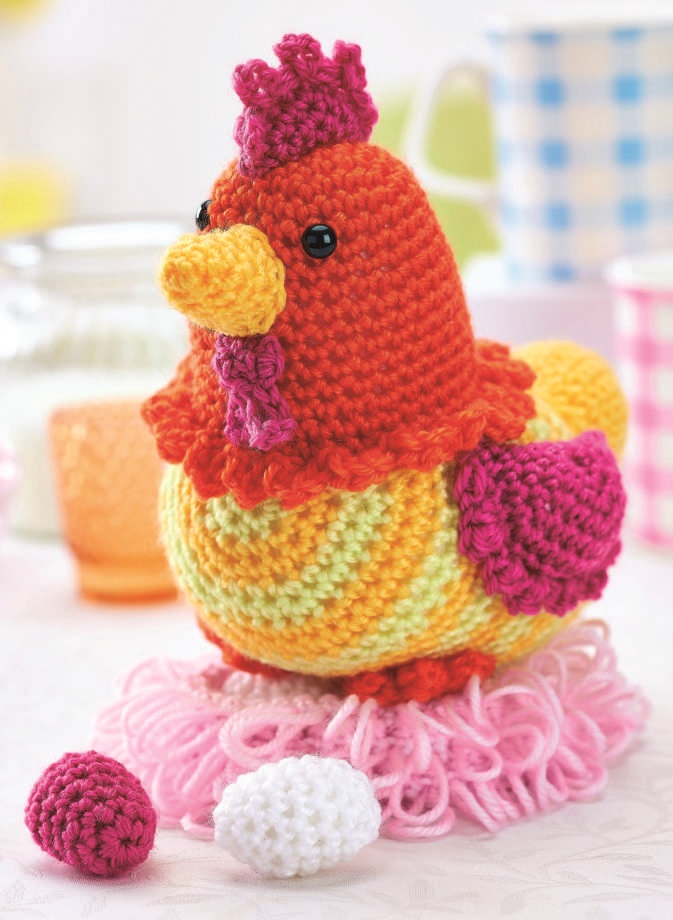
Chicken size: height 8 cm, length 20 cm.
Nest size: 15 cm.
Egg size: 3 cm x 4 cm.
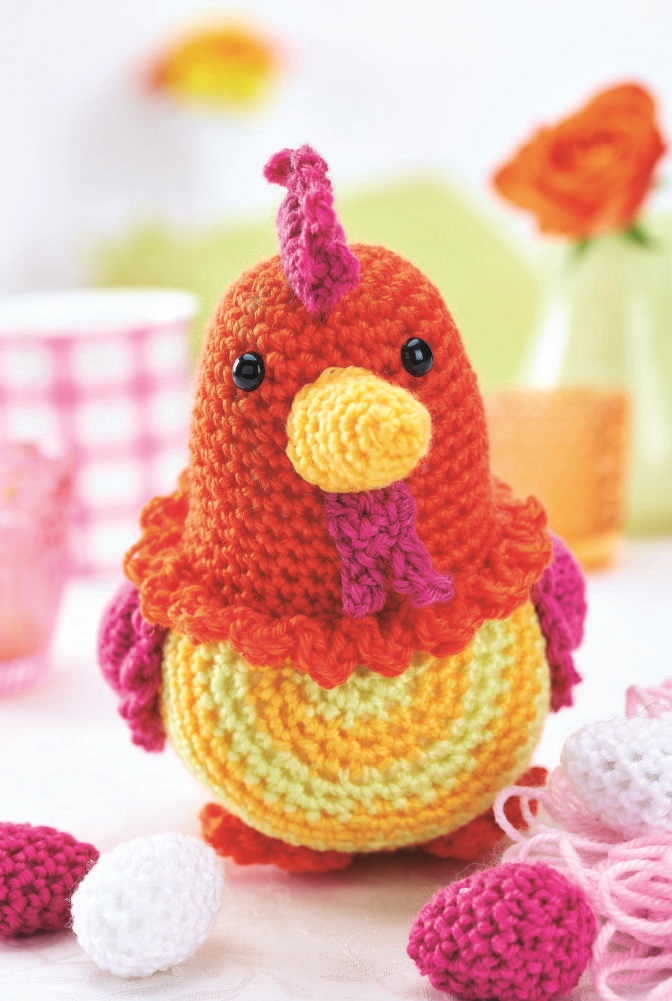
Chicken body
Take light green threads and hook № 5 tie 6sbn into the amigurumi ring ( 6 p. )
Row 1: 2 Sat in each loop ( 12p. )
When knitting, alternating colors – two rows green, two rows yellow.
Row 2: ( 1 Sat, 2 Sat in one loop ) repeat until the end of the row ( 18 p. )
Row 3: ( 2 Sat, 2 Sat in one loop ) repeat until the end of the row ( 24 p. )
Row 4: ( 3 Sat, 2 Sat in one loop ) repeat until the end of the row ( 30 p. )
Row 5: ( 4 Sat, 2 Sat in one loop ) repeat until the end of the row ( 36 p. )
Row 6: ( 5 Sat, 2 Sat in one loop ) repeat until the end of the row ( 42 p. )
Rows 7-9: 1 Sat in each loop ( 42p. )
Row 10: ( 5 Sat, 2 Sat Together ) repeat to the end of the row ( 36 p. )
Rows 11-25: 1 Sat in each loop ( 36 p. )
Row 26: ( 4 Sat, 2 Sat Together ) repeat to the end of the row ( 30 p. )
Row 27: ( 3 Sat, 2 Sat Together ) repeat to the end of the row ( 24 p. )
Row 28: ( 2 Sat, 2 Sat Together ) repeat to the end of the row ( 18 p. )
Fill the knitted chicken with a filler.
Row 29: ( 1 Sat, 2 Sat Together ) repeat to the end of the row ( 12 p. )
Then knit a yellow thread.
Row 30: 2 Sat together repeat until the end of the row ( 6 p. )
Cut the thread, leaving a long tip. Using the needle, sew the open end of the body of the chicken, fix the thread.
Head
Take red-orange threads and hook № 5 tie 6 abnx into the amigurumi ring ( 6 p. ).
Row 1: 2sbn in each loop ( 12 p. )
Rows 2-3: knit as well as rows 2-3 in the body of the chicken ( 24 p. )
Rows 4-7: 1 Sat in each loop ( 24 p. )
Row 8: ( 3 Sat, 2 Sat in one loop ) repeat until the end of the row ( 30 p. )
Rows 9-13: 1 Sat in each loop ( 30 p. )
Row 14: ( 4 Sat, 2 Sat in one loop ) repeat until the end of the row ( 36 p. )
Row 15: 1 Sat in each loop ( 36 p. )
Row 16: * ( 1 Sat, 1 half-column with a cape, 1 column with a cape, 1 half-column with a cape, 1 Sat ) – in one loop, 1 half-column in the next loop *, repeat from * to * to the end of the row. It turned out 18 pestons. Fasten the thread.
Beak
Take the yellow threads and hook № 5 tie 3 Sat into the amigurumi ring ( 3 p. )
Row 1: 2 Sat in each loop ( 6 p. )
Row 2: ( 1 Sat, 2 Sat in one loop ) repeat until the end of the row ( 9 p. )
Rows 3-4: 1 Sat in each loop ( 9 p. )
Row 5: ( 2 Sat, 2 Sat in one loop ) repeat until the end of the row ( 12 p. )
Row 6: 1 Sat in each loop ( 12 p. )
Fasten the thread.
Ribeshok
Take raspberry-colored threads and № 5 hook 6 Sat into the amigurumi ring ( 6 p. )
Row 1: 2 Sat in each loop ( 12 p. )
Row 2: ( 1 Sat, 2 Sat in one loop ) repeat until the end of the row ( 18 p. )
Fold the scallop in half.
Row 3: 1 vp for lifting, connect both halves of the scallop using 9 Sat, rotate ( 9 p. )
Row 4: 1 vp, ( 1 half-column, 4 vp, 1 half-column ) – in one loop, * 1 half-column, ( 1 half-column, 4 vp, 1 half-column ) – in one loop * – repeat * to * to the end of the row. A total of 5 teeth turned out. Fasten the thread.
Wart
Take raspberry-colored threads and № 5 hook 6 Sat into the amigurumi ring ( 6 p. )
Fold the beard in half.
Row 1: 1 vp for lifting, connect both halves of the beard using 3 Sat, rotate ( 3 p. )
Row 2: 1 vp, 1 half-column, * 4 vp, 1 sbn in the second air loop from the hook, 1 sbn in the remaining two air loops, 1 half-column in the same loop*, repeat from * to * once, 1 half-column. Fasten the thread.
Wing ( 2 pcs. )
Take the raspberry thread and № 5 hook to tie 6 abn in the amigurumi ring ( 6 p. )
Row 1: 2 Sat in each loop ( 12 p. )
Rows 2-5: knit as well as rows 2-5 of the body of the chicken ( 36 p. )
Fold the wing in half and fill with a filler.
Row 6: 1 vp for lifting, connect both halves of the wing using 18 sbn, turn knitting ( 18 p. ).
Row 7: 1 vp for lifting, * ( 1 abdomen, 1 half-column with nakid, 1 sbn ) in one loop, 1 half-column *, repeat from * to *. It should turn out 9 pestons.
Fasten the thread.
Tail
Take the yellow threads and hook № 5 tie 6 Sat into the amigurumi ring ( 6 p. )
Row 1: ( 1 Sat, 2 Sat in one loop ) repeat until the end of the row ( 9 p. )
Row 2: ( 2 Sat, 2 Sat in one loop ) repeat until the end of the row ( 12 p. )
Row 3: ( 3 Sat, 2 Sat in one loop ) repeat until the end of the row ( 15 p. )
Row 4: ( 4 Sat, 2 Sat in one loop ) repeat until the end of the row ( 18 p. )
Row 5: ( 5 Sat, 2 Sat in one loop ) repeat until the end of the row ( 21 p. )
Row 6: ( 6 Sat, 2 Sat in one loop ) repeat until the end of the row ( 24 p. )
Rows 7-8: 1 Sat in each loop ( 24 p. )
Fasten the thread.
Feet ( 2 pcs. )
Take the red-orange thread and hook № 5 tie 6sbn into the amigurumi ring ( 6 p. )
Row 1: 2 Sat in each loop ( 12 p. )
Row 2: knit the hinge * ( 1 abdomen, 1 half-column with nakid, 1 sbn, 1 half-column with nakid, 1 sbn ) – in one loop *, repeat from * to * 3 times; knit 1 half-column for the back wall of the loop, 2 Sat together three times. Fasten the thread.
Nest
Take a light pink thread and № 5 hook to tie 6 Sat into the amigurumi ring ( 6 p. )
Knit with alternating colors: one row in pink, one row in white – 8 times, then in white.
Row 1: 2 Sat in each loop ( 12 p. )
Rows 2-6: knit like rows 2-6 in the body of the chicken ( 42 p. )
Row 7: ( 6 Sat, 2 Sat in one loop ) repeat until the end of the row ( 48 p. )
Row 8: ( 7 Sat, 2 Sat in one loop ) repeat until the end of the row ( 54 p. )
Row 9: knit ( 7 Sat, 2 Sat together ) repeat to the end of the row ( 48 p. )
Row 10: elongated loop in each Sat
TAG1 Tip> Extracted Loops (To perform elongated loops, you need to enter the hook into the Sat, form a loop around the thumb, pull it out by about 4 cm. With a hook to drag both threads of an elongated loop through the – base on the hook, you get three loops. Stretch the working thread through all three loops on the hook.
Row 11: 1 Sat in each loop.
Rows 12-15: repeat rows 10-11 twice.
Rows 16-17: repeat the row 11 twice.
Fasten the thread.
Egg
Take threads of any color and hook № 5 tie 6 abnx into the amigurumi ring ( 6 p. ).
Row 1: ( 1 Sat, 2 Sat in one loop ) repeat until the end of the row ( 9 p. )
Row 2: 1 Sat in each loop ( 9 p. )
Row 3: ( 2 Sat, 2 Sat in one loop ) repeat until the end of the row ( 12 p. )
Rows 4-6: 1 Sat in each loop ( 12 p. )
Fill the egg with filler.
Row 7: 2 Sat together to the end of the row ( 6 p. )
Cut the thread, leaving a long tip. Using the needle, sew the open end of the egg, fix the thread.
Assembly
Insert the eyes for toys ( on the thread ) into the head of the knitted chicken between rows 5 and 6, the distance between the eyes is 6 columns. Fill your head with a filler and sew it to your body. Sew the beak to the head, also filling it with a filler. Sew the scallop to the head of the head, sew the beard under the beak. Fill the wings with a filler and sew a Easter knitted chicken on both sides to the body, place between the main part of the wing and the pestons on the rounded part of the stitch. Fill the tail with a filler and sew it to the back of the body. Sew your legs below, a little closer to the front of the body. The distance between the legs is approximately 4 columns. Turn up the upper three rows of the nest, sew the chicken.
Feel free to tag me (@freeamigurumii) in your photos on Instagram or Facebook if you’d like!
All Finished.