Hello amigurumi lovers and beautiful visitors, I wanted to share the free amigurumi patterns for you here. In my article I will share 1 pattern and how to make it for you. At the end of my article, I will share amigurumi patterns that can generate ideas for you.
Supplies:
4/Medium weight yarn in… (The fuzzy yarn is from crochet.com)
Fable Fur (Mishka, 2 skeins)
Light Brown
Black
4mm & 5mm crochet hook
10mm safety eyes, tapestry needle, scissors, bell (optional), and stuffing.
Additional Information:
Difficulty: Easy
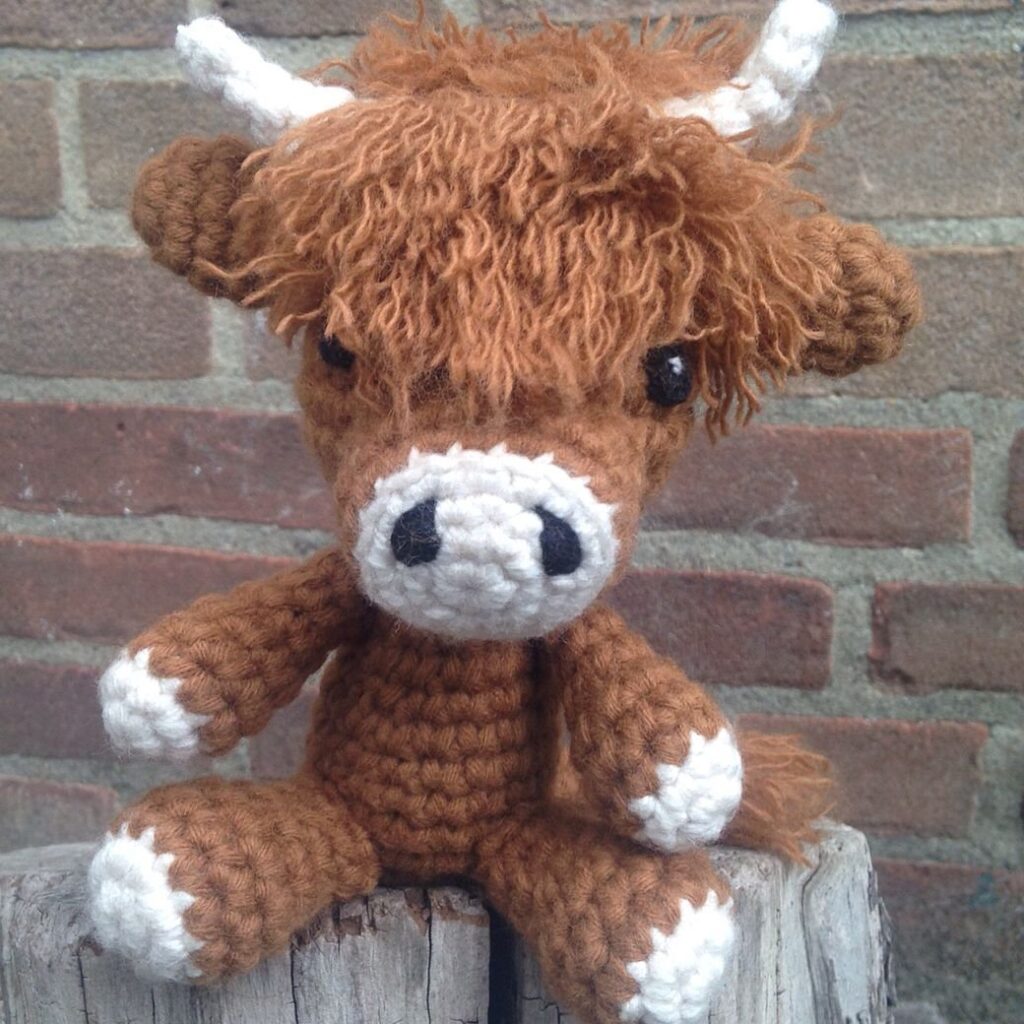
We start by making the head of the cow, which works into the body. They are one piece. We then make the nose, mouth, horns, ears, arms, and legs. Next, we make the tail and add an optional bell. Finally, we sew on nostrils!
Please also note that if you’re using the bulky, furry yarn, that the hook sized suggested DO matter. We will go between a 4mm and 5mm hook at times.
Stitch count is easy when using this yarn! Just be sure to count your stitches the entire time you’re crocheting, rather than at the end of the round. This makes it easier to follow along. If you notice you need to add or decrease a stitch, it should be no problem. You don’t have to redo the entire round, you can just add or decrease that stitch in the last stitch of the round.
Head/Body:
In Fuzzy Yarn & 5mm Hook
Round 1: 6 Sc in Magic Ring (6)
Round 2: *Inc* all around (12)
Round 3: *Inc, Sc* all around (18)
Round 4: *Inc, Sc 2* all around (24)
Round 5: *Inc, Sc 3* all around (30)
Round 6-9: *Sc* all around (30)
Round 10: Sc in the next 12 st. Sc in the next st and add a different colored stitch marker to the sc just made. This marks where we will place the eye. Sc in the next 4 st. Sc in the next st and add a different colored st marker to the sc just made. Sc in the next 12 st (30)
Round 10 Eye Markers Pictured Below
Round 11: Sc in the next 7 st, Repeat *Increase in the next st, Sc in the next st* 4 times, Sc in the next 7 st, Repeat *Increase in the next st, Sc in the next st* 4 times (38)
Round 12-13: *Sc* all around (38)
Round 14: Sc in the next 7 st, Repeat *Dec, Sc in the next st* 4 times, Sc in the next 7 st, Repeat *Dec, Sc in the next st* 4 times (30)
Round 15: *Dec, Sc 3* all around (24)
Round 16: *Dec, Sc 2* all around (18)
Add safety eyes in the marked areas in Round 10 now
Round 17: In the FLO (Front Loop Only), *Sc* all around (18)
Round 18: *Sc* all around (18)
Round 19: *Inc, Sc 2* all around (24)
Round 20-21: *Sc* all around (24)
Round 22: *Inc, Sc 3* all around (30)
Round 23: *Sc* all around (30)
Round 24: *Inc, Sc 5* all around (35)
Round 25-28: *Sc* all around (35)
Round 29: *Dec, Sc 5* all around (30)
Round 30: *Dec, Sc 3* all around (24)
Round 31: *Dec, Sc 2* all around (18)
Stuff here
Round 32: *Dec, Sc* all around (12)
Round 33: *Dec* all around (6)
Finish off.
Nose:
In Light Brown Yarn & 4mm Hook
Round 1: 6 Sc in Magic Ring (6)
Round 2: *Inc* all around (12)
Round 3: Sc in the next st, *Inc* in the next st, Sc in the next 3 st, *Inc* in the next st, Sc in the next 4 st, *Inc* in the next st, Sc in the last st (15)
Round 4: Sc in the next 2 st, *Inc* in the next st, Sc in the next 4 st, *Inc* in the next st, Sc in the next 4 st, *Inc* in the next st, Sc in the next 2 st (18)
Round 5: Sc in the next 3 st, *Inc* in the next 2 st, Sc in the next 8 st, *Inc* in the next 2 st, Sc in the last 3 st (22)
Round 6: Sc in the next 3 st, *Inc* in the next st, Sc in the next 14 st, *Inc* in the next st, Sc in the last 3 st (24)
Finish off and leave a long tail for sewing. Pin to the cow as shown. Sew on.
Mouth:
In Light Brown Yarn & 4mm Hook
Round 1: 6 Sc in Magic Ring (6)
Round 2: *Inc* all around (12)
Round 3: *Sc* all around (12)
Finish off, leaving a long tail for sewing. Fold the piece in half and pin to the cow as shown. Sew on.
Horns: (Make 2)
In Light Brown Yarn & 4mm Hook
Round 1: 6 Sc in Magic Ring (6)
Round 2: *Sc* all around (6)
Round 3: *Inc* all around (12)
Round 4-5: *Sc* all around (12)
Finish off, leaving a long tail for sewing. Pin to the head of the cow as shown and sew on.
Ears: (Make 2)
In Fuzzy Yarn & 5mm Hook
Round 1: 6 Sc in Magic Ring (6)
Round 2: *Sc* all around (6)
Round 3: *Inc* all around (12)
Round 4-8: *Sc* all around (12)
Round 9: *Dec* all around (6)
Finish off, leaving a long tail for sewing. Fold in half. Sew where you folded. Pin each ear to each side of the head. Sew on.
Legs: (Make 2)
In Black Yarn & 4mm Hook
Round 1: 6 Sc in Magic Ring (6)
Round 2: *Inc* all around (12)
Round 3: *Inc, Sc* all around (18)
Round 4: In BLO (Back Loop Only), *Sc* all around (18)
Round 5-6: In BOTH Loops, *Sc* all around (18)
Switch to fuzzy yarn and continue using 4mm hook
Round 7-15: *Sc* all around (18)
Finish off, leaving a long tail for sewing. Stuff the leg now. Pin legs to each side of the cow as shown and sew on.
Arms: (Make 2)
In Black Yarn & 4mm Hook
Round 1: 6 Sc in Magic Ring (6)
Round 2: *Inc* all around (12)
Round 3: In BLO (Back Loop Only), *Sc* all around (12)
Round 4-5: In BOTH Loops, *Sc* all around (12)
Switch to the furry yarn now. Continue using a 4mm hook.
Round 6-14: In BOTH Loops, *Sc* all around (12)
Finish off, leaving a long tail for sewing. Stuff now. Pin the arms to each side of the cow as shown and sew on.
Tail End:
In Black Yarn & 4mm Hook
Round 1: 6 Sc in Magic Ring (6)
Round 2: *Sc* all around (6)
Round 3: *Inc* all around (12)
Round 4-6: *Sc* all around (12)
Round 7: *Dec* all around (6)
Finish off, leaving a long tail for sewing. Set aside for now.
Tail:
In Fuzzy Yarn & 5mm Hook
Row 1: Ch 23. Sc in the 2nd Ch from hook. Sc in the next 21 st (22)
Finish off. Insert the tail into the tail end and sew them together. Pin onto the cow as shown. Sew on.
Bell Assembly: (Optional)
In Red Yarn
Take the bell and insert a needle with yarn into the middle of it. You will have two ends of yarn on each end of the bell. Pull them around the neck of the toy cow and tie a firm knot a few times, cutting off any excess yarn.
Nostrils:
In Black Yarn
Insert needle where shown and pull out on the left side of the nose as shown. Reinsert needle in the top left of the nose and pull out on the opposite side. Reinsert needle into the bottom right of the nose
Feel free to tag me (@freeamigurumii) in your photos on Instagram or Facebook if you’d like!
All Finished.