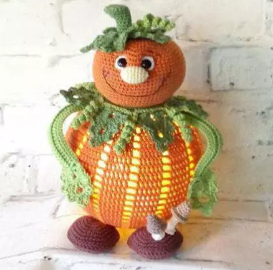
Hello amigurumi lovers and beautiful visitors, I wanted to share the free amigurumi patterns for you here. In my article I will share 1 pattern and how to make it for you.
List of materials:
✓ Cotton yarn 50 gr / 125 m (Catania or Katona),
2 skeins orange
1 skein green
remnants of light green, light yellow, white and 3 different browns.
Embroider the mouth and eyebrows with black silk.
✓ Safe eyes 8 mm (use only heads, cut off the leg)
✓ Hooks No. 2.5 and 2
✓ Filler, needles, scissors, maybe a few pins
✓ Acrylic ball with a diameter of 16 cm with a hole,
✓ LED fairy lights
✓ Acrylic paints in yellow or orange to paint the inside of the ball
✓ Hot glue
✓ Pliers to remove the leg of the eye
If you also want to paint the inside, then you can do that now.
Please note the color is quite dry to apply! After drying
remove the eyelets and connect the two halves.
Air loop VP
Connecting loop sp
Double crochet ccn
Single crochet sc
Half double crochet pssn
Gain inc
Decrease ub
Important !
We tie the ball in rows with 3 lifting loops 3ch, which we count as one
column and finish the row with a connecting loop.
We will tie the ball
crochet number 2.5 in orange.
We knit a chain of 10 air loops ch, close in a circle with
connecting loop.
1) There are now 21 crochet dc in this circle
2) 3 ch, 1 dc. in the same loop of the base of 3 lifting loops, from now 2
ssn. in the column of the previous row (that is, 2dc in each loop
of the previous row), we get 42 dc., closes the row of cn
3) 3 ch, dc, 2 ch, 1 dc, * 2 dc, 2 ch, skip 1 dc * repeat to the end
row, close the row with a st st (here you have 14 groups of dc)
4) 3 ch, 2 dc, 3 ch, * 3 dc, 3 ch * repeat to the end of the row, close the row
ss (again here 14 groups of ss)
From now on, the principle should be clear – the beginning of the series is ch 3 and it closes
cn.
5) 3 ch, 3 dc on the bow, 1 ch, * 4 dc, 1 ch * repeat until the end of the round
6) 3 ch, 3 dc, 2 ch, * 4 dc, 2 ch * repeat until the end of the round
7) 3 ch, inc, 2 dc, 2 ch, * dc, inc, 2 dc, 2 ch * repeat until the end of the round
8) 3 ch, dc over each dc of the previous row, 2 ch, * 5 dc, 2 Svp *,
repeat to end of row
9) knit in the same way as the 8th row
10) 3 ch, dc, inc, 2 dc, 2 ch, * 2 dc, inc, 2 dc, 2ch * to the end of the row
11) 3 ch, dc over each dc of the previous row, 2 ch, * 6 dc, 2 ch *
repeat until the end of the round
12-22) are connected in the same way as the 11th row 23) 3 ch, decrease, 3 dc, 1 ch, * dc, decrease, 3 dc, 1 ch * repeat to the end
row
24) 3 ch, 4 dc, 1 ch, * 5 dc, 1 ch * repeat until the end of the row.
Now put the acrylic ball inside, align the hole in the ball
with the initial hole (here the string of lights will be laid later)!
We continue to tie the ball.
25) 3 ch, decrease, 2 dc, 1 ch, * dc, decrease, 2 dc, 1 ch * repeat until
end of row
26) 3 ch, decrease, dc, 1 ch, * dc, decrease, dc, 1 ch * repeat until the end of the row
27) Ch 3, now work 1 dc over each group of 3 dc stitches,
repeat to end of row
28) 3 ch, dc, skip 1 dc * 2 dc, skip 1 dc * repeat to
end of the row, finish the job.
We knit collar leaves with green yarn crochet No. 2.5.
1 to 3rd row are the same as the beginning of tying the ball, and then
continue as follows.
4) ch 3, we knit dc over the dc, and 3 dc over the arch, repeat until the end of the row.
5) we knit this row for the back half-loop! 5 dc, 6 ch, 10 dc, 6 ch, 10 dc, 6
ch, 10 dc, 6 ch, 10 dc, 6 ch, 10 dc, 6 ch, 5 dc. You now have 7 to check
arches (see photo)
6) In this row, the leaves are knitted in the same way, one after the other, each leaf
consists of two rows, only having fully connected the sheet, we proceed to
next.
5 dc, 3 ch, 3 dc, 1 dc2n, 1 dc3n, 3 ch, 1 dc3n, 1 dc2n, 3 dc, 3 ch, connecting loop
(first photo) ch 2, connection loop under the arch at the bottom (second photo)
5 ch, (dc, 2 ch, dc) on the first dc // 1 ch, sb on the second dc, 1 ch // (dc, 2 ch, dc)
on the third dc // 1 ch, sb on ss2n, 1 ch // (dc, 2 ch, dc) on triple ss3n. // ch 1
now crochet in the arch from ch as follows:
sbn, 2 ch, 1 slst2n, 2 ch, 1 ss2n, 2 ch, sbn, 1 ch // (dc, 2 ch, dc) on triple ss3n // 1
ch, sb on ss2n, 1 ch // (sn, 2 ch, ss) on ss // 1 ch, sb on ss // (ssn, 2 ch, ss) on
last ssn. // ch 5, connect the loop to the beginning of the row. Now with a connecting loop
we knit sc to the next arch from ch, then you start again from the beginning
descriptions of the leaf and so knit all subsequent leaves.
Antennae.
Now with light green yarn in the 5th row we knit for the front half loops
alternately one by one connecting and air loops, focusing
in the photo and diagram (see the first photo) to the middle of two leaves (see the second photo),
now 25 ch and from the second loop from the hook we knit 2 sc in each ch, it will turn out
spiral (see third photo), and continue to knit in the same way on the front
half loops to the end of the row.
Beanie
green yarn crochet No. 2.5.
We knit the tail in a spiral in the usual way
1) in ka 6 sc (6)
2) 6 approx (12)
3) (1 sc, inc) * 6 (18)
4) for the back half loops 12 sc, 3 decreases (15)
5) 11 sc, decrease, 1 sc (13)
6) 9 sc, decrease, 1 sc (11)
7) decrease, 9 sc (10)
8) -12) 10 sbn (5 rows of 10 sbn each)
13) 10 approx (20)
14) in this row we knit arches for leaves
(4 sc, 6 air loops) * 5, connecting loop. Now you have 5 arches,
so you end up with 5 leaves. We knit leaves according to the pattern of leaves for
collar. Stuff some filler into the stem. Similar to knitting
collar, you can also make antennae with light green yarn.
Head
Conrad is crocheted orange with a Nr2.5 crochet hook
(knit in spiral rows)
1) In ka 6 6 sbn (6)
2) 6 approx (12)
3) ( 1 sc, inc) x6 (18)
4) ( 2 sc, inc) x6 (24)
5) ( 3 sc, inc) x6 (30)
6) (4 sc, inc) x6 (36)
7) ( 5 sc, inc) x6 (42)
8) ( 6 sc, inc) x6 (48)
9) ( 7 sc, inc) x6 (54)
10) ( 8 sc, inc) x6 (60)
11) ( 9 sc, inc) x6 (66)
12) ( 10 sc, inc) x6 (72)
13) -25) 72 sc (total 13 rows)
26) ( 10 sc, dec) x6 (66)
27) ( 9 sc, dec) x6 (60)
28) ( 8 sc, dec) x6 (54)
29) ( 7 sc, dec) x6 (48)
30) ( 6 sc, dec) x6 (42)
31) ( 5 sc, dec) x6 (36)
32) ( 4 sc, dec) x6 (30)
33) ( 3 sc, dec) x6 (24)
Leave a longer thread than usual, then cut.
Evenly fill the head with holofiber and sew a hole with a thread.
Konrad crocheted with yarn of light green color crochet No. 2.5 (swivel
rows)
1) a chain of 32 ch, with 3 pv from the hook, 29 dc
2) 3 ch (replaces the first dc), dc to the end of the row
3) Turn, ch 1, only in the far half loops of the sc to the end of the row
4) ch 3 (replaces the first dc), only in the far half-loop dc to the end of the row,
to turn
5R. 3 ch (replaces the first dc), only in the far half-loop dc to the end of the row.
ch 1, turn now, fold in half and tie along the entire length of the sc. Now you
you can double stitch.
Take your hand, attach the thread and start again, knit 6 ch and
connect with the first loop of this chain, now ch 3.
Work the sheet exactly as you did before with the collar and hat.
Conrad. Fasten the thread. The same with the second hand.
Eyes
Whites of the eyes 2 pcs
Knit with white yarn crochet No. 2.52
In ka 7 sc in the first row, fasten the thread.
Nose
Konrad is crocheted with pale yellow yarn No. 2.5 (here again according to
spirals)
1) In ka 6 sc (6)
2) ( 1 sc, inc) x3 (9)
3) ( 2 sc, inc) x3 (12)
4) -7) 12 sc (4 rows)
8) (2 sc, dec) * 3 (9)
Stuff your nose with holofiber.
9) (1 sc, dec) * 3 (6),
close the hole, fasten the thread.
Shoes 2 pcs
brown yarn hook number 2.5 (knit in spiral rows)
1) In ka 6 sc (6)
2) 6 approx (12)
3) (1 sc, inc) * 6 (18)
4) (2 sc, inc) * 6 (24)
5) (3 sc, inc) * 6 (30)
6) (4 sc, inc) * 6 (36)
7) (5 sc, inc) * 6 (42)
8) 42 sc, cut the thread.
Now knit rows 1-8 again, now connect both parts of the sc for the inner
half loops. Just before the end, lightly stuff the shoe
holofiber and finish the row.
Knit the second boot in the same way.
Crochet small mushrooms No. 2 with two different shades
brown and white yarn.
1) brown yarn
In ka 6 sc (6)
2) (2 sc, inc) * 3 (9)
3) 9 sc
4) (3 sc, inc) x3 (12)
5) 12 sc
6) For the front half-loops 12 inc (24), fasten the thread,
then again tie the leg behind the back half loops with white yarn and connect
loop (6sc)
For the small mushroom:
4 rows of 6 sc
For the big mushroom:
7 rows of 6 sc.
Finishing: just tie in the front half loops
(1 sc, inc) x3 (9), fasten the thread.
So, all parts are done.
Assembly
Now we will dedicate ourselves to the head, we will thread a long thread into a darning needle,
pierce the upper center and pull the thread from the bottom, tie both ends,
tightening tightly to form sectors. See from the photo a wide space should be left for the face.
Now mark the place for the eyes with pins. See photo how to do
eye tighteners. Now sew the thread through the head, back and forth along
mark, pulling lightly to form indentations for the eyes. Now
Glue the eyes and whites of the eyes to the head. Sew or glue the nose to
head .
Now that you’ve decided what your mouth should look like, you can start
embroider with black thread. Then just do your eyebrows.
Now glue the collar on the hole.
Attach the finished head to the middle of the collar.
You can now push the fairy lights down the hole. Later
Lay Conrad on a flat surface and place his shoes first
find the position in front, changing your shoes
sustainable. If you have found the right position for balance
toys, glue your shoes.
The stick will be at the tip of the shoe. You can now paste
hands on the right and left under the collar and on the hips. All you need now
Hats off to Conrad.
Feel free to tag me (@freeamigurumii) in your photos on Instagram or Facebook if you’d like!
All Finished.