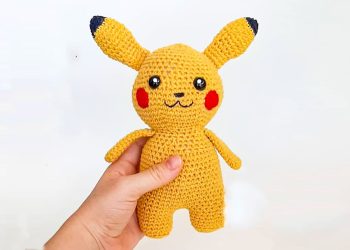
Hello amigurumi lovers and beautiful visitors, I wanted to share the free amigurumi patterns for you here. In my article I will share 1 pattern and how to make it for you.
Materials
• Yarn; number red black
• Fiber for filling
• Plastic eye accessory
• Scissors
Abbreviations
Sc – single crochet
Inc – increase
Dec– decrease
MR – magic ring
BLO– Back loop only
Ch – chain
Arms x2
Rnd 1. 6 sc in the magic ring (6)
Rnd 2. inc (12)
Rnd 3-14. 12 sc (12)
Rnd 15. join both sides and make 6 sc closing the arm.
Save it for later sewing it together with the last row of the body.
Legs x2
Rnd 1. 6 sc in the magic ring (6)
Rnd 2. inc (12)
Rnd 3. (sc, inc) (18)
Rnd 4. 18 sc BLO (18)
Rnd 5-8. 18 sc (18)
Finish off the 1st leg and do not cut the thread from the 2nd. Stuff your legs.
Body
Do 3 ch in the 2nd leg and join with the 1st
Rnd 9. 18 sc, 3 sc at ch, 18 sc, 3 sc on the other side of ch (42)
Rnd 10-24. 42 sc (42)
Rnd 25. (5 sc, dec) (36)
Rnd 26. 36 sc (36)
Rnd 27. (4 sc, dec) (30)
Rnd 28. 30 sc (30)
Rnd 29. 30 sc (30)
Sew the arms in this row. fill the body
Head
Rnd 30. (4 sc, inc) (36) on the loop left over from the previous row
Rnd 31. (5 sc, inc) (42)
Rnd 32. (6 sc, inc) (48)
Rnd 33. (7 sc, inc) (54)
Rnd 34. (8 sc, inc) (60)
Rnd 35-38. 60 sc (60)
Rnd 39. (8 sc, dec) (54)
Rnd 40. (7 sc, dec) (48)
Rnd 41. (6 sc, dec) (42)
Rnd 42. (5 sc, dec) (36)
Rnd 43-45. 36 sc (36)
Start filling your head
Rnd 46. (4 sc, dec) (30)
Rnd 47. (3 sc, dec) (24)
Rnd 48. (2 sc, dec) (18)
Rnd 49. (1 sc, dec) (12)
Encher a cabeça
Rnd 50. dec [6)
Cast off and leave thread to close with an inverted magic ring.
Ears
Start with black
Rnd 1. 6 sc at the MR (6)
Rnd 2. (1 sc, inc) (9)
Rnd 3. 9 sc (9)
Rnd 4. (2 sc, inc) (12)
Rnd 5-6. 12 sc (12)
Change to yellow
Rnd 7. (3 sc, inc (15)
Rnd 8. 15 sc (15)
Rnd 9. (4 sc, inc) (18)
Rnd 10-11. 18 sc (18)
Rnd 12. (4 sc, dec) (15)
Rnd 13. (3 sc, dec) (12)
Rnd 14-15. 12 sc (12)
Rnd 16. join both sides and make 6 sc, fasten off and leave yarn for sew on the head.
Cheeks
Wear red
Rnd 1. 3 sc at the MR (3)
Rnd 2. (inc) (6)
Rnd 3. (1 sc, inc) (9)
Cast off and leave yarn to sew to the head.
Assembly
Sew the ears and cheeks, embroider the muzzle and mouth.
You can embroider the eyes or add a little eye.
I put the little eye and painted it white with a pen.
Feel free to tag me (@freeamigurumii) in your photos on Instagram or Facebook if you’d like!
All Finished.