Hello amigurumi lovers and beautiful visitors, I wanted to share the free amigurumi patterns for you here. In my article I will share 1 pattern and how to make it for you. At the end of my article, I will share amigurumi patterns that can generate ideas for you.
Materials:
1. Alize Cotton Gold yarn No. 21 (gray), No. 161 (powder), No. 243 (red), Yarn Art Jeans No. 62 (white)
2. Filler (holofiber)
3. Hook No. 2
4. Black half beads for eye 10 mm (2 pcs.)
5. Glue
6. Black sewing thread or floss for decorating the muzzle
7. Thick needle for stitching parts
8. Scissors
⠀
Symbols:
k.a. – amigurumi ring
v.p. – air loop
vp p. – air loop lifting
ss – connecting column
sc – single crochet
psn – half
-column double crochet sn – double crochet
pr – increase (2 columns in 1 loop)
dec – decrease (2 columns together)
zpp – back half loop
(…) – the number in brackets means the number of loops in a row
Legs (2 parts)
We start with a powder-colored thread:
1 row: 6 sc in k.a.
2nd row: (inc, 1 sbn) * 3 (9)
3rd row: inc, 8 sbn (10)
4th row: inc, 9 sbn (11)
Change the thread to gray:
5th row: inc, 10 sbn (12)
6 row: inc, 11 sbn (13)
7th row: inc, 12 sbn (14)
8th row: inc, 13 sbn (15)
9th row: 15 sbn Cut the
thread, fill it. We knit the second leg in the same way, we fill it, at the end of knitting we do not cut the thread.
Torso We
continue to knit with a gray thread. Fill tightly as you knit.
From the second leg we collect a chain of 3 ch, insert the hook into the loop from the inside of the first leg and knit in a circle:
1 row: 15 sb on the first leg, 3 sb on one side of the chain, 15 sb on the second leg, 3 sb on the reverse side of the chain (36)
2 row: (5 sb, inc) * 6 (42)
3 row: 3 sb , inc, (6 sc, inc) * 5, 3 sc (48)
4 row: (7 sc, inc) * 6 (54)
5-9 row: 54 sc
10 row: (7 sc, dec) * 6 ( 48)
11 row: 48 sc
12 row: 3 sc, dec, (6 sc, dec) * 5, 3 sc (42)
13 row: 42 sc
14 row: (5 sc, dec) * 6 (36)
15 row : 36 sc
16 row: 5 sc, dec, (10 sc, dec) * 2, 5 sc (33)
17 row: 33 sc
18 row: (9 sc, dec) * 3 (30)
19 row: 30 sc
20 row: 4 sc, dec, (8 sc, dec) * 2, 4 sc (27)
21 row: 27 sc
22 row: (7 sc, dec) * 3 (24)
23 row: 24 sc
We cut the thread, leaving the long end of the thread for sewing.
Head
We knit with a thread of the main color, fill it tightly as we knit.
1 row: 6 sc in k.a.
2 row: 6 inc (12)
3 row: (1 sc, inc) * 6 (18)
4 row: 1 sc, inc, (2 sc, inc) * 5, 1 sc (24)
5 row: (3 sc , inc) * 6 (30)
6 row: 2 sb, inc, (4 sb, inc) * 5, 2 sb (36)
7 row: (5 sb, inc) * 6 (42)
8 row: 3 sb, inc, (6 sc, inc) * 5, 3 sc (48)
9 row: (7 sc, inc) * 6 (54)
10 row: 4 sc, inc, (8 sc, inc) * 5, 4 sc ( 60)
11-20 row: 60 sc
21 row: 4 sc, dec, (8 sc, dec) * 5, 4 sc (54)
22 row: (7 sc, dec) * 6 (48)
23 row: 3 sc , dec, (6 sc, dec) * 5, 3 sc (42)
24 row: (5 sc, dec) * 6 (36)
25 row: 2 sc, dec, (4 sc, dec) * 5, 2 sc (30)
26 row: (3 sc, dec) * 6 (24)
27 row: 1 sc, dec, (2 sc, dec) * 5, 1 sb (18)
28 row: (1 sb, dec) * 6 (12)
29 row: 6 dec (6)
We tighten the hole, hide the thread inside the part.
⠀
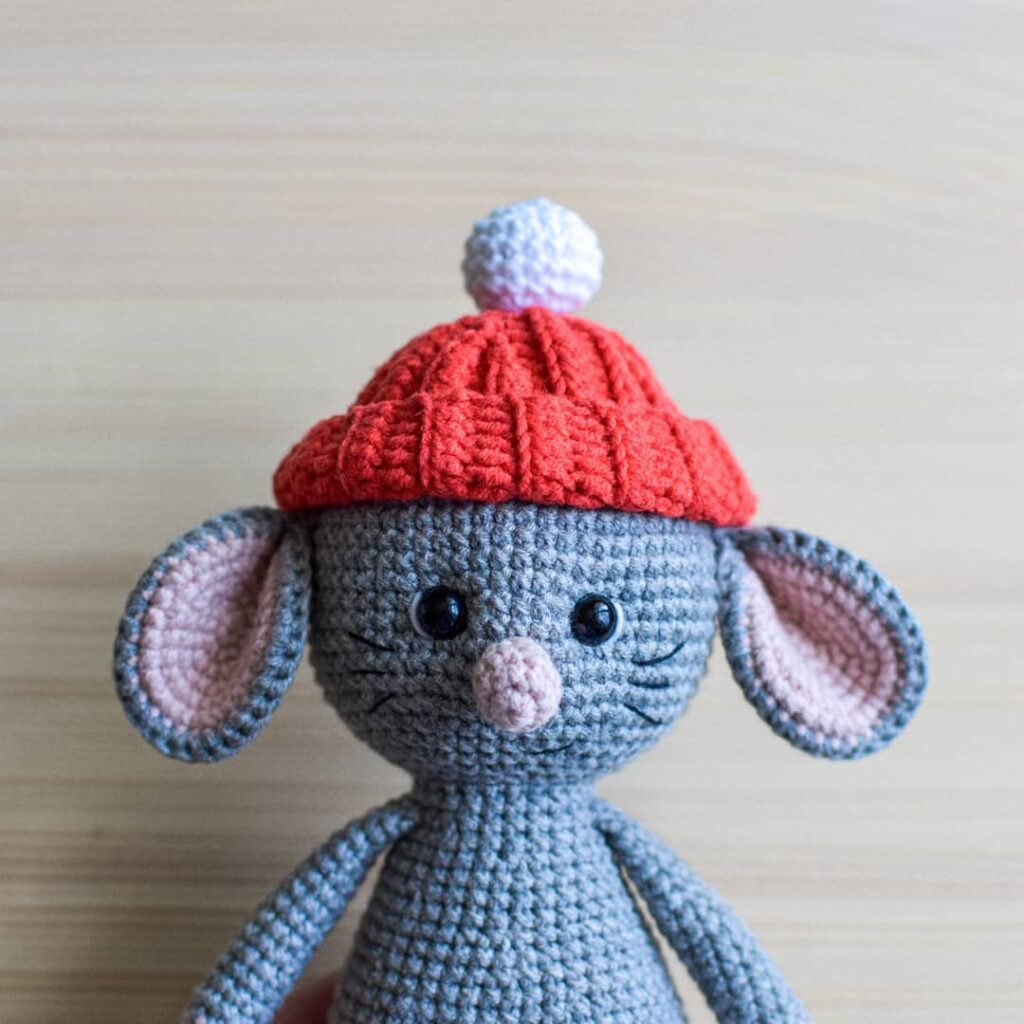
Ears⠀ We
knit the inner ear (2 parts) with a powder-colored thread:
1 row: 6 sc in k.a.
2 row: 6 inc (12)
3 row: (1 sc, inc) * 6 (18)
4 row: 1 sc, inc, (2 sc, inc) * 5, 1 sc (24)
5 row: (3 sc , inc) * 6 (30)
6 row: 2 sb, inc, (4 sb, inc) * 5, 2 sb (36) Cut the
thread.
We knit the outer ear (2 parts) with a thread of the main color:
1 row: 6 sc in k.a.
2 row: 6 inc (12)
3 row: (1 sc, inc) * 6 (18)
4 row: 1 sc, inc, (2 sc, inc) * 5, 1 sc (24)
5 row: (3 sc , inc) * 6 (30)
6 row: 2 sb, inc, (4 sb, inc) * 5, 2 sb (36)
We do not cut the thread.
We put the outer and inner ear together (wrong side to wrong side) and connect with one row of 36 sc (as shown in the photo). Fold the ear in half and connect the edges, knitting 3 sc. We cut the thread, leaving a long end for sewing. ⠀
Nose
We knit with a powder-colored thread:
1 row: 6 sc in k.a.
2 row: 6 inc (12)
3 row: 12 sc
4 row: 6 dec (6) Cut the
thread, leaving a long end for sewing. Fill in the details.
Handles (2 parts)⠀
We start knitting with a powder-colored thread: Fill
up to the 13th row.
1 row: 6 sc in k.a.
2 row: inc, 5 sb (7)
3 row: inc, 6 sb (8)
Change the thread to gray
4 row: inc, 7 sb (9)
5 row: inc, 8 sb (10)
6-13 row: 10 PRS
14 row: dec, 8 PRS (9)
15 row: 9 PRS
16 row: dec, 7 PRS (8)
17 row: 8 PRS
We knit additional 4 PRS, fold the part in half, connect the edges, knitting 4 PRS. We cut the thread, leaving a long end for sewing.
We knit the second handle in the same way. ⠀
⠀
Tail
We knit with a powder-colored thread:
Do not fill.
1 row: 6 sc in k.a.
2-21 row: 6 sbn Cut the
thread, leaving a long end for sewing.
Assembling the toy:
1. With the help of pins, try on the head to the body and start sewing. As we sew, we stuff the neck tightly so that it does not dangle under its own weight.
2. Sew on the handles at the level of the 22nd row of the body.
3. Sew the tail between the 6th and 9th rows of the body.
4. Sew on the nose between rows 17 and 20 of the head.
5. We try on the ears to the head, as shown in the photo, and sew them at the level of the 12th row of the head.
Making a mouse:
We make a tightening for the eye. To do this, we mark points 1 and 2 between 15 and 16 nearby at a distance of 7 sc and points 3 and 4 between 17 and 18 nearby at a distance of 7 sc under points 1 and 2 (as shown in the photo). Now we insert the needle into the head, fix the thread and bring it out at point 1, then we insert it into the head at point 3 and bring it out at point 2, we tighten the thread. Again we insert the needle into the head at point 4 and withdraw it at point 1, we tighten the thread. We repeat this movement 2-3 times. We fix the thread, cut it and hide it inside the head. ⠀ Glue on the
eyes. With a white thread we embroider the whites of the eyes, with a black thread we embroider the antennae and mouth.
It remains to tighten the navel.
To do this, we outline points 1 and 2 between the 9th and 10th rows of the body at a distance of 1 sc. We insert the needle from the side of the back, bring it out at point 2, insert it at point 1 and bring it out at the starting point on the back, pull the navel, tie the ends of the threads into a knot and hide them in the body.
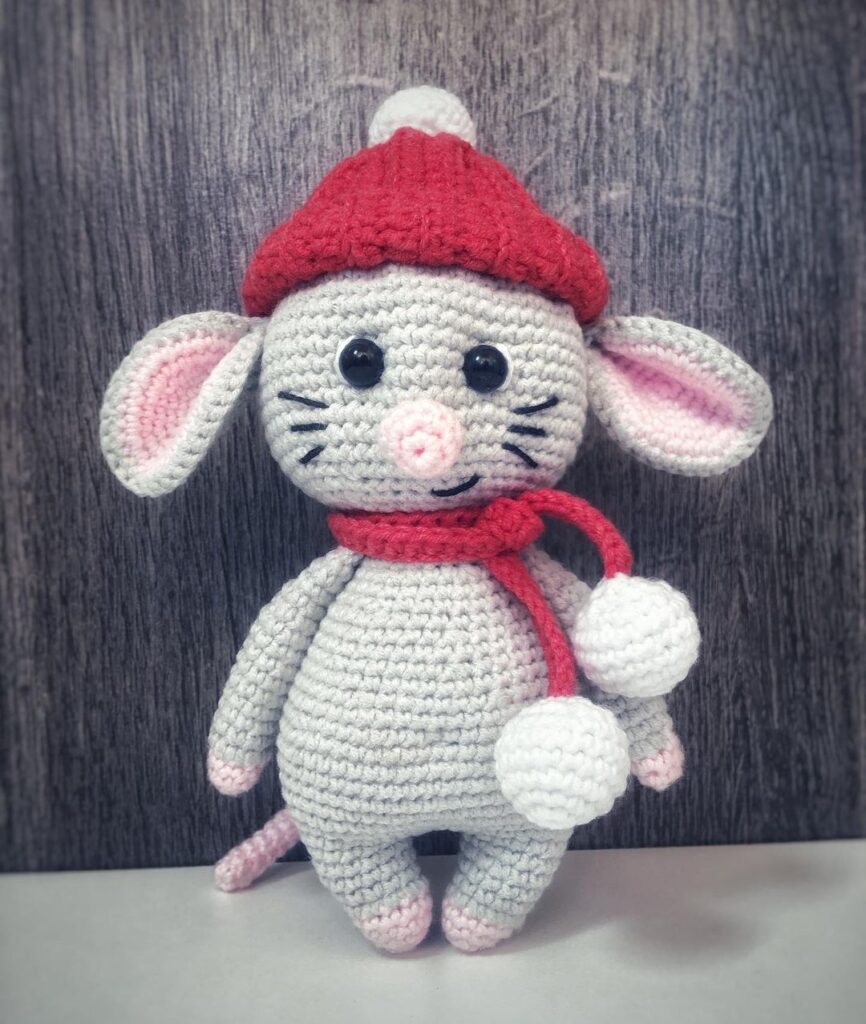
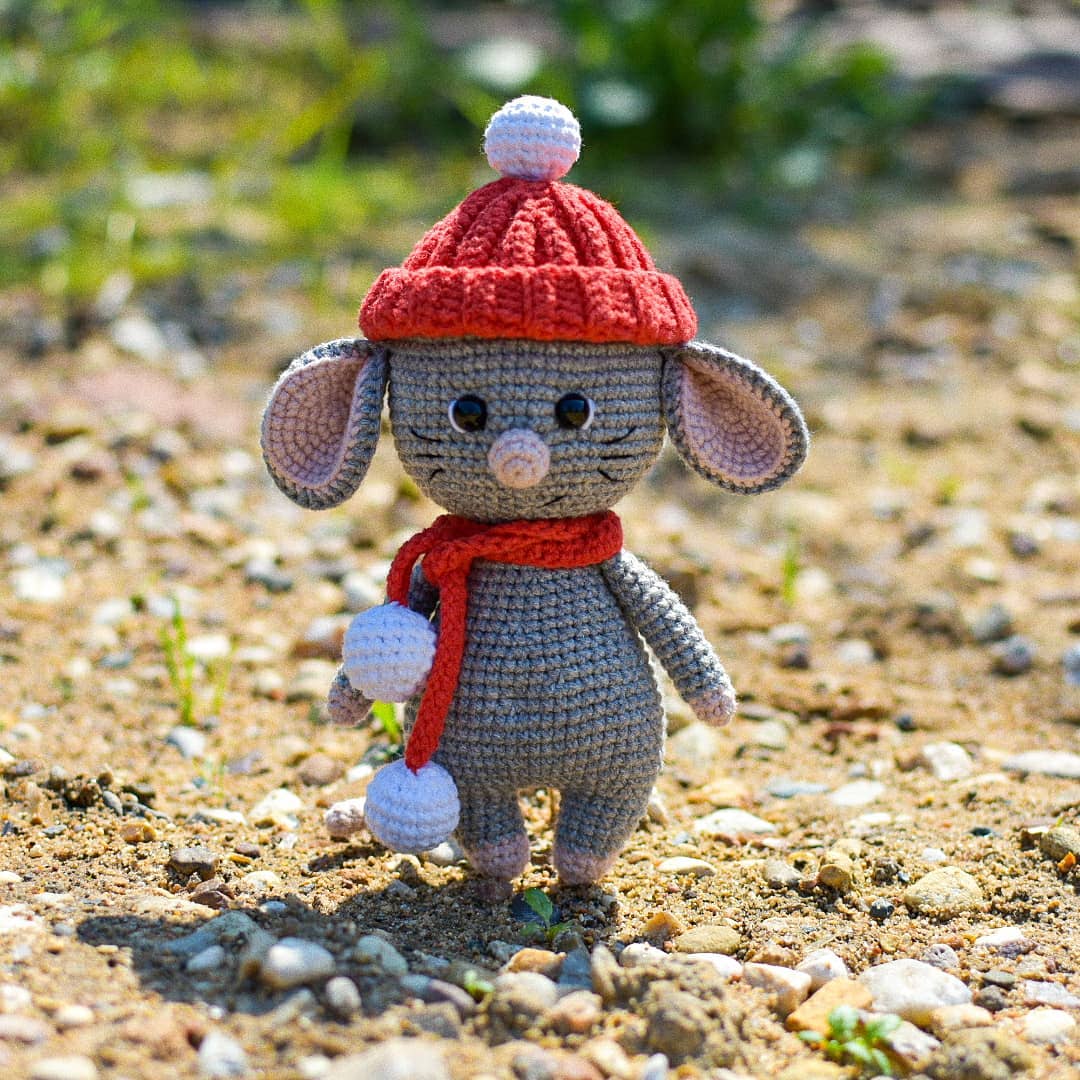
Cap
We knit with a red thread:
We collect a chain of 24 ch, insert the hook into the 3rd loop from the hook and knit with turning short rows for the back half-loops according to the scheme:
1 row: 14 psn, 1 sbn, 1 sl-st, turn the knitting ( you should have a free chain of 6 ch, see photo 1)
2 row: 1 ch, 1 sb, 15 dc, turn knitting (see photo 3)
3 row: 2 ch, 15 dc, 1 sb, 1 sb in the loop of the remaining chain (see photo 4), 1 sl-st in the next loop of the remaining chain, turn knitting (there should be a free chain of 4 ch ., see photo 5)
4 row: 1 chp, 1 sbn, 17 dc, turn knitting
5 row: 2 chp, 17 dc, 1 sbn (see photo 6), 1 sb in the loop of the remaining chain (see photo 7), 1 sl-st in the next loop of the remaining chain, turn the knitting (there should be a free chain of 2 ch, see photo 8)
6 row: 1 ch, 1 sbn, 19 dc, turn knitting
7 row: 2 ch, 19 dc, 1 sbn, 1 sbn in the loop of the remaining chain, 1 sl-st in the last loop of the remaining chain, turn the knitting (see photo 9)
8 row : 1 vp, 1 sbn, 21 dc, turn knitting
9 row: 2 ch, 14 dc, 1 sb, 1 sl-st, turn knitting (leave 6 sb not knitted, see photo 10)
10 row: 1 ch, 1 sb, 15 dc, turn the knitting (see photo 11)
11 row: 2 ch, 15 dc, 1 sb (see photo 12), 1 sb in the 1st untied loop of the 9th row (see photo 13), 1 sl-st in the 2nd untied loop of the 9th row, turn the knitting (4 untied loops should remain in the 9th row, see photo 14)
12th row: 1 ch, 1 sb, 17 dc, turn knitting (see photo 15)
13 row: 2 chp, 17 dc, 1 sbn, 1 sbn in an untied loop of the 9th row, 1 sl-st in the next untied loop of the 9th row, turn knitting (at 9 th row should remain 2 untied loops)
14 row: 1 ch, 1 sbn, 19 dc, turn knitting
15 row: 2 ch, 19 dc, 1 sb, 1 sb in the untied loop of the 9th row, 1 sl-st in the last untied loop of the 9th row, we turn knitting
16 row: 1 ch.p.p. , 1 sb, 21 dc, turn knitting
17 row: 2 ch, 14 dc, 1 sb, 1 sl-st, turn knitting (leave 6 sb not knitted)
18 row: 1 ch, 1 sb , 15 dc, turn knitting
19 row: 2 ch, 15 dc, 1 sb, 1 sb in the 1st untied loop of the 17th row, 1 sl-st in the 2nd untied loop of the 17th row, turn knitting (4 untied loops should remain in the 17th row)
20 row: 1 ch, 1 sb, 17 dc, turn knitting
21 row: 2 ch, 17 dc, 1 sbn, 1 sbn in the untied loop of the 17th row, 1 sl-st in the next untied loop of the 17th row, turn knitting (2 untied loops should remain in the 17th row loops)
22 row: 1 chp, 1 sbn, 19 dc, turn knitting
23 row: 2 chp, 19 dc, 1 sbn, 1 sbn in the untied loop of the 17th row, 1 sl-st in the last untied loop of the 17th row, we turn the knitting of the
24th row: 1 ch, 1 sbn, 21 dc, we turn the knitting of the
25th row: 2 chp, 14 dc, 1 sb, 1 sl-st, turn knitting (leave 6 sbn untied)
26 row: 1 chp, 1 sbn, 15 dc, turn knitting
27 row: 2 ch, 15 dc, 1 sb, 1 sb in the 1st untied loop of the 25th row, 1 sl-st in the 2nd untied loop of the 25th row, turn knitting (in the 25th there should be 4 untied loops in the row)
28 row: 1 chp, 1 sbn, 17 dc, turn knitting
29 row: 2 chp, 17 dc, 1 sbn, 1 sbn in an untied loop 25- row, 1 sl-st in the next untied loop of the 25th row, turn knitting (2 untied loops should remain in the 25th row)
30 row: 1 ch, 1 sbn, 19 dc, turn knitting
31 row: 2 ch, 19 dc, 1 sb, 1 sb in an untied loop of the 25th row, 1 sl-st in the last untied loop of the 25th row, turn knitting
32 row: 1 ch, 1 sb , 21 psn (see photo 16)
We connect the edges of the cap, knitting 22 sl-st (see photo 17), we connect the crown of the cap with 3 sc. We fix the thread and cut it (see photo 18, 19). Now we knit a pompom with a white thread according to the scheme (see photo 20):
1 row: 6 sc in k.a.
2 row: 6 inc (12)
3 row: (1 sc, inc) * 6 (18)
4-6 row: 18 sc
7 row: (1 sc, dec) * 6 (12)
8 row: 6 dec (6 )
We fill. We tighten the hole, hide the thread inside the part. Sew the pompom to the hat (see photo 21).
Scarf
We knit with a red thread:
We collect a chain of 82 ch, insert the hook into the 3rd loop from the hook and knit 80 hc.
We cut the thread, leaving the end for sewing on the 1st pom-pom.
We knit two pompoms with a white thread in the same pattern as for the hat and sew them to the ends of the scarf.
Feel free to tag me (@freeamigurumii) in your photos on Instagram or Facebook if you’d like!
All Finished.