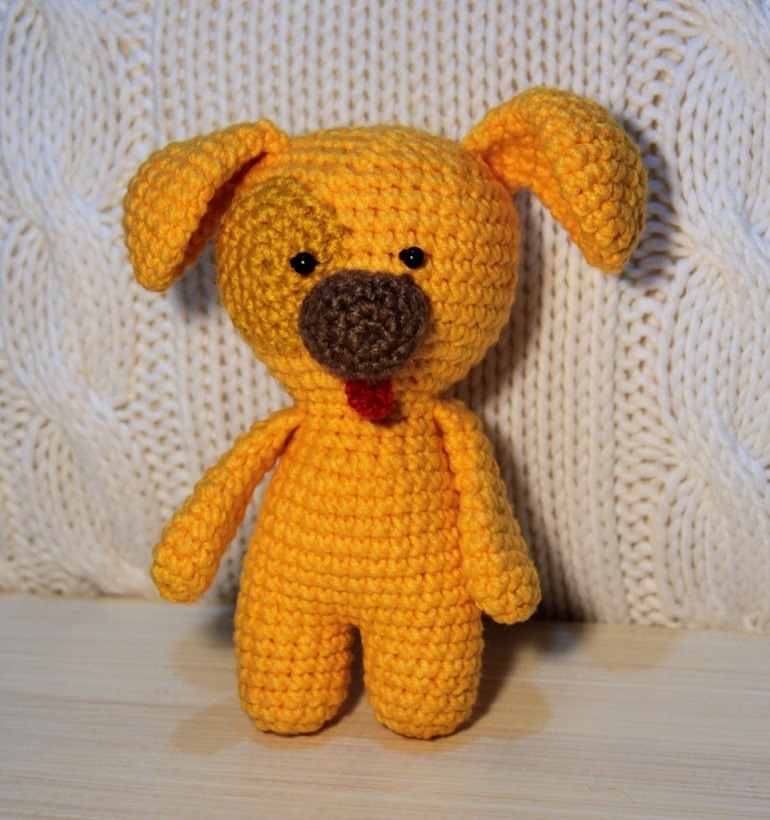
Hello amigurumi lovers and beautiful visitors, I wanted to share the free amigurumi patterns for you here. In my article I will share 1 pattern and how to make it for you. At the end of my article, I will share amigurumi patterns that can generate ideas for you.
Tools and materials:
- Hooks: No. 2.5 (main hook) and No. 3 (only for knitting the head).
- Yarn: Main YarnArt Jeans Yellow, Halo Red Poppy for the tongue, Halo Cappuccino for the muzzle, Aleze Lanagold for the tail and eye spot. You can choose colors and yarn to your liking, but the threads for the muzzle and tongue should be 2 times thinner than the main yarn.
- Eyes on a secure mount or 2 beads.
- Holofiber for stuffing.
Abbreviations:
RLS – single crochet
VP – air loop
P – loop
UB – decrease (knit 2 loops with one RLS)
PR – increase (2 RLS in one loop)
SP – connecting loop
R – row
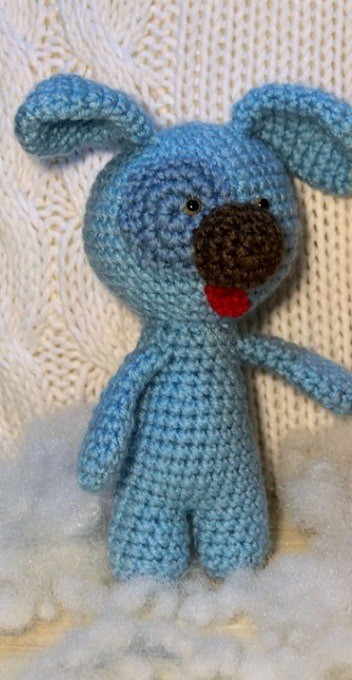
Toy size: 11 cm
Hand (2 parts)
1 R – 2 VP, 6 RLS = (6 P). [Dial 2 air loops, knit 6 sc in the second loop from the hook]
2 R – 6 PR \u003d (12 P). [Knit 6 increments in a row]
3-6 R – 12 RLS = (12 P)
7 R – (RLS, UB) 4 times = (8 P)
8-11 R – 8 RLS = (8 P)
12 R – fold the part knit in half, capturing the loops 2 RLS, UB, SP \u003d (3 P).
Cut the thread, leaving a short tail.
Legs-torso-head
We start knitting by knitting 2 parts of the legs from 1 to 7 rows inclusive. We knit the first leg and cut the thread, leaving a short tip. Having knitted the 7th row of the second leg, in the 8th row we connect the parts into one part of the body:
1 P – 2 VP, 7 RLS = (7 P). [Dial 2 air loops, knit 7 sc in the second loop from the hook]
2 R – 7 PR = (14 P). [Knit 6 increments in a row]
3-7 P – 14 RLS = (14 P). [Knit 5 rows in a circle without changes, 1 sc in each loop of the previous row]
8 P – 13 sc, 2 inc, 13 sc = (30 p)
9 p – 14 sc, 2 inc, 14 sc = (32 p)
10 -16 R – 32 RLS = (32 P). [Knit 6 rows in a circle without changes, 1 sc in each loop of the previous row]
17 R – 13 RLS, 4 UB (the place of this group of decreases is the back of the toy), 11 RLS \u003d (28 P)
18 R – (2 RLS, UB) 7 times \u003d (21 P)
19 R – (UB, 5 RLS) 3 times \u003d (18 P)
20 R – 18 RLS \u003d (18 P)
21 R – 4 RLS, we knit the arm: we attach the part of the arm to the body and knit 3 RLS, simultaneously capturing the loops of the arm and body, 6 RLS, we knit the second hand in the same way the first: 3 RLS, 2 RLS = (18 P)
22 R – 18 RLS = (18 P)
We fill the part of the body with holofiber
We proceed to knitting the head. Attention!!! Go to hook No. 3
23 R – (2 RLS, CR) 6 R \u003d (24 P)
24 R – (3 RLS, CR) 6 R \u003d (30 P)
25 R – (4 RLS, CR) 6 R \u003d ( 36 P)
26 R – (5 RLS, PR) 6 R \u003d (42 P)
Next, we knit 6 rows without changes, 1 sc in each loop of the previous row.
27-32 R – 42 RLS \u003d (42 P)
33 R – (5 RLS, UB) 6 R \u003d (36 P)
34 R – (4 RLS, UB) 6 R \u003d (30 P)
35 R – (3 RLS , UB) 6 R = (24 P)
ATTENTION! If you chose the eyes on a secure fastening, then before continuing to knit further, tie a spot on the eye socket, sew it to the head and insert the eyes.
36 R – (2 RLS, UB) 6 R = (18 P)
37 R – (RLS, UB) 6 R = (12 P)
38 R – 6 UB, SP = (6 P)
Cut the thread more authentically with a hook to collect the remaining 6 loops on the end of the cut thread and pull off the knitting, fasten the thread with a knot and hide the tip inside the toy with a hook.
Eye spot
1 R – 2 VP, 6 RLS = (6 P). [Dial 2 air loops, knit 6 sc in the second loop from the hook]
2 R – 6 PR \u003d (12 P). [Knit 6 increments in a row]
3 R – (SC, PR) 6 R \u003d (18 P)
4 R – (2 RLS, PR) 6 R \u003d (24 P)
Sew to the head in the region of the right eye socket between the 5th and 13th rows from the crown.
Muzzle
1 R – 2 VP, 6 RLS = (6 P). [Dial 2 air loops, knit 6 sc in the second loop from the hook]
2 R – 6 PR \u003d (12 P). [Knit 6 increases in a row]
3-4 R – 12 RLS = (12 P)
5 R – (RL, PR) 6 R = (18 P)
Sew between the 10th and 14th rows.
Tongue
1 P – dial 3 VP, in the second from the hook into the upper half loop, knit 1 PR into the next upper half loop, knit RLS.
Sew detail under the muzzle.
Right ear
1 R – 2 VP, 6 RLS = (6 P). [Dial 2 air loops, knit 6 sc in the second loop from the hook]
2 R – 6 PR \u003d (12 P). [Knit 6 increments in a row]
3 R – (SC, PR) 6 R \u003d (18 P)
4 R – (2 RLS, PR) 6 R \u003d (24 P)
5-8 R – 24 RLS \u003d (24 P). [Knit 4 rows in a circle without changes, 1 sc in each loop of the previous row]
9 P – (4 sc, dec) 4 p = (20 p)
10 p – (2 sc, dec) 5 p = (15 p)
11 R – (3 RLS, UB) 3 R \u003d (12 P)
12 R – 12 RLS \u003d (12 P)
13 R – fold the ear part in half and, capturing the loops of both sides of the part, knit 6 RLS = (6 P)
Fold the ear part in half, sweep over the edge with a seam and sew to the head in the third row from the crown.
Left ear
1 R – 2 VP, 6 RLS = (6 P). [Dial 2 air loops, knit 6 sc in the second loop from the hook]
2 R – 6 PR \u003d (12 P). [Knit 6 increments in a row]
3 R – (SC, PR) 6 R \u003d (18 P)
4 R – (2 RLS, PR) 6 R \u003d (24 P)
5-8 R – 24 RLS \u003d (24 P). [Knit 4 rows in a circle without changes, 1 sc in each loop of the previous row]
9 P – (4 sc, dec) 4 p = (20 p)
10 p – (2 sc, dec) 5 p = (15 p)
11 R – (3 RLS, UB) 3 R \u003d (12 P)
12 R – 12 RLS \u003d (12 P)
13 R – 12 RLS \u003d (12 P)
14 – fold the ear part in half and grabbing the loops of both sides of the part, knit 3 RLS , UB, RLS = (5 P)
Cut the thread and sew the ear to the head in the 4th row from the top of the head, giving the ear some “burr”.
Tail
1 R – 2 VP, 5 RLS = (5 P). [Dial 2 air loops, knit 5 sc in the second loop from the hook]
2-3 P – 5 PRS = (5 P). [Knit 2 rows in a circle without changes, 1 sc in each loop of the previous row]
Sew the tail between the 5th and 6th row of the body.
Eyes
Insert eyes on a secure fastening or sew on beads in the 9th row from the crown of the head, the distance between the eyes is 4-5 loops.
Feel free to tag me (@freeamigurumii) in your photos on Instagram or Facebook if you’d like!
All Finished.