Hello amigurumi lovers and beautiful visitors, I wanted to share the free amigurumi patterns for you here. In my article I will share 1 pattern and how to make it for you. At the end of my article, I will share amigurumi patterns that can generate ideas for you.
Materials and tools:
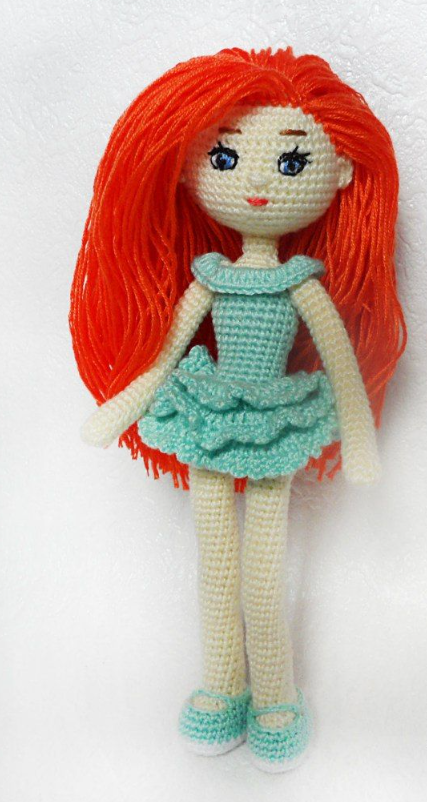
1. Yarn Pekhorka Lace (acrylic 100%, 280 m / 50 g). Color: severe, white, mint, bright orange.
( You can use any yarn that is convenient for you )
2. Thread floss for embroidery of the face. Color: black, pink, blue, brown.
3. Filler (holofiber, synthetic winterizer)
4. Wire – copper insulated, 1.5 mm.
5. Adhesive plaster based on cotton.
6. A piece of plastic for insoles.
7. Hook 1.25
8. Needle for sewing details and embroidery of the face.
When using these materials, the height of the doll is 18 cm.
Legend:
KA – amigurumi ring
sc – single crochet
dec – decrease (knit two loops for the front walls together sc)
pr – increase (knit 2 sc in one loop)
ssn – double crochet
pr ss – increase ss (knit 2 ss in one loop)
ss – connecting column
vp – air loop
Legs
We knit in beige color (severe)
Tie a chain of 6 ch
1 row – from the second loop from the hook: 4 sbn, 3 sbn in the extreme loop; on the other side: 3 sc, inc (12)
2 row – inc, 3 sc, 3 inc, 3 sc, 2 inc (18)
3 row – 1 sc, inc, 3 sc, (1 sc, inc) x3, 3 sc, (1 sc, inc) x2 (24)
Cut out the insole.
4 row – 24 sc for the back walls
5, 6 rows – 24 sc
1 offset loop
7 row – 2 sc, (1 sc, dec) x6, 2 sc, dec (17)
8 row – 2 sc, 6 dec, 2 sc , pr (12)
Insert the insole and wire approximately 20-22 cm long. Stuff with filler as you knit.
9 – 38 rows – 12 sbn
At one leg, cut the thread, thread. Do not cut off the second thread.
Body
1 offset loop. The marker should be in the center of the inside of the leg.
Attach a white thread (we knit panties).
1 row – right leg: 6 sb, (inc, 1 sb) x3, 3 ch, left leg: (1 sb, inc) x3, 6 sb (33)
2 row – 3 sb in the chain, 15 sb on the right leg, 3 sbn in a chain, 15 sbn on the right leg (36)
Connect the wire and secure with a plaster.
3 row – 36 sc
4 row – 9 sc, dec, 17 sc, dec, 6 sc (34)
5 row – 17 sc, 2 dec, 13 sc (32)
6 row – 9 sc, dec, 14 sc, dec, 5 sc (30)
7 row – 9 sc, dec, 12 sc, dec, 5 sc (28)
8, 9 rows – 28 sc
10 row – 9 sc, dec, 4 sc, dec, 1 sc, dec, 4 sc , dec, 2 sc (24)
(Check: 1 sc in the 10th row is the middle of the back)
Change the thread to a mint color. Stuff while knitting.
11 row – (2 sc, dec) x6 (18)
12 row – 18 sc for the back walls of the loop
13-16 rows – 18 sc
17 row – 7 sc, inc, 8 sc, inc, 1 sc (20). Side additions.
18 row – 20 sb
19 row – 8 sb, inc, 9 sb, inc, 1 sb (22)
20 – 24 rows – 22 sb
15 offset loops.Marker in the center of the back.
Change thread to flesh .
25 row – 4 sbn, 2 dec, 7 sbn, 2 dec, 3 sbn (18) – behind the back walls. Decreases on the sides – this is the transition to the shoulders.26 row – 3 sb, 2 dec, 5 sb, 2 dec, 2 sb (14)
27 row – 2 sb, 2 dec, 3 sb, 2 dec, 1 sb (10)
Cut the thread, fasten, tuck.
Head
1 row – 6 sc in KA
2 row – 6 inc (12)
3 row – (1 sc, inc) x6 (18)
4 row – (2 sc, inc) x6 (24)
5 row – (3 sc, inc) x6 (30)
6 row – (4 sc, inc) x6 (36)
7 row – (5 sc, inc) x6 (42)
8 row – (6 sc, inc) x6 (48)
9 – 18 rows – 48 sc
19 row – (4 sbn, ub) x8 (40)
20 row – (3 sbn, ub) x8 (32)
21 row – (2 sbn, ub) x8 (24)
Stuff the head with filler.
22 row – (1 sc, dec) x6 (16)
23 row – (2 sc, 3 dec) x2 (10)
Neck
24, 25 rows – 10 sc. The neck can be lengthened by 1-2 rows.
Cut the thread, fasten, thread (or leave it long for further sewing).
Arms
1 row – 6 sb in KA
2 row – (1 sb, inc) x3 (9)
3 – 26 rows – 9 sb
Insert the wire, add filler to the palm.
27 row – (1 sc, dec) x3 (6)
Cut the thread, pull off the loops, fasten the thread, thread (or leave it long for further sewing).DRESS
Rows: 2, 4, 5, 7, 8 start with 3 ch lifts (we count as 1 dc), end with sl-st.
Attach a mint-colored thread to the front loop of 12 rows (sideways)
1 row – 18 inc (36)
First frill
2 row – 36 dc for the front walls
3 row – in each loop: 1 sc, 3 ch, 1 sc Cut the
thread, fasten, refuel.
Second frill
Attach the thread to the back wall of the 1st row
4th row – 36 dc, behind the back walls of the 1st row
5th row – (2 dc, 1 inc dc) x12 (48) – behind the front walls
6th row – like 3rd row
Cut the thread, fasten, fix.
Third frill
Attach the thread to the back wall of the 4th row
7 row – 36 dc
8 row – (3 dc, 1 inc dc) x9 (45)
9 row – like 3rd row
Cut the thread, fasten, thread. Sew on the hands.
Upper frill
Attach the thread to the front wall of the 25th row at the junction of the left arm and torso from the back.
1 row – in each loop of the 25th row, knit sc. Above the hands for 6 ch.
2 row – in each loop – pr ss, over ch 7 ss. Cut the thread, fasten, thread.
Sew on the head. Make sure there is enough filler in the neck.
Outline the position of the eyes, nose and mouth.
Ears
A chain of 2 ch
1 row – in the second from the loop hook: 5 sbn, turn
2 row – 5 sbn Cut
off the thread, sew on the ears. Attach hair.
We knit white.
Knit a chain of 7 ch
1 row – starting from the second loop from the hook: 5 sbn, 3 sbn to the extreme loop, on the second side of the chain: 4 sbn, inc (14)
2 row – inc, 4 sbn, 3 inc, 4 sbn, 2 inc (20)
3 row – 1 sc, inc, 4 sc, (1 sc, inc) x3, 4 sc, (1 sc, inc) x2 (26)
4 row – 26 sc for the back walls
Change the thread to mint
5 , 6 rows – 26 sc
7 row – 6 sc, (1 sc, dec) x4, 6 sc, dec (21)
8 row – 7 sc, 6 ch. Fasten the thread so that a clasp is formed.
Feel free to tag me (@freeamigurumii) in your photos on Instagram or Facebook if you’d like!
All Finished.