Hello amigurumi lovers and beautiful visitors, I wanted to share the free amigurumi patterns for you here. In my article I will share 1 pattern and how to make it for you. At the end of my article, I will share amigurumi patterns that can generate ideas for you.
Materials and tools:
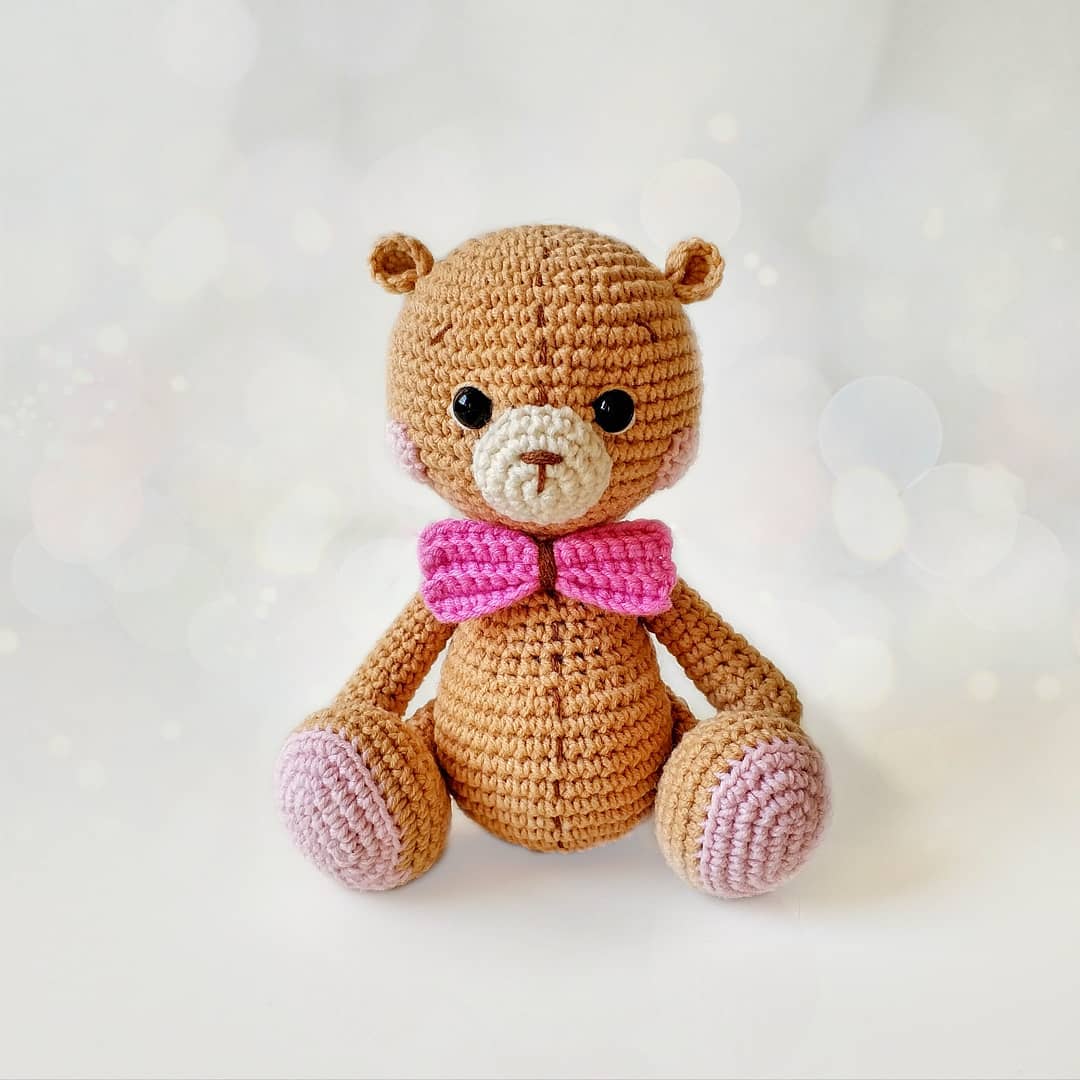
1. Yarn Jeans YarnArt beige (No. 07), light pink (No. 18), hot pink (No. 20), milky (No. 03) and a little brown yarn (No. 40) for decoration
2. Hook No. 2
3. Filler (holofiber)
4. Black semi-beads with a diameter of 8 mm
5. Glue
6. Plastic buttons (4 pcs.) for attaching arms and legs
7. Thick needle for sewing parts
8. Scissors
Symbols:
KA – amigurumi ring
v.p. – air loop
v.p.p. – lifting air loop
sc – single crochet
ss – connecting column
pr – increase
dec – decrease
(…) * n – repeat indicated in brackets n times
(12) – number of loops at the end of the row
Head
Beige yarn:
Fill tightly as you knit.
1: 6 sc in KA (6)
2: 6 inc (12)
3: (1 sc, inc) * 6 (18)
4: 1 sc, inc, (2 sc, inc) * 5, 1 sc (24)
5: (3 sc, inc) * 6 (30)
6: 2 sc, inc, (4 sc, inc) * 5, 2 sc (36)
7: (5 sc, inc) * 6 (42)
8: 3 sb, inc, (6 sb, inc) * 5, 3 sb (48)
9: (7 sb, inc) * 6 (54)
10-17: 54 sb (8 rows)
18: (7 sb, dec) * 6 (48)
19: 3 sc, dec, (6 sc, dec)*5, 3 sc (42)
20: (5 sc, dec)*6 (36)
21: 2 sc, dec, (4 sc, dec) ) * 5, 2 sc (30)
22: (3 sc, dec) * 6 (24)
23: 1 sc, dec, (2 sc, dec) * 5, 1 sc (18)
24: (1 sc, dec ) * 6 (12)
25: 6 dec (6)
We tighten the hole, hide the thread inside the part.
Muzzle
We knit with milky yarn:
1: 6 sbn in KA (6)
2: 6 inc (12)
3: (1 sbn, inc) * 6 (18)
4: 18 sbn Cut the
thread, leaving a long end for sewing.
Ears (2 parts)
We knit with beige yarn:
1: 6 sbn in KA, unfold knitting
2: 1 ch, 6 inc (12) Cut
thread, leaving a long end for sewing.
Cheeks (2 parts)
Knit with pink yarn:
In the amigurumi ring, we collect 2 ch, knit 10 dc, close the circle sl-st in the 2nd ch.
We cut the thread, leaving a long end for sewing.
Torso
We knit with beige yarn:
Fill tightly as we knit.
1: 6 sc in KA (6)
2: 6 inc (12)
3: (1 sc, inc) * 6 (18)
4: 1 sc, inc, (2 sc, inc) * 5, 1 sc (24)
5: (3 sc, inc) * 6 (30)
6: 2 sc, inc, (4 sc, inc) * 5, 2 sc (36)
7: (5 sc, inc) * 6 (42)
8: 3 sb, inc, (6 sb, inc) * 5, 3 sb (48)
9-16: 48 sb (8 rows)
17: 12 sb, 12 dec, 12 sb (36)
18-19: 36 sb (2 rows ) )
20: 2 sc, dec, (4 sc, dec) * 5, 2 sc (30)
21-22: 30 sc (2 rows)
23: (3 sc, dec) * 6 (24)
24-25: 24 sbn (2 rows)
Cut the thread, leaving a long end for sewing.
Handles (2 parts)
Knit with beige yarn:
Fill tightly as you knit.
1: 6 sc in KA (6)
2: 6 inc (12)
3-4: 12 sc (2 rows)
5: dec, 10 sc (11)
6: dec, 9 sc (10)
7: dec, 8 sc (9)
8-15: 9 sc (8 rows)
16: (1 sc, dec) * 3 (6) We
tighten the hole, hide the thread inside the part.
Legs (2 parts)
We start knitting with light pink yarn:
We collect 6 ch, knit on both sides of the chain, forming an oval . We start knitting from the second loop from the hook.
1: 4 sc, 3 sc in the last loop, turn, on the other side of the chain: 3 sc, inc (12)
2: inc, 3 sc, 3 inc, 3 sc, 2 inc (18)
3: 1 sc, inc, 3 sc, (1 sc, inc)*3, 3 sc, (1 sc, inc)*2 (24)
4: 2 sc, inc, 3 sc, (2 sc, inc)*3, 3 sc, (2 sbn, inc) * 2 (30)
Change the thread to beige.
5: 30 sc behind the back walls of the loops
6-7: 30 sc (2 rows)
8: 4 sc, dec, (1 sc, dec) * 5, 9 sc (24)
9: 24 sc
10: 4 sc, dec, 1 sc, 4 dec, 1 sc, dec, 6 sc (18)
11: (1 sc, dec) * 6 (12)
Fill.
12-19: 12 sc (8 rows)
20: 6 dec (6)
We do not fill the upper part of the leg. We tighten the hole, hide the thread inside the part.
Bow
We knit in rotary rows with a thread of bright pink color:
We collect 15 ch.
1: 1 ch, 15 sbn
2-5: we knit for the back walls of the loops 1 ch, 15 sbn We
fix the thread and cut it.
We wrap the bow with brown thread and sew it to the body.
Assembly and decoration
1. We sew a muzzle between 13 and 29 rows, fill it.
2. We make a tightening of the eye. To do this, we mark points 1 and 2 between 13 and 14 rows at a distance of 6 sc and points 3 and 4 between 14 and 15 rows directly below points 1 and 2, as shown in the photo. Now we insert the needle into the head, fix the thread and bring it out at point 1, then we insert it into the head at point 3 and bring it out at point 2, we tighten the thread. Again we insert the needle into the head at point 4 and withdraw it at point 1, we tighten the thread. We repeat this movement 2-3 times, we fix the thread, cut it off and hide it inside the head.
3. We make out the muzzle. To do this, we embroider the whites of the eyes with a milky thread, we embroider the eyelids with a beige thread, we embroider a nose, eyebrows and a seam with a brown thread.
4. Sew cheeks between 15 and 19 rows at a distance of 4 sc from the muzzle.
5. It remains to sew on the ears. To do this, first fold the part in half and connect with one stitch, after that we sew the ears to the head at the level of the 8th row.
6. Sew the head to the body. As we sew, we fill the neck so that the head does not dangle under its own weight.
7. Fasten the legs with buttons. To do this, we insert the needle between the 9th and 10th rows of the body, leaving a small tip, and bring it out on the opposite side at the same level. Then we insert the needle into the leg between 9 and 10 rows, fasten the button. Now we insert the needle again into the body in the same place where the thread came out from, and bring it out on the opposite side of the body at the starting point. We take the tail, which was left at the beginning, pull it up and tightly tie the knot. We do a similar manipulation with the second leg.
8. In the same way we fasten the handles. We introduce the needle into the body between 21 and 22 side by side, into the pen between 14 and 15 side by side.
9. We embroider a shovchik.
Feel free to tag me (@freeamigurumii) in your photos on Instagram or Facebook if you’d like!
All Finished.