Hello amigurumi lovers and beautiful visitors, I wanted to share the free amigurumi patterns for you here. In my article I will share 1 pattern and how to make it for you.
Material
• Hook 2,5mm
• Yarn needle
• Pins
• Scissors
• Stitch markers
• For eyes: black embroidery thread
• For nose: embroidery thread or a safety eye 5-6 mm
• Fiberfill
Yarn
• Gazzal Baby cotton (Beige 3437) for the head
• Phildar Phil cotton 3 (101) ou DMC wool chic (112) for the body
The result may depending on the gauge and the size of your hook. You can adapt the size of your hook according to your way working: if you crochet tightly, use the recommended hook or a larger one. Conversely, if you are used to crocheting rather loosely, get a smaller hook. Using the threads recommended in the tutorial allows you to obtain a result similar to the original model.
Abbreviations
MR– magic ring
Sc– single crochet
Slst– slip stitch
Dc– double crochet
Dc dec– double crochet decrease
Inc– increase
Dec– decrease
Popcorn stitch
The bobble stitch is made of several double crocheted in the same stitch and cast off together. Yarn over hook, insert into next stitch, yarn over hook and pull up a loop, yarn over hook and pull through 2 loops (two loops on hook) [yarn over hook, insert into the same stitch, yarn over hook and pull up loop, yarn over hook and pull through 2 loops] 3 times, yarn over hook and pull through all 5 loops on hook.
Head
Beige
Rnd 1. 6sc in a magic ring (6)
Rnd 2. 1sc, 1 inc x 3 (9)
Rnd 3. 2sc, 1 inc x 3 (12)
Rnd 4. 1sc, 1 inc x 6 (18)
Rnd 5. 1sc in each st from previous round (18)
Rnd 6. 1sc, (1 inc, 2sc) x 5, 1 inc, 1sc (24)
Rnd 7. 1sc in each st (24)
Rnd 8. 2sc, (2sc, 1 inc) x 6, 4sc (30)
Rnd 9. 1sc in each st (30)
Rnd 10. 2sc, (3sc, 1 inc) x 5, 2sc, 1 inc, 5sc (36)
Rnd 11. 6sc, 1 inc, 3cs, (1 inc, 4sc) x 3, 1 inc, 3sc, 1 inc, 6sc (42)
Rnd 12. 1sc in each st (42)
Rnd 13. 1 dec, 38sc, 1 dec (40) Change color
Body
Brown
Rnd 14. 7dc, (1 popcorn, 1 dc) x 13, 7dc (40)
Rnd 15. 6dc, (1 popcorn, 1 dc) x 14, 6dc (40)
Rnd 16. 7dc, (1 popcorn, 1 dc) x 13, 7dc (40)
Rnd 17. 6dc, (1 popcorn, 1 dc) x 14, 6dc (40)
Rnd 18. 7dc, (1 popcorn, 1 dc) x 13, 7dc (40)
Rnd 19. 6dc, (1 popcorn, skip 1 stitch) x 14, 6dc (26)
Rnd 20. 2 dec dc, 2dc, (1 popcorn, 1dc) x 7, 2dc, 2 dec dc (22)
– Start stuffing
Rnd 21. 2 dec dc, (1 popcorn, skip 1 stitch) x 9 (11)
– Continue stuffing
Cut the thread leaving enough length to close the opening. To do this, take your yarn needle and pass your yarn through the front loop of the remaining to stitches. Pull hard to close.
Details and embroidery
Feel free to use a few pins to help with positioning.
Face embroidery
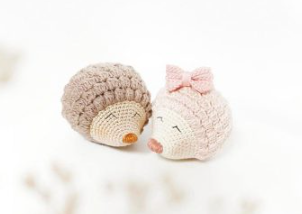
First place two pins on round 10, then one slightly above, slightly offset, then one even more offset to the side so as to from a small pointed hat.
Using thread of the color of your choice, embroider a little muzzle on the upturned part of his little nose. If you prefer, you can also insert a small safety nose (5-6mm)
Feel free to tag me (@freeamigurumii) in your photos on Instagram or Facebook if you’d like!
All Finished.