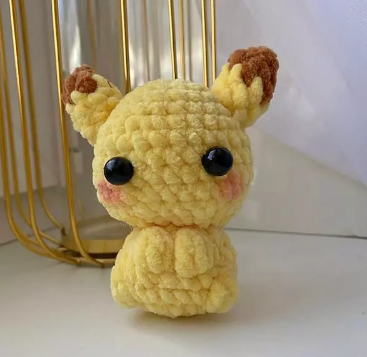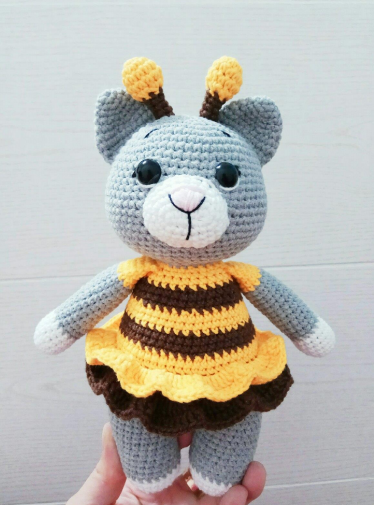
Hello amigurumi lovers and beautiful visitors, I wanted to share free amigurumi models with you here. In my article, I will share with you a model and how to make it. At the end of my article, I will share with you the detailed construction patterns of the mold.
List of materials:
Yarn “YarnArt Jeans” semi cotton 50g / 160m, colors:
– 46 gray, consumption 1 skein
– 01 white, consumption 0.5 skeins
– 70 milk chocolate, consumption 0.5 skeins
– 35 yellow, consumption 0.5 skeins
– some black and pink yarn for decoration
faces
Hook No. 2, sewing needle, scissors
Filling – holofiber
Safety eyes or semi beads with a diameter of 10
mm
Growth of the finished toy when using the indicated
materials – about 23 cm.
Legend:
KA – amigurumi ring
sc – single crochet
VP – air loop
gain – increase
dec – decrease
ss – connecting post
(…) – the number in brackets means the number of loops in
a number of
(…)*x – repeat X times specified in brackets
dc – double crochet
You can use a completely different yarn,
the size and quality of the product will depend on this.
The toy is knitted in a spiral on both sides of the loop,
unless otherwise stated.
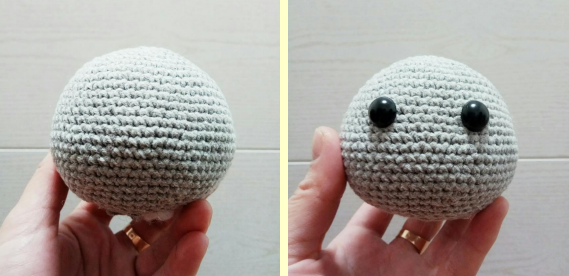
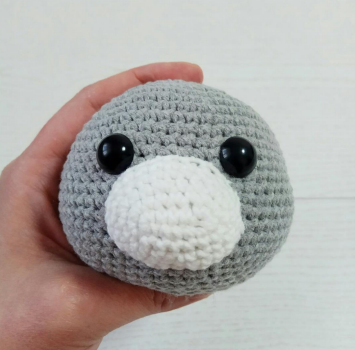
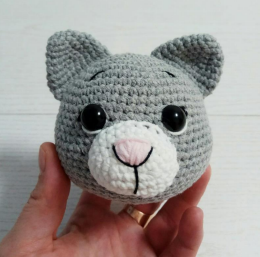
Head:
We knit with gray yarn.
1st row: 6 in KA
2nd row: 6prib (12)
3rd row: (1sc, inc)*6 (18)
4th row: (2sc, inc)*6 (24)
5th row: (3sc, inc)*6 (30)
6th row: (4sc, inc)*6 (36)
Row 7: (5sc, inc)*6 (42)
8th row: (6sc, inc)*6 (48)
Row 9: (7sc, inc)*6 (54)
10 – 15 row: 54sc (6 rows)
If you use safety eyes, secure them
between 13 – 14 rows. Approximate distance
There are 8 columns between the eyes.
Row 16: (8sc, inc)*6 (60)
17 – 21 row: 60sc (5 rows) Row 22: (8sc, dec)*6 (54) 23rd row: (7sc, dec)*6 (48) 24 row: (6sc, dec)*6 (42) Row 25: (5sc, dec)*6 (36) Row 26: (4sc, dec)*6 (30) Row 27: (3sc, dec)*6 (24) Fill tightly. Cut the thread and hide the end inside the part.
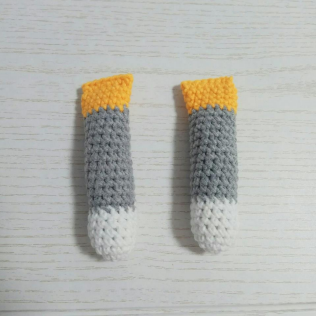
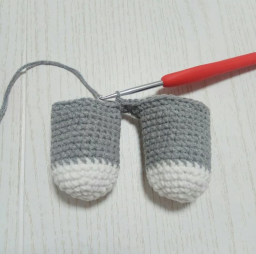
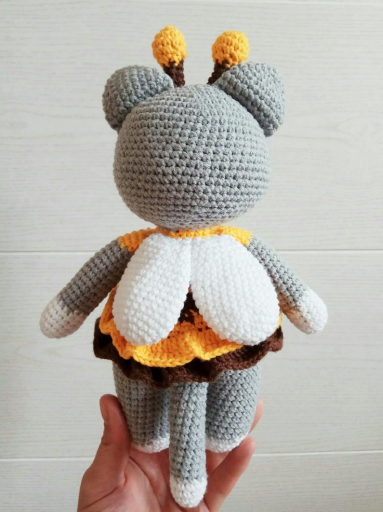
Upper legs:
We start knitting with white yarn.
1st row: 6sc in KA
2nd row: 6prib (12)
3rd row: (5sc, inc)*2 (14)
4 – 7 row: 14sc (4 rows)
Change to gray yarn.
8 – 19 row: 14sc (12 rows)
Change to yellow yarn.
20 – 23 row: 14sc (4 rows)
We stuff the foot during knitting: stuff the bottom very
tight, middle medium, top (approx.
1-2 cm) may not be stuffed. Fold it in half and
knit 7 sc for both loops.
Cut the thread, hide the end of the thread. Second paw
knits similarly.
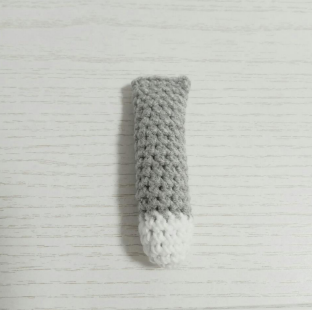
Ponytail:
We start knitting with white yarn.
1st row: 6sc in KA
2nd row: 6prib (12)
3 – 5 row: 12sbn (3 rows)
Change to gray yarn.
6 – 19 row: 12sbn (14 rows)
We stuff the tail during knitting: stuff the bottom
very tight, middle middle, top
(about 1-2 cm) you don’t have to stuff it. We fold
cut it in half and knit 6 sc for both loops.
Cut the thread, hide the end of the thread.
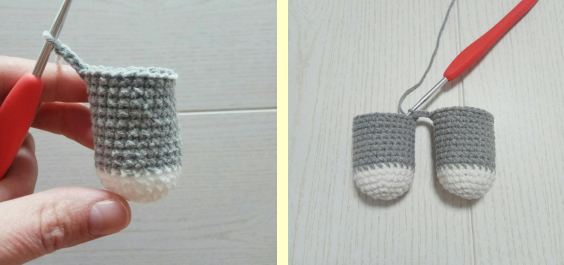
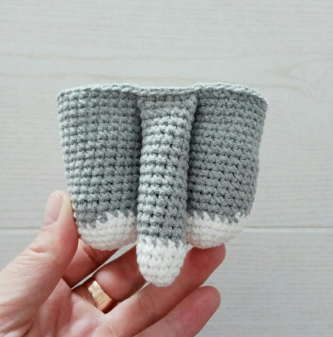
Legs + body:
We start knitting with white yarn.
1st row: 6 in KA
2nd row: 6prib (12)
3rd row: (1sc, inc)*6 (18)
4th row: (2sc, inc)*6 (24)
5 – 6 row: 24sbn (2 rows)
Change to gray yarn.
7 – 15 row: 24sbn (9 rows)
Knit another 7 sc, ss. Fasten the thread and cut it.
We knit the second leg similarly to the first, but after 15
knit another 18 sc in a row. Perhaps you
you will need a different number of loops after the 15th row,then you need to adjust it yourself.
Do not cut the thread, but continue to knit the body.
Row 16: from the second leg, cast on a chain of 3 ch and attach to the first leg using a ss. Next, knit 24 sc along the first piece, 3 sc across chain of air loops, 24sc on the second details, 3sc on the reverse side of the chain of air loops (54sc)
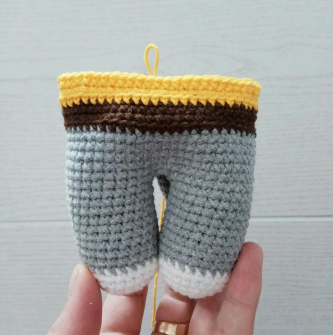
At this stage it is necessary to move the marker to of this, knit another 25sbn (or other necessary quantity) so that it is exactly in the middle backrests Now here will be the beginning of the row. Change the yarn color to milk chocolate. Row 22: 54sc 23rd row: 54 sc behind the back wall of the loop 24 row: 54sc
A marker must be placed at this location
(the marker is on the front).
17 – 20 row: 54sc (4 rows)
In the next row you need to knit a tail.
Make sure it is level
in the middle.
21 row: 23sbn, 6sbn (tie in a tail), 25sbn (54)
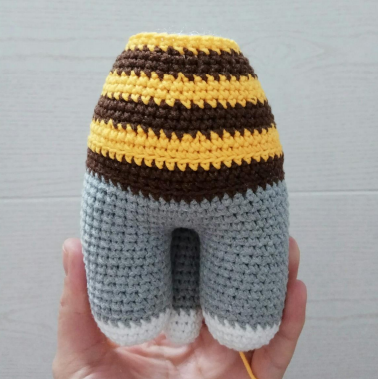
Change to yellow yarn. Row 25: 54sc Row 26: 54 sc behind the back wall of the loop Row 27: 54sc
Change the yarn color to milk chocolate. 28 row: (7sc, dec)*6 (48) 29 – 30 row: 48sc (2 rows) Change to yellow yarn. 31st row: (6sc, dec)*6 (42) 32 – 33 row: 42sbn (2 rows)
Change the yarn color to milk chocolate.
Row 34: (5sc, dec)*6 (36)
35 – 36 row: 36sc (2 rows)
Change to yellow yarn.
Row 37: (4sc, dec)*6 (30)
Row 38: 30sc
In the next row you need to knit handles.
Make sure they are positioned
symmetrically on the sides of the body.
Row 39: 3sbn, 7sbn (knit a handle), 8sbn, 7sbn
(knit a handle), 5sc (30)
Row 40: (3sc, dec)*6 (24) Change to gray yarn. 41 row: 24sbn Stuff the body tightly. Leave the thread for sewing.
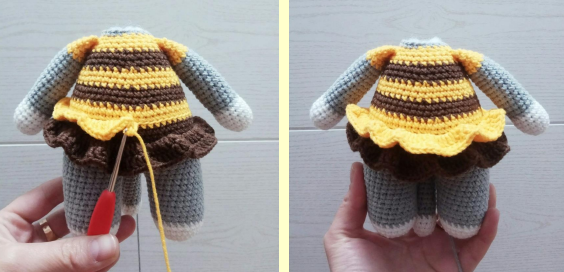
First skirt:
We return to the 23rd row, where we knitted
back wall of the loop and attach a thread of color
milk chocolate. We knit dc behind the front
wall in a circle.
1st row: 2ch rise, 2dc in each loop to
end of row, ss (108)
2nd row: 2ch lift, 108 dc, ss
We finish knitting. We hide the thread.
2nd row: 2ch lift, 108 dc, ss
We finish knitting. We hide the thread.
Second skirt:
We return to the 26th row, where we knitted
the back wall of the loop and attach the thread
yellow color. We knit dc behind the front wall along
circle.
1st row: 2ch rise, 2dc in each loop to
end of row, ss (108)
2nd row: 2ch lift, 108 dc, ss
We finish knitting. We hide the thread.
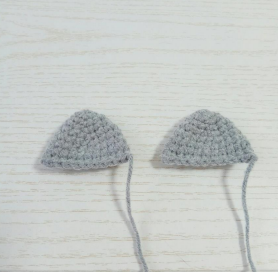
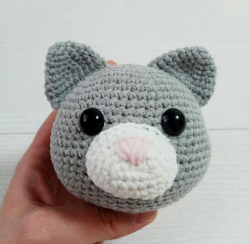
Ears:
We knit with gray yarn.
1st row: 6 in KA
2nd row: (1sc, inc)*3 (9)
3rd row: (2sc, inc)*3 (12)
4th row: (3sc, inc)*3 (15)
5th row: (4sc, inc)*3 (18)
6th row: (5sc, inc)*3 (21)
7 – 8 row: 21sbn (2 rows)
We don’t stuff our ears. Fold in half and
We knit 10sc for both loops. Leave a long one
thread for sewing.
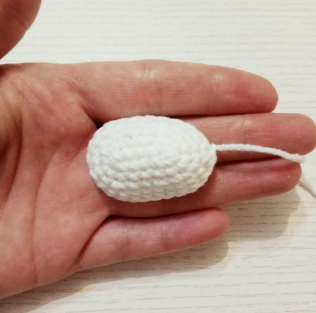
Muzzle:
We knit with white yarn.
Row 1: cast on a chain of 6 ch. Let’s get started
knit from the second loop from the hook: inc, 3sc,
4sc in the last loop of the chain, on the other
side of the chain: 3sc, inc (14)
2nd row: inc, 5 sc, 2 inc, 5 sc, inc (18)
3rd row: (2sc, inc)*6 (24)
4 – 5 row: 24sbn (2 rows)
Cut the thread, leaving a long end for
sewing.
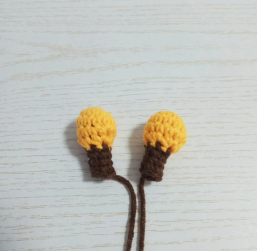
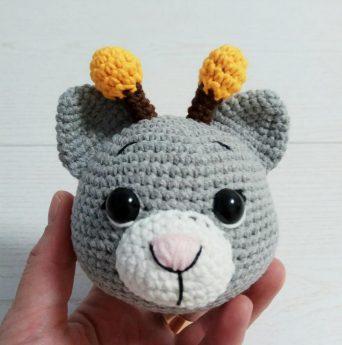
Horns:
We start knitting with yellow yarn.
1st row: 6 in KA
2nd row: 6prib (12)
3 – 4 row: 12sbn
5th row: 6ub (6)
Change the yarn color to milk chocolate.
6 – 9 row: 6sbn (4 rows)
Leave the thread for sewing. Horns slightly
stuffing.
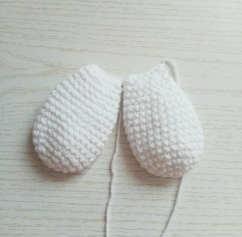
Wings (2 parts):
We knit with white yarn.
1st row: 6 in KA
2nd row: 6prib (12)
3rd row: (1sc, inc)*6 (18)
4th row: (2sc, inc)*6 (24)
5 – 13 row: 24sbn (9 rows)
Row 14: (2sc, dec)*6 (18)
15 – 16 row: 18sc (2 rows)
Row 17: (1sc, dec)*6 (12)
We do not stuff the wings. Fold in half and
We knit 10sc for both loops. Leave a long one
sewing thread.
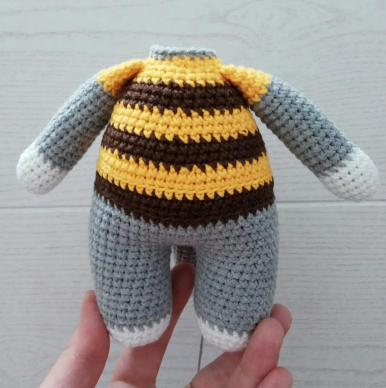
Assembly and design:
First, let’s design the cat’s head.
We will sew the muzzle to the head. Sew in the center
lower part of the head, under the eyes, approximately between
13 – 14 (upper limit) and 22 – 23 (lower limit)
in rows. During sewing, when will it remain
small hole, fill the muzzle
with holofiber and sew it up until the end.
Then we sew on the ears, securing them first
with pins. The ears should be positioned
symmetrically. Sew on the ears approximately between 4 –
10 rows of heads.
We embroider the nose with pink thread. Using black thread we embroider the outline of the nose, eyelashes and eyebrows. Using white yarn we embroider the whites of the eyes in order to the eyes looked more “alive”. Then we sew on the horns, securing them pre-pins. Horns must positioned symmetrically. Sew them on approximately between the 3rd and 4th rows of the head. Sew the head and body, fastening them first in a circle with pins. When there is a small hole left, fill it space between neck and head holofiber. You need to fill it tightly so that the head did not bend. Sew until the end, and the end of the thread Let’s hide the details inside. Sew the wings to the back, approx. between rows 38 and 39.
Feel free to tag me (@freeamigurumii) in your photos on Instagram or Facebook if you’d like!
All Finished.